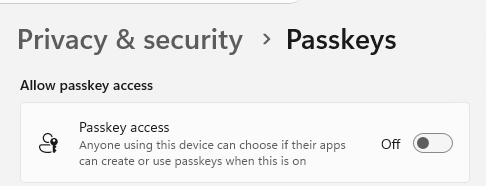
I recently read an article from Dr. Emin Huseynov about the toggle in Windows settings that disables passkeys for every user.
Admin experienceUser experience
While there can be specific circumstances where an organization may intentionally disable passkey usage, I – passkey fan – want to make sure it is enabled.
I did not find any official solution to restrict disabling passkeys, so I share my approach.
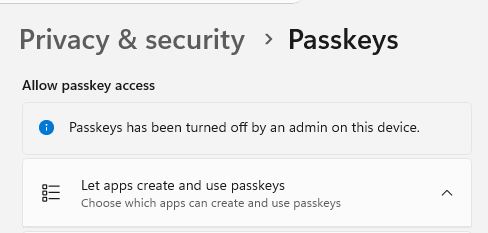
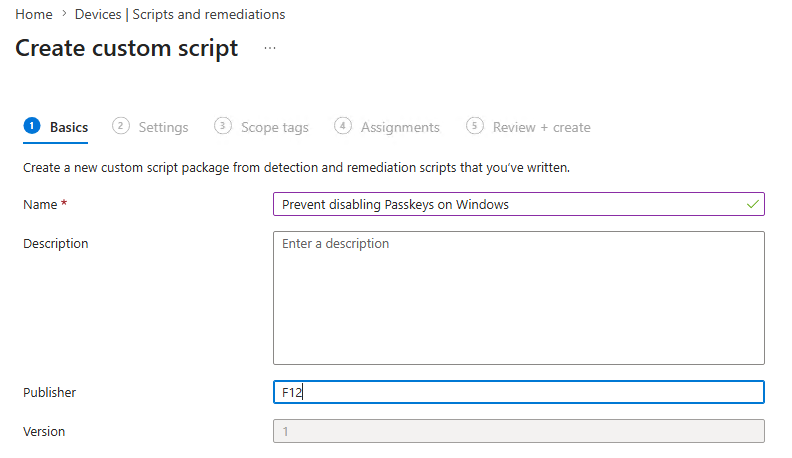
We know how to detect the drift and how to remediate, it’s up to our favorite device management solution to handle it (I’m sharing my first Intune remediation script – but don’t worry SCCM, you will always be my favorite)
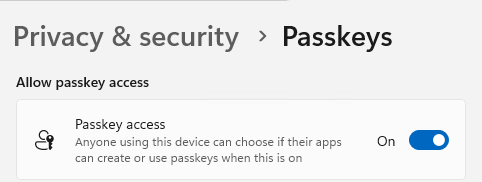
Note: It is not enough to set the registry value to “Allow”. The command above invokes “svchost.exe -k osprivacy -p -s camsvc” which applies the relevant settings.
I guess I summarized everything so let’s cut to the Intune remediation.
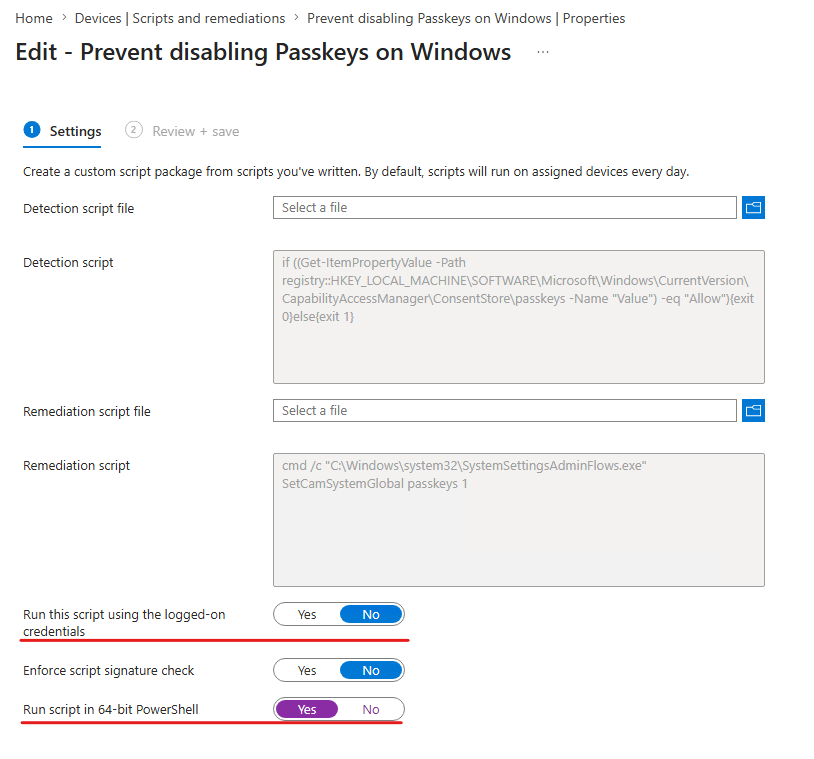
Detection script:
if ((Get-ItemPropertyValue -Path registry::HKEY_LOCAL_MACHINE\SOFTWARE\Microsoft\Windows\CurrentVersion\CapabilityAccessManager\ConsentStore\passkeys -Name "Value") -eq "Allow"){exit 0}else{exit 1}
Upload the detection and remediation scripts. As per my experience, this requires admin privileges so make sure “Run this script using the logged-on credentials” is set to “No” and “Run script in 64-bit PowerShell” is set to “Yes” (registry detection would fail because of the 32bit redirection)
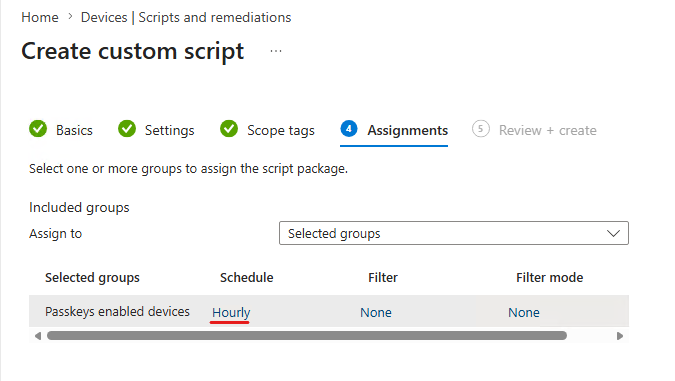
I guess this can be deployed to All devices, but for testing purposes I deployed it to a dedicated group with Hourly schedule:
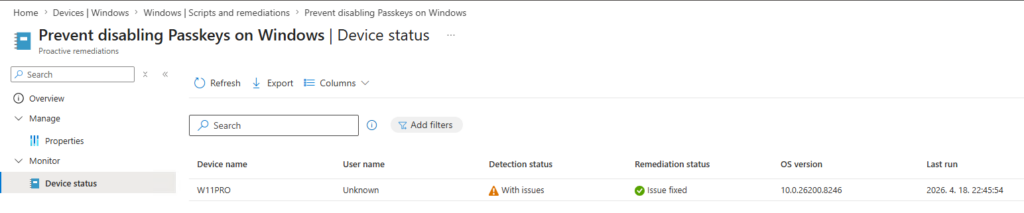
After “enforcing” the remediation, the issue is now fixed:
In Entra News #134 I came across Michael Frank’s wonderful Self-Service LAPS automation solution – which gave me inspiration to finally write about my more simplistic approach to delegate access to the LAPS password.
TL;DR
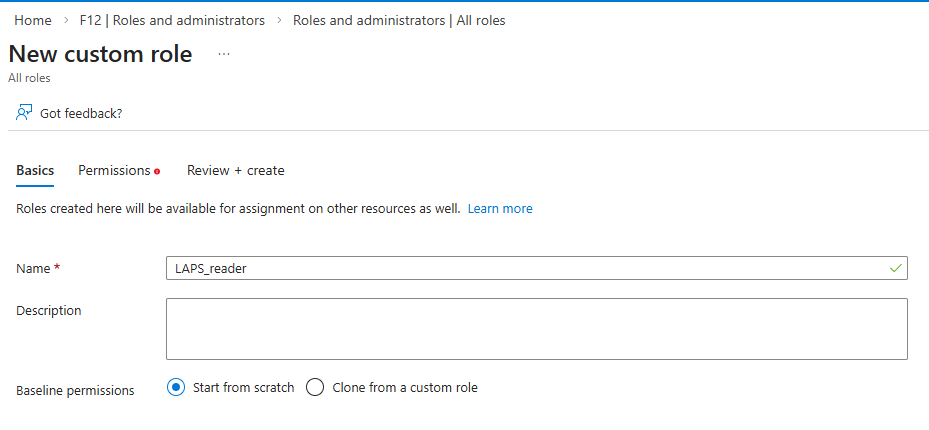
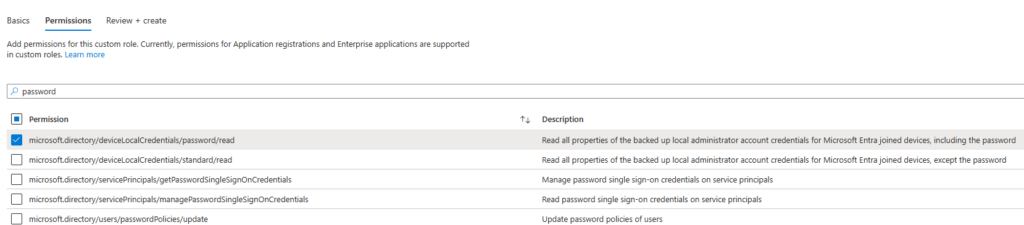
Create a “LAPS Reader” role in Entra with the following permission: microsoft.directory/deviceLocalCredentials/password/read
Delegate this role to a user and scope it to the device to which you want to grant the LAPS password to be retrieved
With Entra P2 this can be achieved via GUI (and PIM and all the P2 goodness)
With Entra P1 you will need Graph Powershell/Graph API request:
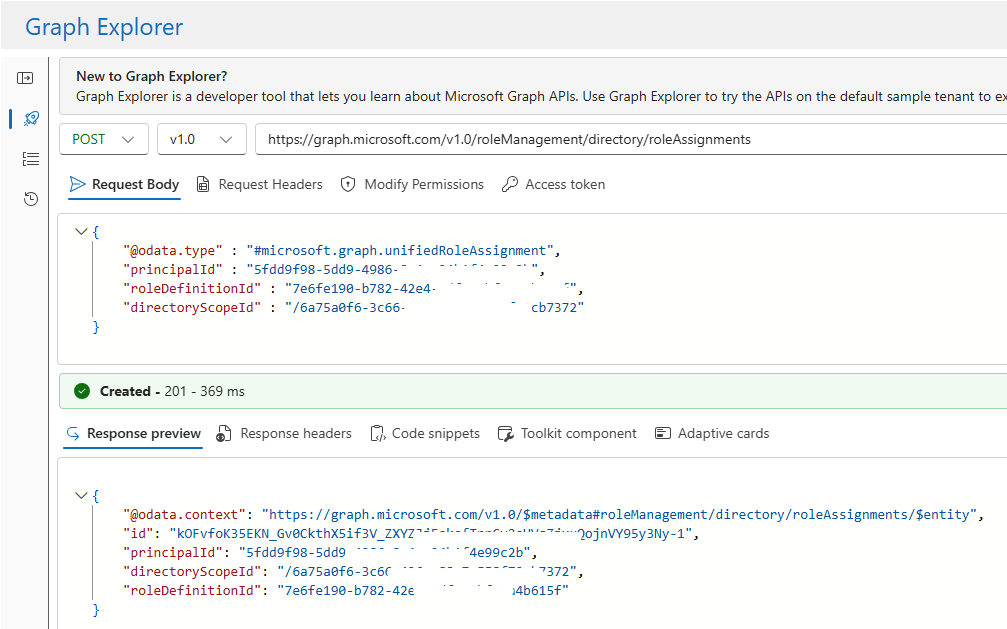
POST to https://graph.microsoft.com/v1.0/roleManagement/directory/roleAssignments with the following payload: { "@odata.type" : "#microsoft.graph.unifiedRoleAssignment", "principalId" : "<user objectId>", "roleDefinitionId" : "<LAPS_reader role's ID>", "directoryScopeId" : "/<device objectId>" }
Creating the role
Nothing special here, create a custom role with the following permission only: microsoft.directory/deviceLocalCredentials/password/read
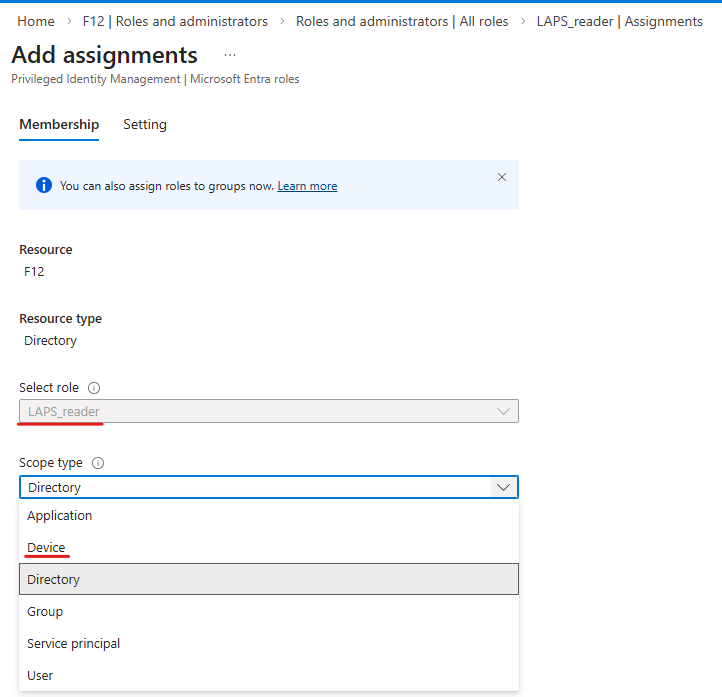
Next, if you have Entra P2, when you assign a role to a user, you can select “Device” as a scope type:
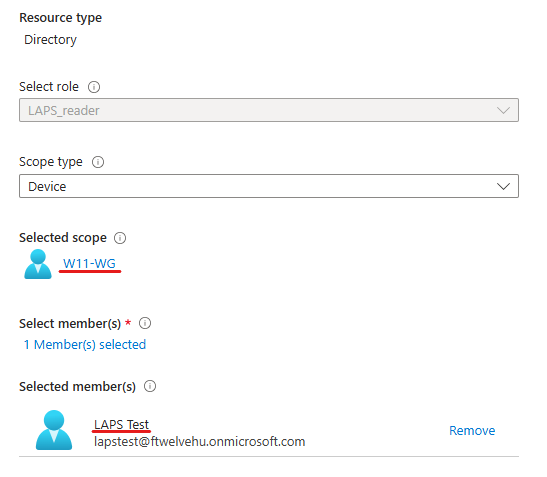
Now you have the option to select the device of which you want to grant the LAPS password to be revealed, then the user who will be given access:
I will not cover the options given by Entra P2 PIM functionality, but you can consider requiring additional MFA, notification email, approval flow, etc.*
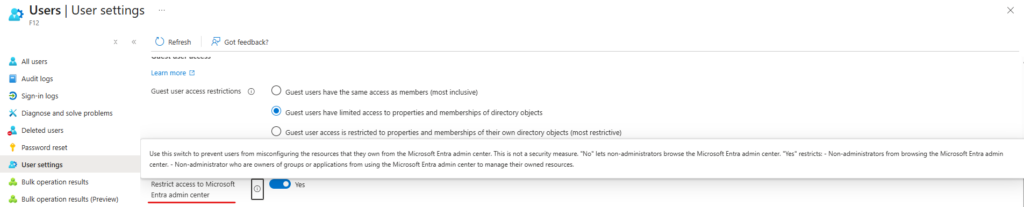
*By giving a Role assingment to a user, it will be considered as an “administrator” – so these users will be able to access the portal even if “Restrict access to Microsoft Entra admin center” option is set to yes:
*If the role is assigned as ‘Eligible’, I thought that this restriction will effectively block the user from activating the Role, but in reality, PIM will still be reachable via the Azure portal – but the recommendation is to activate the role via MyAccess.
Now the problem is, that with Entra P1, Microsoft does not offer this granular scoping – at least on a GUI level. But what about some Graph API? Apparently, this can work. I still have issues with Graph Powershell, but according to the documentation, the New-MgRoleManagementDirectoryRoleAssignment command should do the trick. But what the trick is? You will need 3 parameters: directoryScopeId, principalId and roleDefinitionId.
directoryScopeId is the objectID of the device
principalID should be the user’s objectID
roleDefinitionId can be queried or you can simply copy it from the URL when you open the role’s page:
So we will issue a POST request to https://graph.microsoft.com/v1.0/roleManagement/directory/roleAssignments with the following payload:
Make sure you have inserted the “/” before the device ID in directoryScopeId.
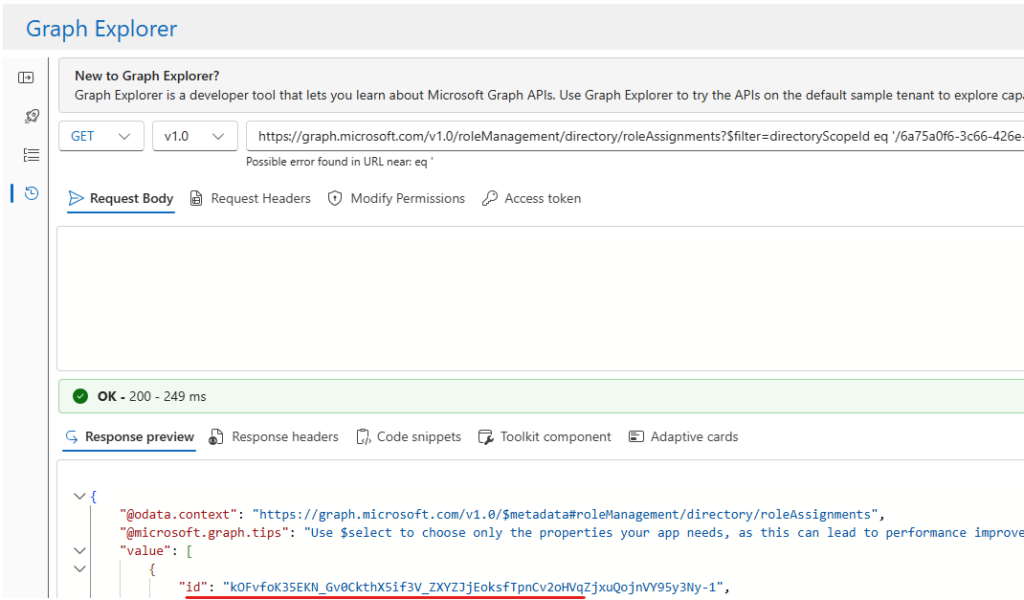
Unfortunately, while you can verify the results on the portal, you will not be able to delete assignments of this kind. However, you can delete it via Graph API: the only thing required is the id of the assignment (this is returned in the response [see above in my example it’s id: k0Fv….])
To delete the assignment issue a DELETE request to the “https://graph.microsoft.com/v1.0/roleManagement/directory/roleAssignments/<assignmentID>” endpoint:
If you don’t know this ID, you will need to query the roleAssingments (the most effective way probably is to filter by directoryScopeId [aka deviceID]):
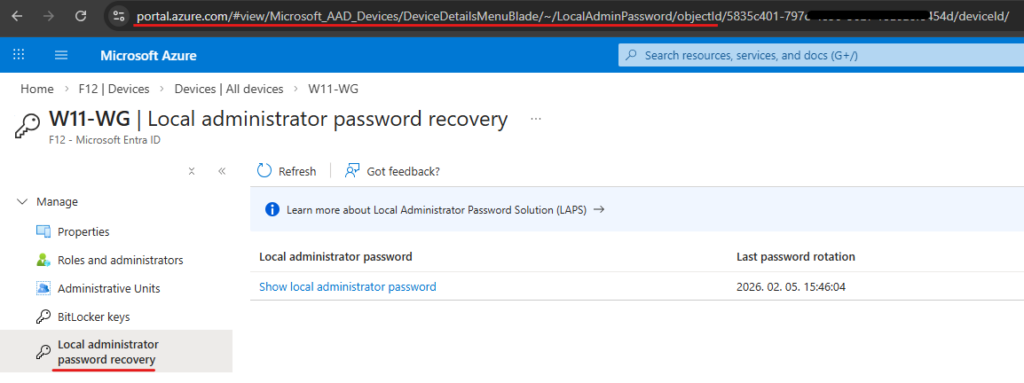
For advanced users (or IT support who will have this role for several computers) you can show the admin portal and how to access the devices. If there is only a 1-to-1 relation, you can directly send the link to the user.
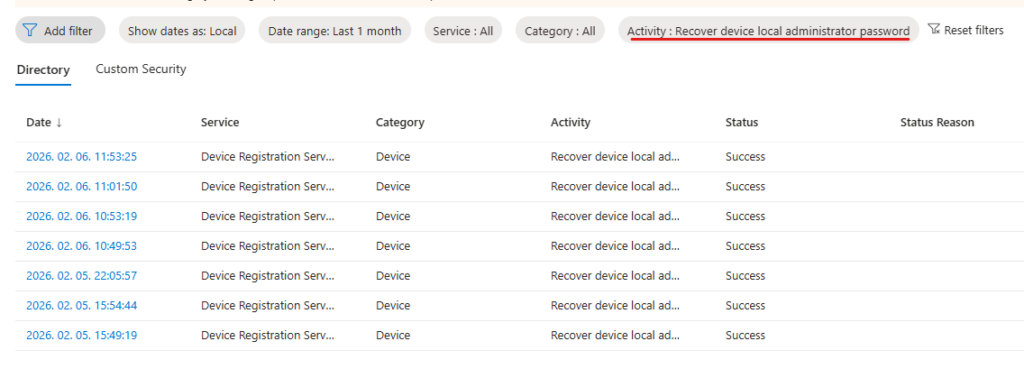
If you want to see the audit events, look for “Recover device local administrator password” activity type in Entra Audit logs:
That’s it. Not a sophisticated solution and it clearly has some security implications, but it is probably still better than assigning localadmin rights permanently to a user 🙃
Recently I tried to set up ClaimXRay NG with the guidance of DSInternals, learned things, failed here and there and stumbled upon a totally-not-helpful error message: “There was an error in the uploading the private certificate and password. Please try again or contact support.”
To cut to the chase: This message appeared when I was trying to upload a SAML signing certificate to one of my Enterprise Applications in Entra – which was caused by the App instance property lock enabled on the corresponding application registration object.
TL;DR
App instance property lock is enabled by default for OIDC applications (“App you’re developing”), but not for SAML applications (Non-gallery)
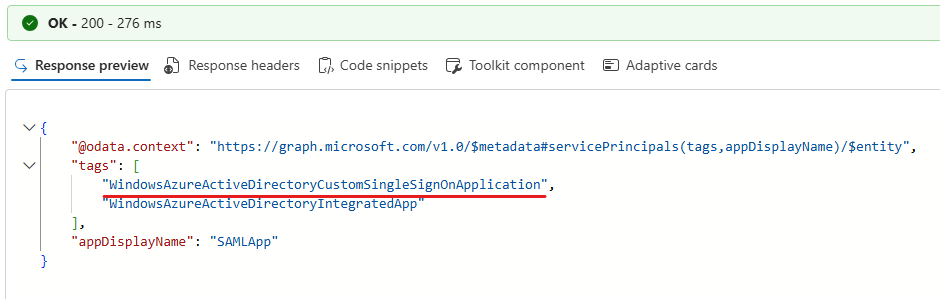
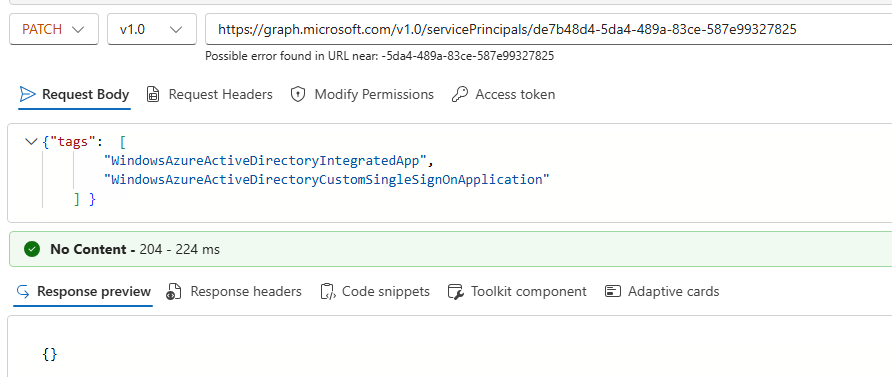
When you add the tag “WindowsAzureActiveDirectoryCustomSingleSignOnApplication” to the service principal, the Enterprise application will display the SAML/custom SSO settings
If you happen to have “converted” your application to SAML this way, the app instance property lock will prevent adding SAML signing certificates to your app
The journey
As mentioned, I encountered this issue when attempting to set up ClaimsXRay NG – but instead of doing it via PowerShell, I wanted to understand each step and do it via GUI if possible. And this is why – I guess – the guide does not mention app instance property lock: because it is turned on by default (only) for applications created in the Entra Admin Center (docs)
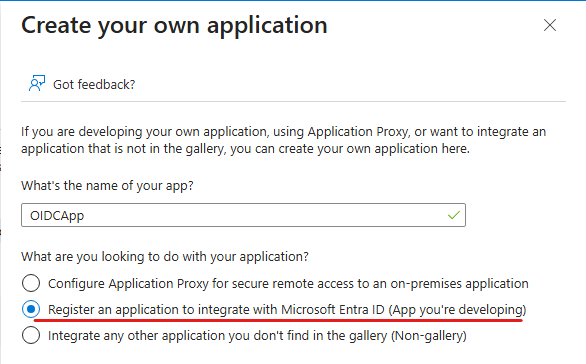
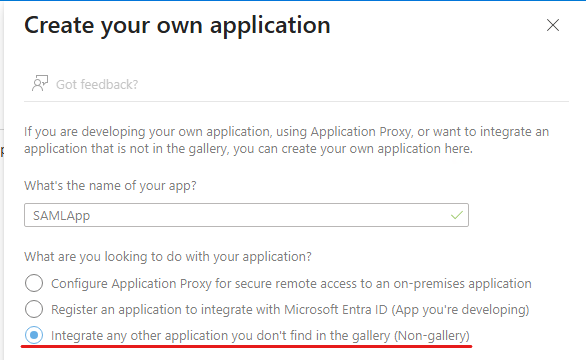
To reproduce and understand the issue, let’s see what happens when a SAML/customSSO and an OIDC application is registered in the portal (sorry, still using Azure portal not the Entra admin center) under the Enterprise applications menu.
Creating the applications “OIDCApp” and “SAMLApp”, nothing else specified:
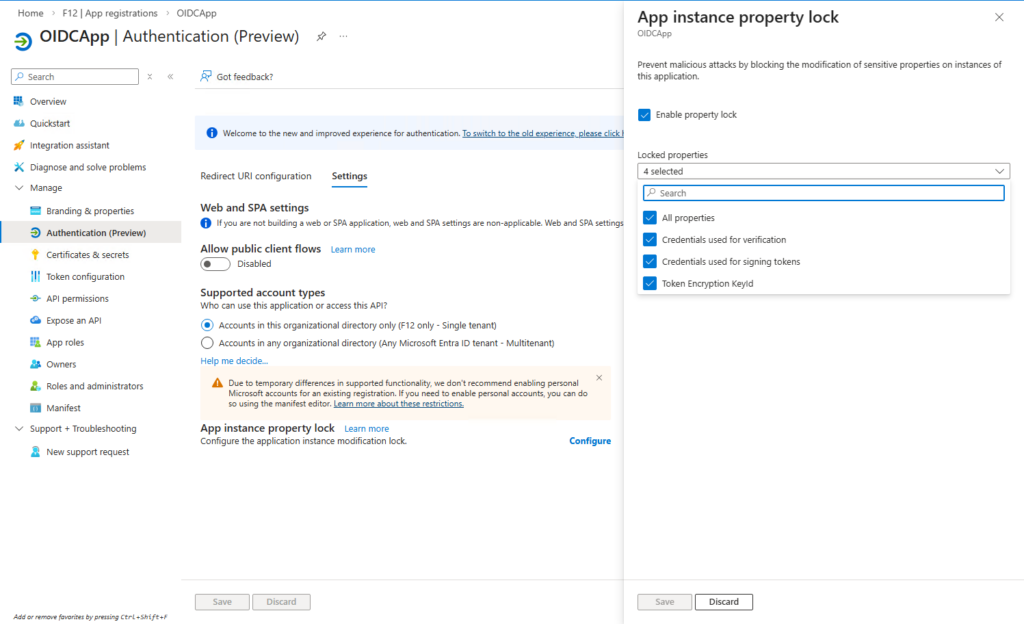
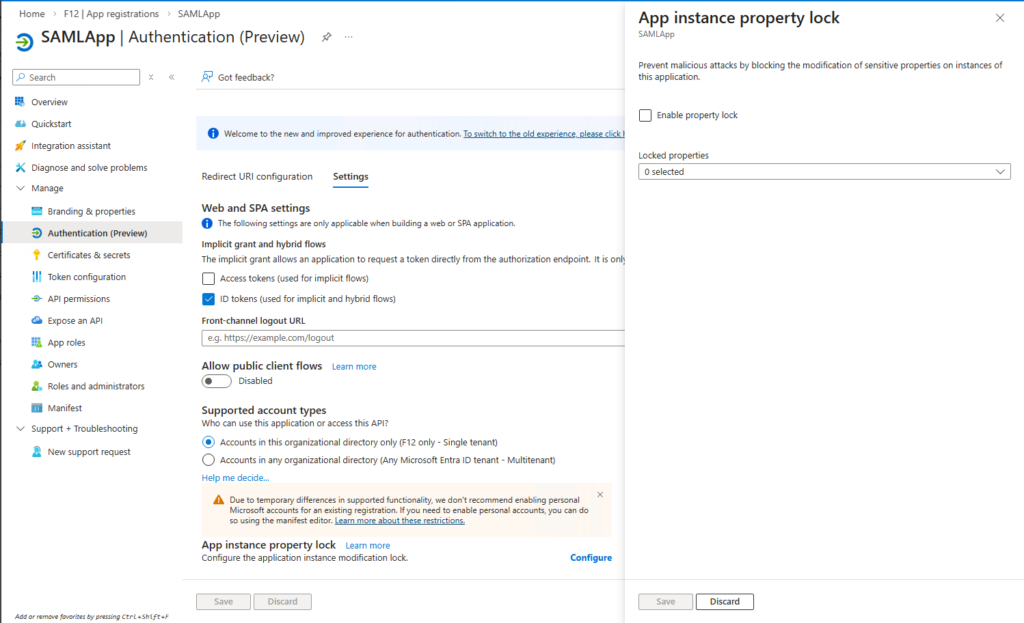
On the App registrations pane, looking at the corresponding application object’s properties (Manage – Authentication (Preview) – Settings – App instance property lock) we can see that App instance property lock is enabled for all properties on the OIDCApp, but not for SAMLApp:
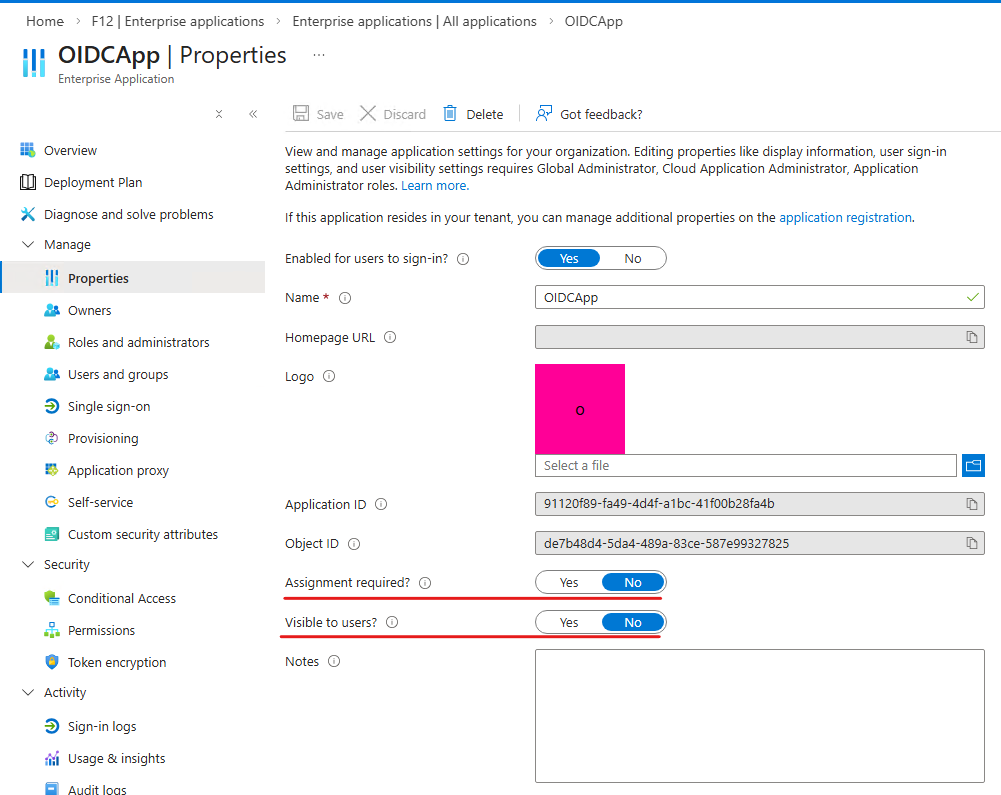
It was also a suprise for me that the Assignment settings are different for the two applications (on the Enterprise Application pane) – OIDCApp does not require assignment but is hidden, while SAMLApp requires assignment but isn’t hidden:
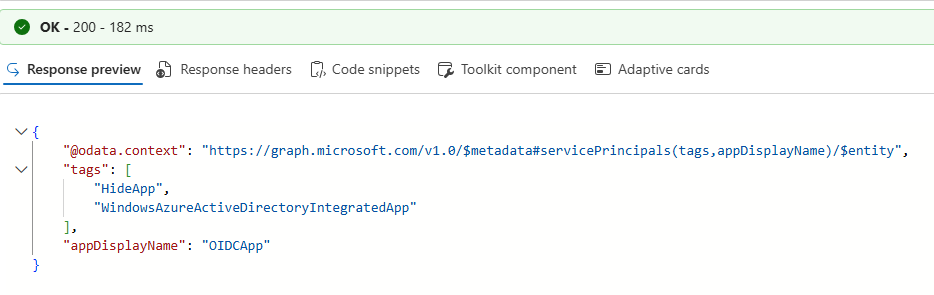
There is no GUI option to inspect the tags assigned to a service principal, so it needs to be done via Graph API:
GET https://graph.microsoft.com/v1.0/servicePrincipals/<objectID of service principal>?$select=tags,appDisplayName
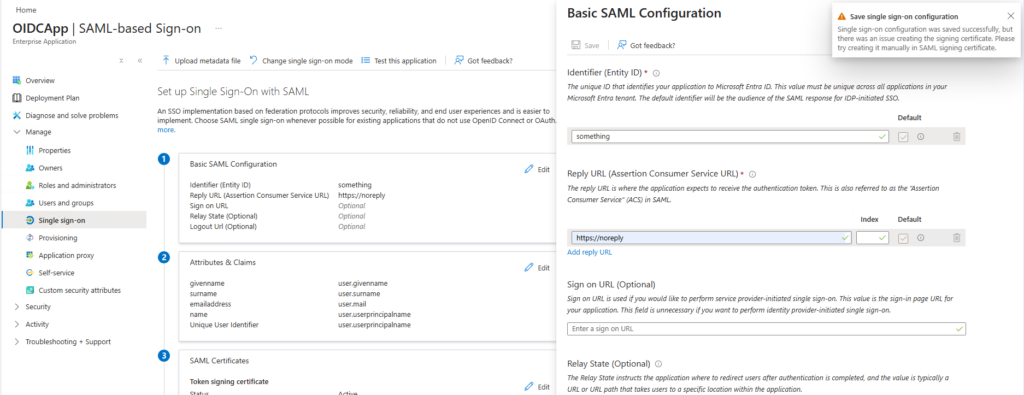
Heading back to the portal, OIDCApp now offers the option to set up SAML SSO:
Keep in mind that the corresponding application object has App instance property lock enabled. Let’s configure the Basic SAML Configuration:
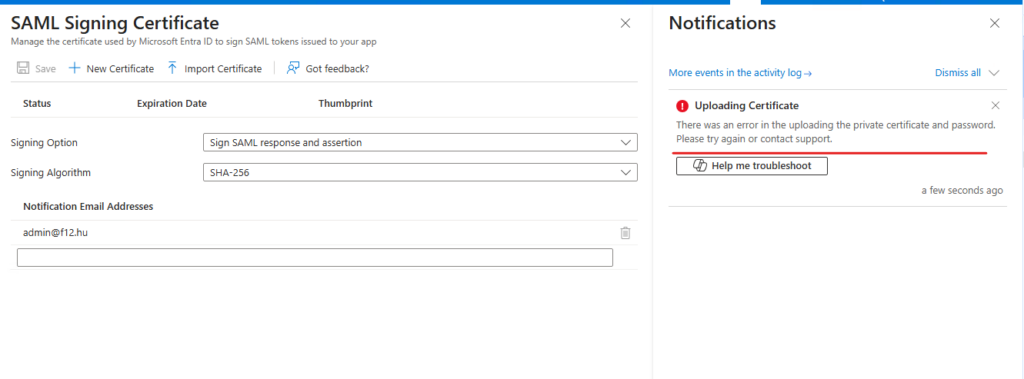
After adding the Entity ID and the Reply URL, hitting save resulted in a warning message saying: “Single sig-on configuration was saved successfully, but there was an issue creating the signing certificate. Please try creating it manually in SAML signing certificate.“
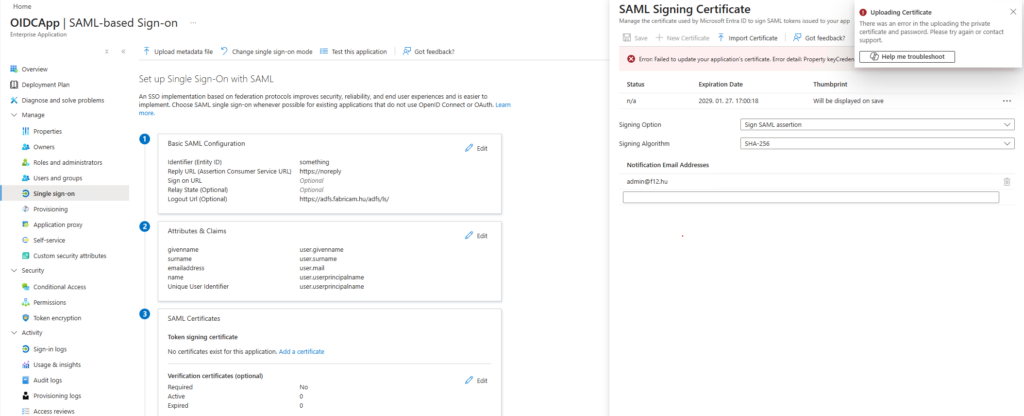
At this point I had no clue what caused this, but since it was only a warning message, I ignored it and tried to add a certificate myself, which resulted in another error message: “There was an error in the uploading the private certificate and password. Please try again or contact support“
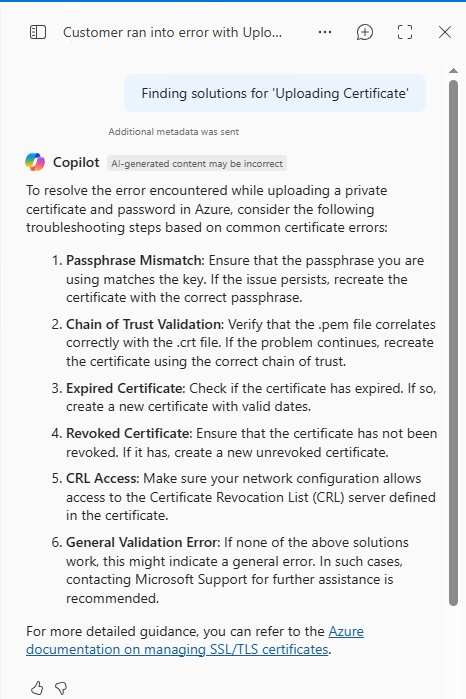
Let’s try this Copilot “Help me troubleshoot” button 🙂
Nothing was useful in this troubleshooting guide, so I tried the “Help myself troubleshoot” button (F12) and analyze the network traffic. This led me to this error message: “Property keyCredentials is invalid“
I don’t know why, but this error immediately ringed the bell about App instance property lock – so after disabling it, I could successfully upload/create a signing certificate.
I’m sure that this is a really uncommon situation and probably nobody will encounter this – but I learned a lot from it and hope someone else can also benefit from my journey as well. 🙃
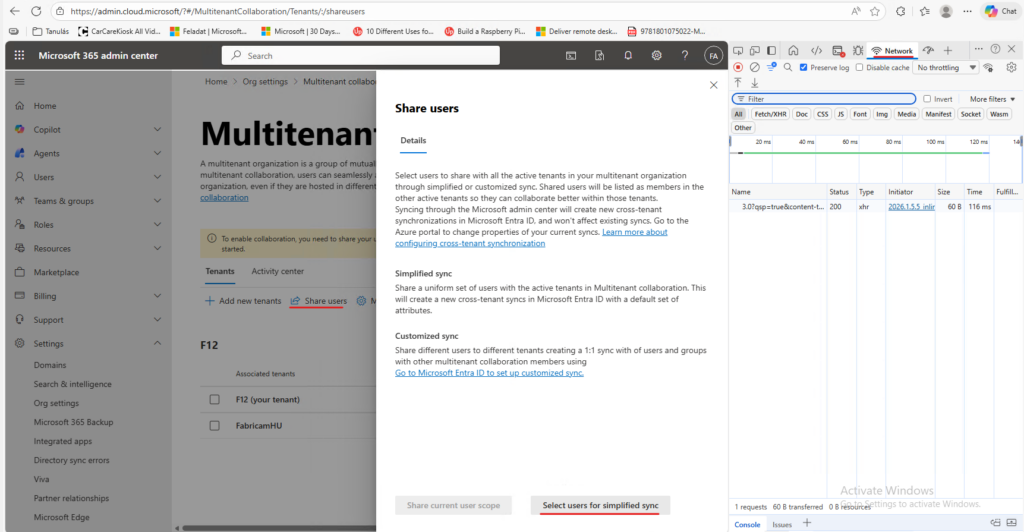
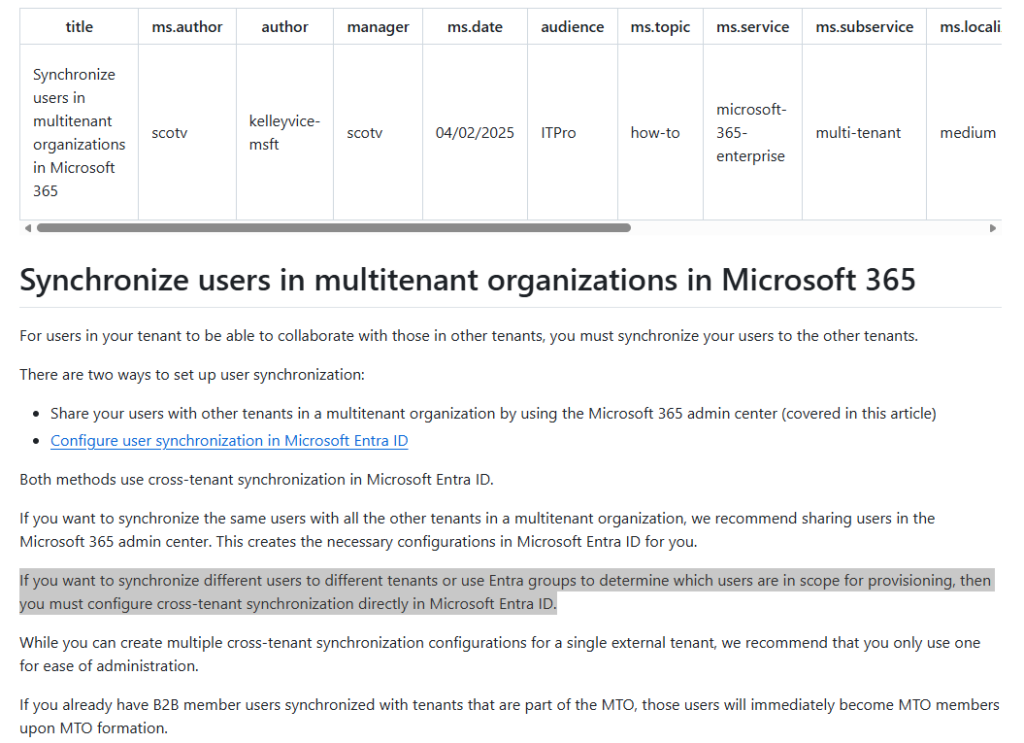
Back in the days when M365 MTO was in preview, it was possible to add group(s) to the default sync scope – today, the documentation states that if you want to sync groups, “you must configure cross-tenant synchronization directly in Microsoft Entra ID”. It doesn’t say “it is impossible to add groups to the default sync scope” – but clearly implies that this is not supported. Anyways, I’m sharing this cheat, but keep in mind that this is not a supported scenario.
TL;DR – In the M365 Admin center when you click on “Share users” on the Multitenant collaboration page, an HTTP POST is sent to https://admin.cloud.microsoft/admin/api/tenantRelationships/userSyncApps/assign which contains the userID(s) of the users to be synchronized – This request can be modified to contain the ID of the group that you want to sync (the JSON node itself is named “userAndGroupIds“, so I guess only the GUI has been restricted to lookup users only 🙃) – The cheat is to replay a modification payload (developer tools -> <request> -> Copy -> Copy as Powershell) replacing the required userIDs with the desired groupIDs
The cheat in short
As a first step, you need to add a user to the sharing scope (with developer tools open on the network tab):
Add a user and hit save:
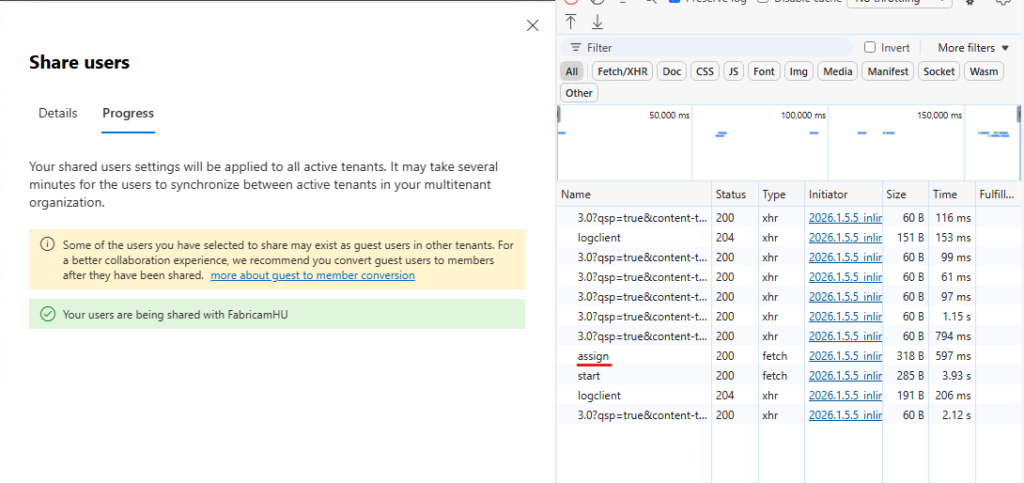
After confirmation, locate the request to the assign endpoint:
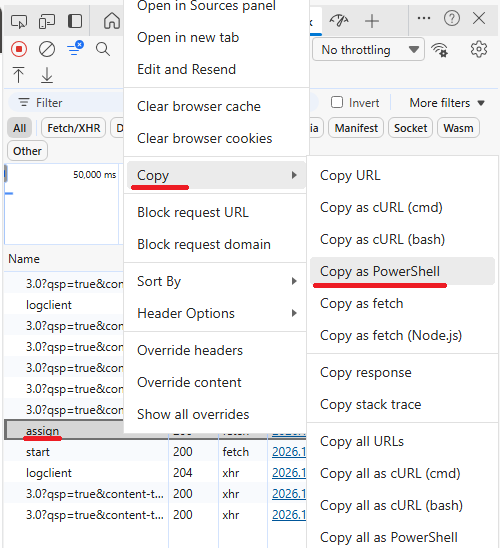
Right click – Copy – Copy as PowerShell:
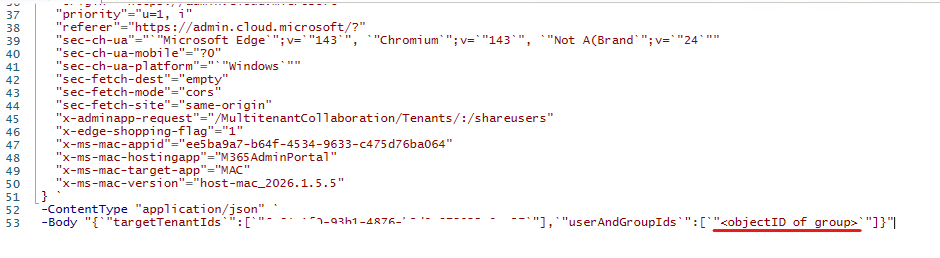
Paste the content into your favorite code editor (like PowerShell ISE), locate the -Body parameter of the request and modify the userAndGroupIds node in the payload (replace the userID with the objectID of the group to be synced) and run the script:
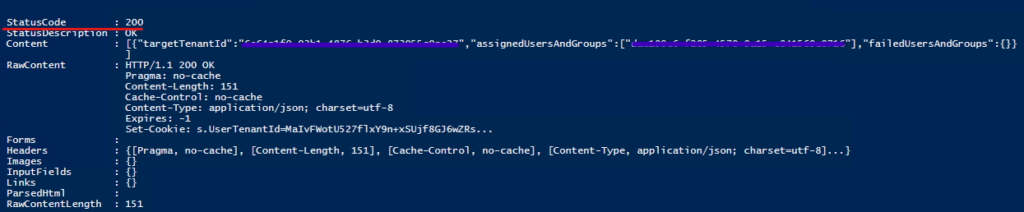
If everything went well, you should receive an HTTP status code 200 (OK):
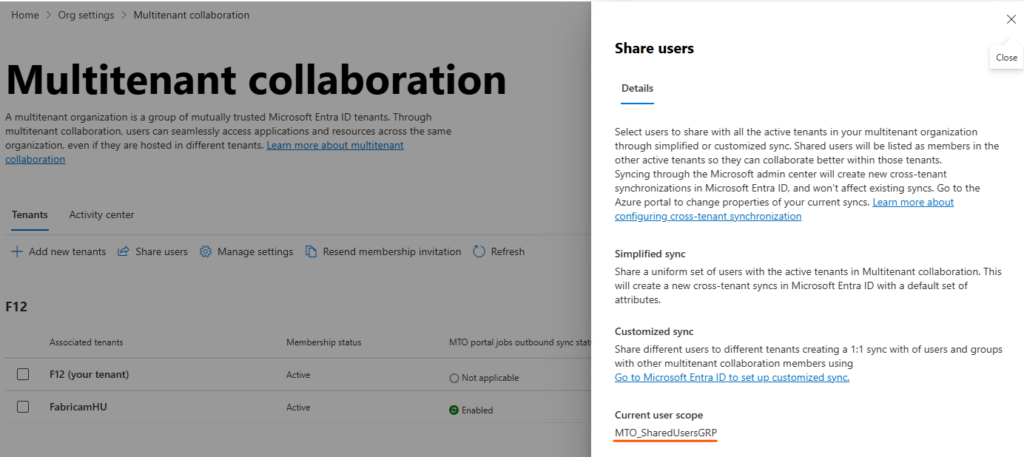
If you go back to the portal, you can verify the result:
Some storyand remarks
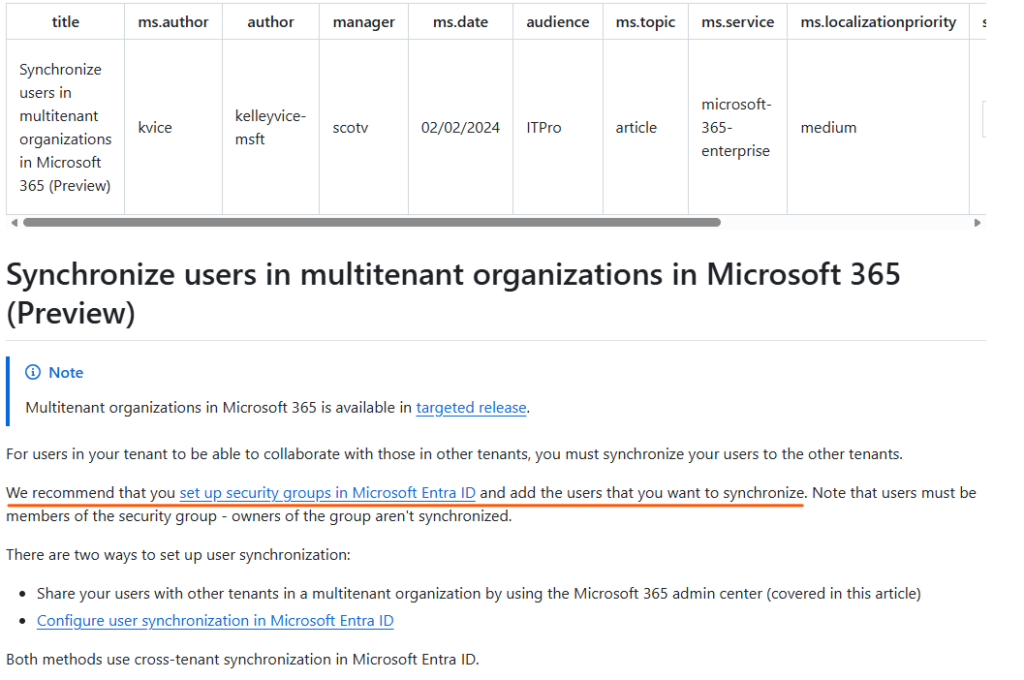
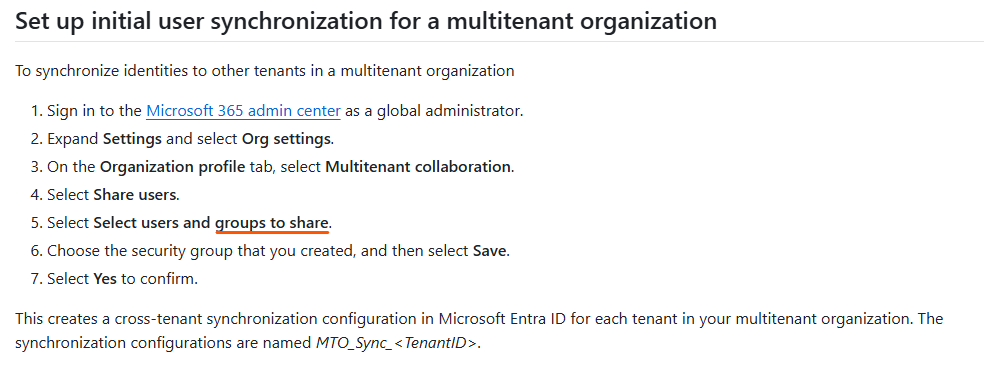
When multitenant organizations in Microsoft 365 was in preview, the documentation recommended to set up security groups in Entra ID and add users to be synchronized:
Now it states that: If you want to synchronize different users to different tenants or use Entra groups to determine which users are in scope for provisioning, then you must configure cross-tenant synchronization directly in Microsoft Entra ID.
I guess this feature was removed (or at least hidden) to prevent accidental oversharing (make sure you really want to sync this group to a freshly added tenant).
Also, keep in mind that only members of the group are synced, owners are not.
Also keep in mind that this “cheat” uses the authentication cookies from the browser session – some limits may apply (Conditional Access) and the cookies are only valid for the authenticated session (the code is not reusable, try to reproduce the steps within an hour).
Having a personal Microsoft account registered with a corporate email address can cause confusion for users (and I’m pretty sure that it has some security implications as well). When a domain is already added to an Entra tenant as a verified custom domain, you cannot create a personal account with an email address from that domain – but if this domain is just getting “onboarded” to Entra, it is likely that users have already signed up for a personal account.
However, I tried to find a different solution which does not require an app registration and provides an anonymous method to find if the user has a personal account or not.
TL;DR – the signup.live.com page (where you can create a personal account) uses the CheckAvailableSigninNames API endpoint to verify the email address – we can use this API to query addresses in batch – if we find users with a registered account, we can instruct them to change the alias to avoid confusion
The script (explained below):
#example: Check-MSAccountAssociation -emailAddress user@domain.com

function Check-MSAccountAssociation ($emailAddress){
Start-Sleep 2 #to avoid "Too many Requests"
#Initialize session
$session = New-Object Microsoft.PowerShell.Commands.WebRequestSession
$req1 = Invoke-WebRequest -UseBasicParsing -Uri "https://signup.live.com" -WebSession $session

#Extract ServerData
$regex_pattern = 'var ServerData=.*;' #find response starting with 'var ServerData' ending with a semicolon -
$matches = [regex]::Match($req1.Content, $regex_pattern)
$data = ($matches.Value.Split(";"))[0]
$data = $data.Replace("var ServerData=","")
$sessionData = $data | ConvertFrom-Json


    $body = @{
        uaid = $sessionData.sUnauthSessionID
        signInName = $emailAddress
        scid = "100118"
        hpgid = "200225"
        uiflvr = "1001"
        }

    $headers = @{
        'client-request-id' = $sessionData.sUnauthSessionID
        correlationId = $sessionData.sUnauthSessionID
        Origin = "https://signup.live.com"
        Referer = "https://signup.live.com/?lic=1"
        hpgid = "200225"
        canary = $sessionData.apiCanary
        }

$response = Invoke-RestMethod -method Post -Headers $headers -uri "https://signup.live.com/API/CheckAvailableSigninNames?lic=1" -ContentType "application/json" -WebSession $session -Body ($body | ConvertTo-Json -Compress) -UseBasicParsing
#error 1242 = already exists
#error 1184 = no MSA account, can't sign up with work or school account
#error 1181 = email belongs to a reserved domain (other than outlook.com or hotmail.com)
# isAvailable : false = MS account username is taken (outlook.com or hotmail.com)
    [pscustomobject]@{
        emailAddress = $emailAddress
        resultCode = $response.error.code
        MicrosoftAccount = switch ($response.error.code){'1242' {$true} '1184' {$false}}
        }
}
Example:
Fabrikam’s Alice apparently has a personal account
This is a PowerShell function, so it is up to you how you pass the addresses to it.
Story
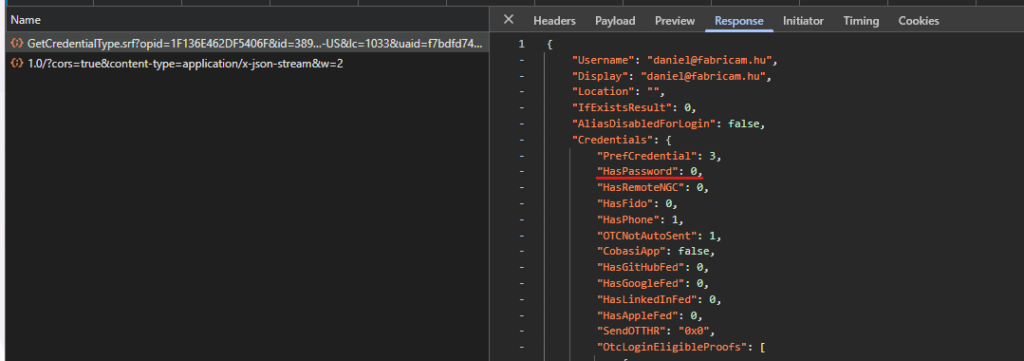
This method is similar to the one used in the solution linked above, but uses an application registered in an Entra tenant. However, I found that it may return incorrect results, because it looks for the HasPassword property with a 1 value, but since it is possible to create a passwordless Microsoft account, this property can be 0
Passwordless Personal Microsoft account
Instead of creating an application for this purpose, I wanted to find a solution without this dependency – like trying to create a personal account.
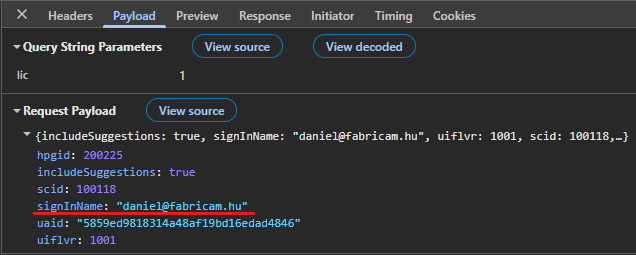
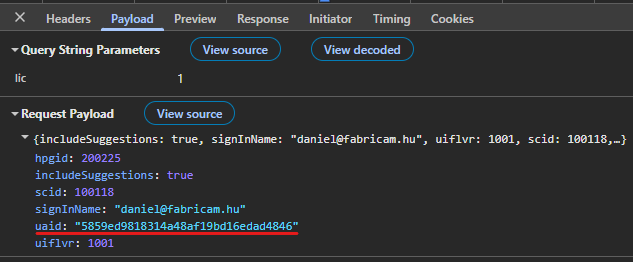
The payload contains some IDs and the signInName to be checked:
POST payload to the CheckAvailableSigninNames API
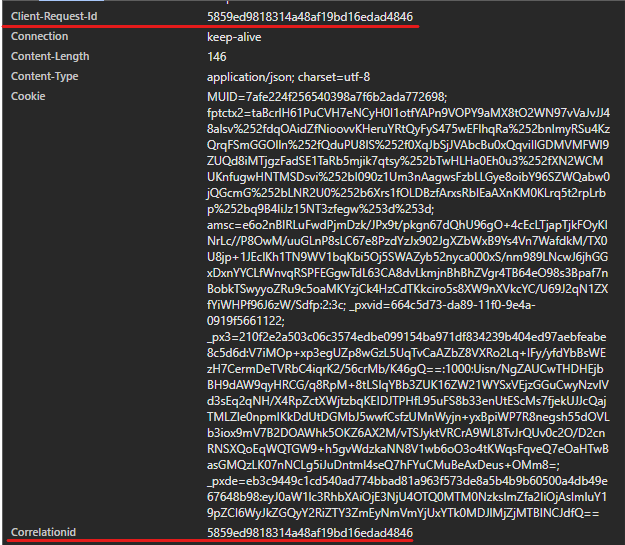
Unfortunately, this endpoint requires some session data, you cannot just submit this payload. So it needs to be figured out, which headers/cookies are needed and how to obtain this info. Right clicking on the request, we can use the “Copy as PowerShell” option which will set all headers as static values – and we can strip it to the bare minimum. After trying a lot of combinations, I came to the conclusion that the following headers are the absolute minimum: – client-request-id (dynamic) – correlationID (dynamic) – Origin (can be static) – Referer (can be static) – hpgid (can be static) – canary (dynamic) In the payload, the uaid is the only value that cannot be static.
If we take a closer look, we can see that the client-request-id and the correlationID is the same:
And the uaid in the payload is this same value:
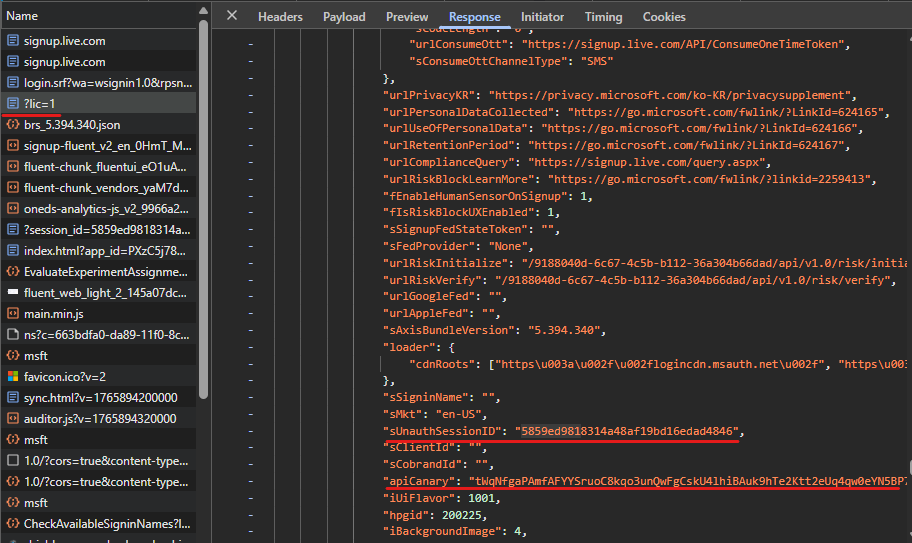
This ID along with the canary is returned upon the first request to https://signup.live.com (after some redirections):
This information is returned in a variable called ServerData – this needs to be parsed in Powershell. There are probably more sophosticated ways to do this, but I used the following method:
Invoke a request to https://signup.live.com, let PS handle the redirections, store session data in $session variable: $session = New-Object Microsoft.PowerShell.Commands.WebRequestSession $req1 = Invoke-WebRequest -UseBasicParsing -Uri “https://signup.live.com” -WebSession $session
Using regex, find a string that starts with “var ServerData=” and ends with a semicolon $regex_pattern = ‘var ServerData=.*;’ $matches = [regex]::Match($req1.Content, $regex_pattern)
Drop everything after the semicolon, and replace “var ServerData=” with nothing (~trim). The remaining content is a JSON data which can be natively parsed by PowerShell: $data = ($matches.Value.Split(“;”))[0] $data = $data.Replace(“var ServerData=”,””) $sessionData = $data | ConvertFrom-Json
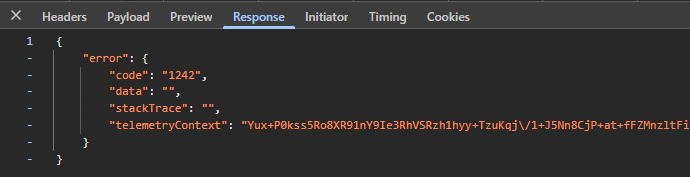
The response apparently has always the same structure: an error block with varying code depending on the submitted address:
As per my testing, the following codes are possible:
1242 = Microsoft account exists
1184 = No MS account, domain cannot be used for signup (~verified domain in Entra)
1064 = address contains invalid character (don’t ask 🙈)
1181 = reserved domain
Note: when testing outlook.com or hotmail.com accounts, the response has a different structure but I didn’t feel the need to handle this scenario in the script.
Note2: The function starts with a 2 seconds pause, because I experienced some throttling when querying multiple addresses (rejected after ~150 requests).
To get rid of the work address – personal account association, the following Microsoft support article can help: link
There are some great resources on this topic (link, link2) and it is supposed to be an easy task – but why not overcomplicate it? So I thought I share my experiences.
TL;DR – Seamless SSO is a nice convenience feature, with some drawbacks. It is easy and recommended to disable it, even if it causes minimal inconvenience – The documentation was not clear enough for me, so I tried to track the SSO flow from the beginning – I tried to cover some scenarios (browsers) to prepare the transition to PRT based SSO – but keep in mind, that domain-only clients will not benefit from Seamless SSO (which doesn’t necessarily mean that users will be overwhelmed by authentication prompts) – After disabling the feature, some extra steps may be needed for a complete removal (GPO, monitoring, documentation)
Seamless SSO on a web browser
The documentation (link) provides a detailed explanation on the behaviour, but it does not make easy to connect the dots – so I share my interpretation:
User tries to access a web application, gets redirected to the Entra sign-in page
This triggers a connection to the tenant specific autologon URL (SSOprobe): https://autologon.microsoftazuread-sso.com/<upnsuffix>/winauth/ssoprobe?<parameters>
The endpoint returns a 401 Unauthorized response, challenging the browser to provide a Kerberos ticket. The browser needs to be configured to trust this endpoint enough to provide a Kerberos ticket (eg. by adding the site to the intranet zone)
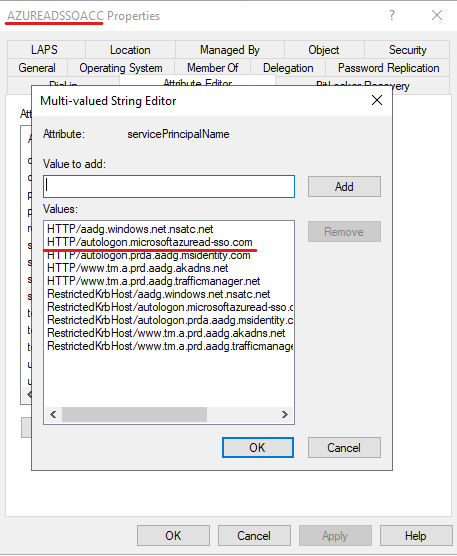
The client will attempt to find the SPN for HTTP/autologon.microsoftazuread-sso.com in AD. This SPN is registered to the AZUREADSSOACC computer account:
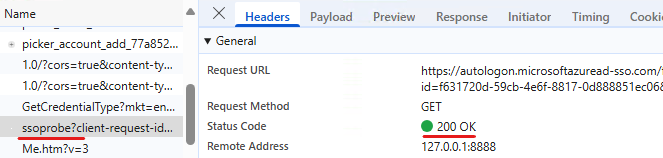
The client requests the ticket for this service, sends this ticket to the ssoprobe. Entra verifies the ticket. This results in an HTTP 200 OK request to the ssoprobe endpoint:
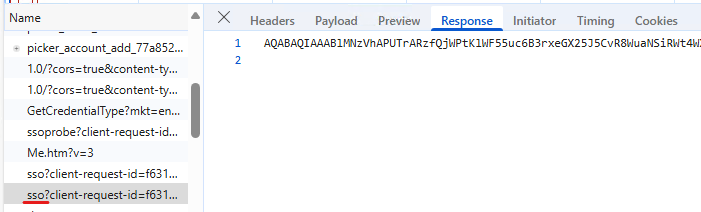
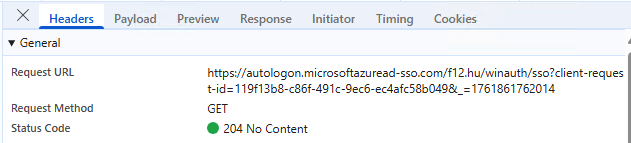
The next step is a request to the sso endpoint which returns the dssoToken: https://autologon.microsoftazuread-sso.com/<upnsuffix>/winauth/sso?<parameters>
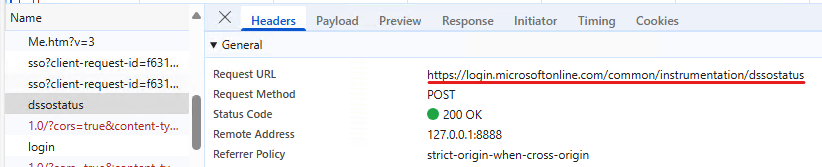
From an admin standpoint, at this stage it’s like the user entered the password. If additional controls are in place (like MFA requirement or other Conditional Access policies), these are evaluated and access is granted (or not).
The flow described above assumes that the user is not signed into Edge and no other settings are in place that automates that sign-in process.
Seamless SSO on a client application
The same logic applies in this scenario: the docs are a bit shady, so I try to understand what is happening in the background. Fiddler + OneDrive login is used here:
The user is not signed in, “the native application retrieves the username of the user from the device’s Windows session” – this one is very interesting. First I thought that it uses the UserPrincipalName and sends the UPN suffix (see next step), but this is may not true. As it is stated in another doc:
Sign-in username can be either the on-premises default username (userPrincipalName) or another attribute configured in Microsoft Entra Connect (Alternate ID). Both use cases work because Seamless SSO uses the securityIdentifier claim in the Kerberos ticket to look up the corresponding user object in Microsoft Entra ID.
My guess is that if the UPN suffix corresponds to a verified custom domain, then the common endpoint is queried (see below) – if Alternate_id is used, then the client is configured with a DomainHint which determines the tenant to be used.
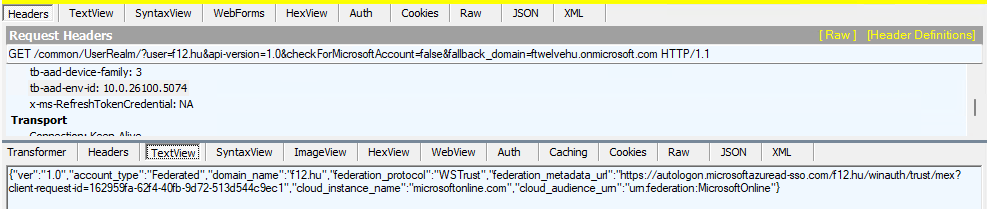
The client issues an HTTP GET to the following endpoint (no authentication):
This request in itself does not return the MEX endpoint, but inserting the following header to the request does the job:
"tb-aad-env-id" = "10.0.26100.5074"
The result:
It even works with the on-premises domain name – just replace the URL’s ?user=<domain> with ?user=<on-premises domain> – the only difference here is that the domain will be replaced by the fallback domain*, eg.:
*in case of the on-premises domain, the fallback_domain needs to be specified in the URL. I didn’t find any trace of how this information is fetched, but it is an easy task so I didn’t investigate that part (any verified domain’s fallback domain can be queried).
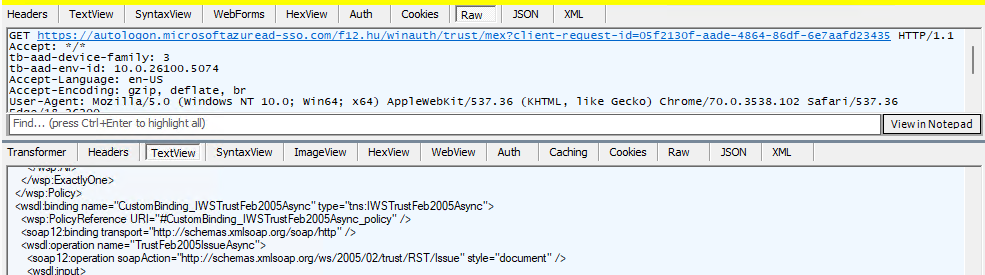
So now we have the MEX endpoint, the next step is a request to the MEX endpoint which returns a lot of information – I guess this is the step described in the documentation as follows:
The app then queries the WS-Trust MEX endpoint to see if integrated authentication endpoint is available.
Integrated authentication endpoint is available, so a Kerberos challenge is issued (HTTP 401 at first):
Since the autologon URL is added to the intranet zone list, the client requests a ticket for HTTP/autologon.microsoftazuread-sso.com, then this ticket is passed to Entra and a SAML token (including the DesktopSsoToken) is returned (POST to https://autologon.microsoftazuread-sso.com/f12.hu/winauth/trust/2005/windowstransport?client-request-id=<id>) :
The SAML token is then presented to the OAuth2 endpoint and we have a refresh token, access token and id token.
Now that I’ve come to understand how the feature works, let’s get rid of it 🙃
Prepairing for the non-DSSO world
On domain joined devices you don’t have a PRT (Primary Refresh Token), so you have to either Hybrid Join the computers affected or accept that SSO will not work here (users will be prompted for authentication when accessing cloud resources). Microsoft is a bit more professional on this:
Seamless SSO is an opportunistic feature. If it fails for any reason, the user sign-in experience goes back to its regular behavior – that is, the user needs to enter their password on the sign-in page.
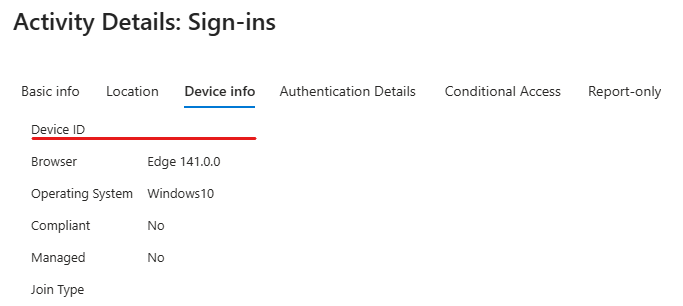
DesktopSSO login does not provide information on the device identity in Entra. This makes sense on a domain-only device, but may cause some headaches on Hybrid Joined devices
Example: if you require a compliant device to access a resource, but DSSO is used (hence no device identity is provided) the user will get blocked.
To overcome this issue, the client browsers need to be instructed to use the PRT (Primary Refresh Token) for the authentication process. Microsoft provided some guidance here.
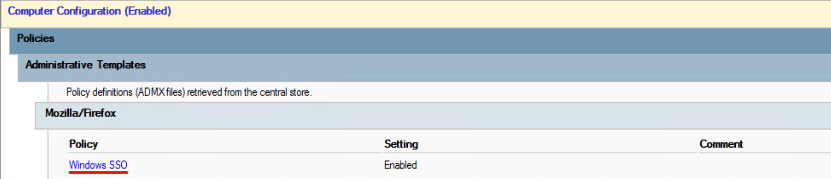
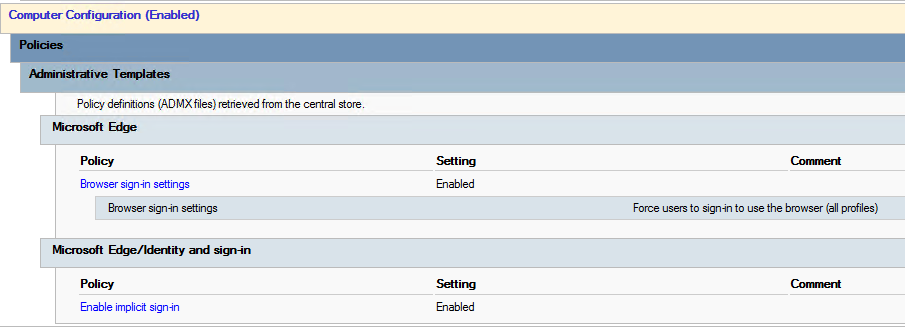
Let’s start with 3rd party browsers: – Chrome: enable CloudAPAuth as described in the previous link (same logic applies to other Chromium based browsers) – Firefox: the Microsoft guidance says “Allow Windows single sign-on for Microsoft, work, and school accounts”. If you use group policy to configure the setting, import the Firefox ADMX and look for Windows SSO setting under Mozilla/Firefox
Edge: the docs state that Edge 85+ requires the user to be signed in to the browser to properly pass device identity:
This is the official and supported scenario – however, since the new Edge is Chromium based, you can also enable CloudAPAuth. Enforcing signing into Edge combined with implicit sign-in may probably fit for standard scenarios, but in my case it just resulted in more questions than answers (overcomplicating, as usual 🙃).
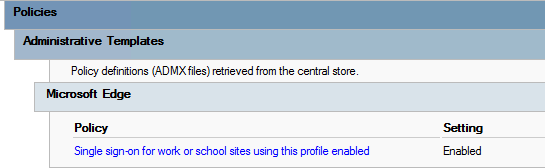
So as an alternative, I used the following setting:
Either setting will make the browser skip the DSSO flow and use the signed-in user’s credentials.
Unfortunately, I don’t have experience with native clients. Microsoft apps automatically use the user’s cloud identity on a hybrid joined device (or at least they transition when disabling DSSO)
Detecting DSSO usage
This topic was greatly covered by Nathan McNulty and Daniel Bradley. One thing to overcomplicate this topic: if you happen to have Defender for Endpoint on your devices, you can use the DeviceNetworkEvents table to find which process is connecting to autologon.microsoftazuread-sso.com
DeviceNetworkEvents
| where RemoteUrl == @"autologon.microsoftazuread-sso.com"
| project TimeGenerated,DeviceName, InitiatingProcessFileName, InitiatingProcessAccountName, InitiatingProcessParentFileName, DeviceId, InitiatingProcessCommandLine
| sort by TimeGenerated desc
This will return an enormous amount of events that I wasn’t able to process – but revealed some funny circumstances (like computer accounts that didn’t successfully finish the hybrid join process; or that Edge attempts to reach this URL when running as a network service [probably some update mechanism])
Most of these events will disappear when DSSO is “deactivated”.
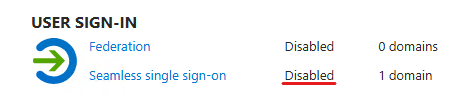
Disabling DSSO
Microsoft provides a detailed guidance on disabling the feature. I opted for the Powershell approach:
The state can be verified under the Connect Sync menu
At this point, the configuration is not removed so it can be re-enabled if needed. On the client side, DSSO will still be attempted, but the SSO endpoint will not return any data (no dssotoken is received):
This means that users/applications will transition to other modern authentication flows (which also means that DSSO will be phased out, will not be tried again). I think 1-2 weeks is enough to wait for user feedback. If everything is okay, the feature can be completely removed:
Then finally, the AZUREADSSOACC computer account can be deleted from AD.
Some additional cleanup
Entra SSSO does not work out of the box – the autologon URLs need to be added to the intranet zone settings (docs). This may be implemented via GPO or Intune, but my point is that for a complete removal, you may want to remove these settings as well.
If you set up some automation to remind you for the Kerberos decryption key rotation (eg. by monitoring the AZUREADSSOACC computer account’s password age), don’t forget to remove it.
Recently, I came across an uncommon issue while disabling legacy authentication in a hybrid Exchange environment. Since I did not find any exact solutions, I thought I share my story about modern authentication in on-premises Exchange server and how it affects the mailbox migration account. Spoiler: it breaks the mailbox migration
TL;DR – Exchange Online uses NTLM authentication for MRSProxy – if you set the Exchange organization config to disable legacy authentication as default authentication policy, the mailbox migration account will not be able to authenticate (except when this account has a dedicated “allow legacy auth” policy assigned)
The story
So the Exchange Team blogged about disabling legacy authentication in Exchange (link) and I thought that this is an easy win: we have HMA enabled, we notified the users about the upcoming change, all we have to do is to create the “Block Legacy Auth” policy, gradually roll it out to users then set it as default (Set-OrganizationConfig -DefaultAuthenticationPolicy “Block Legacy Auth”). Everything went well, but some weeks later a mailbox migration batch to Exchange Online failed with the following error:
Error: CommunicationErrorTransientException: The call to 'https://<exchangeserver>/EWS/mrsproxy.svc' failed. Error details: The HTTP request is unauthorized with client authentication scheme 'Negotiate'. The authentication header received from the server was 'Negotiate, NTLM'.. --> The HTTP request is unauthorized with client authentication scheme 'Negotiate'. The authentication header received from the server was 'Negotiate, NTLM'.
We figured it out that it has to do something with the new authenticationpolicy – but every other aspect of the hybrid config was working fine. So as a workaround we created a “Allow legacy authentication” policy (to be honest, it’s more like: “don’t disable any authentication method”) and assigned it to the mailbox migration account:
One of my previous posts covered a “basic” way to track secure score changes using Graph API with application permissions. While I still prefer application permissions (over service accounts) for unattended access to certain resources, sometimes it is not possible – for example when you want to access resources which are behind the Defender portal’s apiproxy (like the scoreImpactChangeLogs node in the secureScore report). To overcome this issue, I decided to use Entra Certificate-based Authentication as this method provides a “scriptable” (and “MFA capable”) way to access these resources.
Lot of credit goes to the legendary Dr. Nestori Syynimaa (aka DrAzureAD) and the AADInternals toolkit (referring to the CBA module as this provided me the foundamentals to understand the authentication flow). My script is mostly a stripped version of his work but it targets the security.microsoft.com portal. Credit goes to Marius Solbakken as well for his great blogpost on Azure AD CBA which gave me the hint to fix an error during the authentication flow (details below).
prerequisites: Entra CBA configured for the “service account”, appropriate permissions granted for the account to access secure score informations, certificate to be used for auth
the script provided is only for research/entertainment purposes, this post is more about the journey and the caveats than the result
tested on Windows Powershell ( v5.1), encountered issues with Microsoft Powershell (v7.5)
The scipt
$tenantID = "<your tenant id>"
$userUPN = "<CBA user UPN>"
$thumbprint = "<thumbprint of certificate installed in Cert:\CurrentUser\My\ >"

function Extract-Config ($inputstring){
    $regex_pattern = '\$Config=.*'
    $matches = [regex]::Match($inputstring, $regex_pattern)
    $config= $matches.Value.replace("`$Config=","") #remove $Config=
    $config = $config.substring(0, $config.length-1) #remove last semicolon
    $config | ConvertFrom-Json
}

#https://learn.microsoft.com/en-us/entra/identity/authentication/concept-authentication-web-browser-cookies
##Cert auth to security.microsoft.com
# Credit: https://github.com/Gerenios/AADInternals/blob/master/CBA.ps1
# STEP1 - Invoke the first request to get redirect url
$webSession = New-Object Microsoft.PowerShell.Commands.WebRequestSession
$response = Invoke-WebRequest -Uri "https://security.microsoft.com/" -Method Get -WebSession $webSession  -ErrorAction SilentlyContinue -MaximumRedirection 0 -UseBasicParsing
$url = $response.Headers.'Location'

# STEP2 - Send HTTP GET to RedirectUrl
$login_get = Invoke-WebRequest  -Uri $Url -Method Get -WebSession $WebSession -ErrorAction SilentlyContinue -UseBasicParsing -MaximumRedirection 0

# STEP3 - Send POST to GetCredentialType endpoint
#Credit: https://goodworkaround.com/2022/02/15/digging-into-azure-ad-certificate-based-authentication/
$GetCredentialType_Body = @{
    username = $userUPN
    flowtoken = (Extract-Config -inputstring $login_get.Content).sFT
    }

$getCredentialType_response = Invoke-RestMethod -method Post -uri "https://login.microsoftonline.com/common/GetCredentialType?mkt=en-US" -ContentType "application/json" -WebSession $webSession -Headers @{"Referer"= $url; "Origin" = "https://login.microsoftonline.com"} -Body ($GetCredentialType_Body | convertto-json -Compress) -UseBasicParsing

#STEP 4 - Invoke REST POST to certauth endpoint with ctx and flowtoken using certificate
$CBA_Body = @{
    ctx = (Extract-Config -inputstring $login_get.Content).sctx
    flowtoken = $getCredentialType_response.FlowToken
    }
$CBA_Response = Invoke-RestMethod -UseBasicParsing -Uri "https://certauth.login.microsoftonline.com/$TenantId/certauth" -Method Post -Body $CBA_Body -Certificate (get-item Cert:\CurrentUser\My\$thumbprint)

#STEP 5 - Send authentication information to the login endpoint
$login_msolbody = $null
$login_msolbody = @{
        login = $userUPN
        ctx = ($CBA_Response.html.body.form.input.Where({$_.name -eq "ctx"})).value
        flowtoken = ($CBA_Response.html.body.form.input.Where({$_.name -eq "flowtoken"})).value
        canary = ($CBA_Response.html.body.form.input.Where({$_.name -eq "canary"})).value
        certificatetoken = ($CBA_Response.html.body.form.input.Where({$_.name -eq "certificatetoken"})).value
        }

$headersToUse = @{
        'Referer'="https://certauth.login.microsoftonline.com/"
        'Origin'= "https://certauth.login.microsoftonline.com"
        }

$login_postCBA = Invoke-WebRequest -UseBasicParsing -Uri "https://login.microsoftonline.com/common/login" -Method Post -Body $login_msolbody -Headers $headersToUse -WebSession $webSession

#STEP 6 - Make a request to login.microsoftonline.com/kmsi to get code and id_token
$login_postCBA_config = (Extract-Config -inputstring $login_postCBA.Content)
        $KMSI_body = @{
            "LoginOptions" = "3"
            "type" = "28"
            "ctx" = $login_postCBA_config.sCtx
            "hpgrequestid" = $login_postCBA_config.sessionId
            "flowToken"	= $login_postCBA_config.sFT
            "canary" = $login_postCBA_config.canary
            "i19" = "2326"
        }


$KMSI_response = Invoke-WebRequest -UseBasicParsing -Uri "https://login.microsoftonline.com/kmsi" -Method Post -WebSession $WebSession -Body $KMSI_body

#STEP 7 - add sessionID cookie to the websession as this will be required to access security.microsoft.com (probably unnecessary)
#$websession.Cookies.Add((New-Object System.Net.Cookie("s.SessID", ($response.BaseResponse.Cookies | ? {$_.name -eq "s.SessID"}).value, "/", "security.microsoft.com"))) #s.SessID cookie is retrived during first GET to defender portal

#STEP 8 - POST the id_token and session information to security.microsoft.com to get sccauth and XSRF-TOKEN cookies
$securityPortal_POST_body = @{
    code = ($KMSI_response.InputFields.Where({$_.name -eq "code"})).value
    id_token = ($KMSI_response.InputFields.Where({$_.name -eq "id_token"})).value
    state = ($KMSI_response.InputFields.Where({$_.name -eq "state"})).value
    session_state = ($KMSI_response.InputFields.Where({$_.name -eq "session_state"})).value
    correlation_id = ($KMSI_response.InputFields.Where({$_.name -eq "correlation_id"})).value
    }
$securityPortal_POST_response = Invoke-WebRequest -UseBasicParsing -Uri "https://security.microsoft.com/" -Method Post -WebSession $webSession -Body $securityPortal_POST_body -MaximumRedirection 1
##END of Cert auth to security.microsoft.com

## Query the secureScoresV2
#Decode the XSRF-TOKEN
$xsrfToken = $webSession.Cookies.GetCookies("https://security.microsoft.com") | ? {$_.name -eq "XSRF-TOKEN"} | % {$_.value}
$xsrfToken_decoded = [System.Web.HttpUtility]::UrlDecode($xsrfToken)

#Send GET to secureScoresV2 with the decoded XSRF-TOKEN added to the headers
$SecureScoresV2_headers = @{
    "x-xsrf-token" = $xsrfToken_decoded
    }
$secureScoresV2_response = Invoke-WebRequest -UseBasicParsing -Uri "https://security.microsoft.com/apiproxy/mtp/secureScore/security/secureScoresV2?`$top=400" -WebSession $webSession -Headers $SecureScoresV2_headers

#RESULT
$secureScoreInfo = $secureScoresV2_response.Content | ConvertFrom-Json
$secureScoreInfo.value
Explained
Since I’m not a developer, I will explain all the steps (result of research and lot of guesswork) as I experienced them (let’s call it sysadmin aspect). So essentially, this script “mimics” the user opening the Defender portal, authenticates with CBA, clicks on Secure Score and returns the raw information which is transformed in the browser to something user-friendly. As a prerequisite, the certificate (with the private key) needs to be installed in the Current User personal certificate store of the user running the script.
Step 0 is to populate the $tenantID, $userUPN and $thumbprint variables accordingly
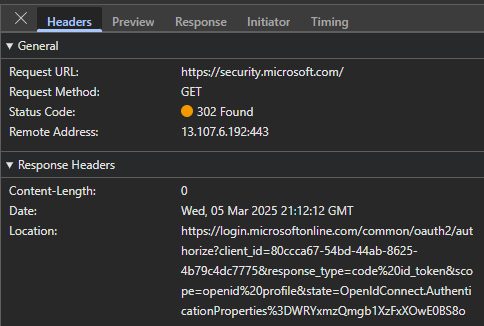
Step 1 is creating a WebRequestSession object (like a browser session, from my perspective the $websession variable is just a cookie store) and navigating to https://security.microsoft.com. When performed in a browser, we get redirected to the login portal – if we open the browser developer tools, we can see in the network trace that this means a 302 HTTP code (redirect) with a Location header in the response. This is where we get redirected:
From the script aspect, we will store this Location header in the $url variable:
Notice that every Invoke-WebRequest/Invoke-Restmethod command uses the -UseBasicParsing parameter. According to documentation, this parameter is deprecated in newer PowerShell versions and from v6.0.0 all requests are using basic parsing only. However, I’m using v5.1 which uses Internet Explorer to get the content – so if it is not configured, disabled or anything else, the command could fail.
At this point the $webSession variable contains the following cookies for security.microsoft.com: s.SessID, X-PortalEndpoint-RouteKey and an OpenIdConnect.nonce:
Step 2 is to open the redirectUrl:
When opened, we receive some cookies for login.microsoftonline.com, including buid,fpc,esctx (documentation for the cookies here):
But the most important information is the flowtoken (sFT) which can be found in the response content. In the browser trace it looks like this:
In PowerShell, the response content is the $login_get variable’s Content member, returned as string. This needs to be parsed, because it is embedded in a script HTML node, beginning with $Config:
I’m using the Extract-Config function to get this configuration data (later I found that AADInternals is using the Get-Substring function defined in CommonUtils.ps1 which is more sophisticated 🙃):
Step 3 took some time to figure out. When I tried to use AADInternals’ Get-AADIntadminPortalAccessTokenUsingCBA command I got an error message:
AADSTS90036: An unexpected, non-retryable error stemming from the directory service has occurred.
Luckily I found this blogpost which led me to think that this GetCredentialType call is missing in AADInternals (probably something is misconfigured on my side and this can be skipped). This call – from my standpoint – is returning a new flowtoken and this new one needs to be sent to the certauth endpoint. (Until I figured it out, every other attempt to authenticate on the certauth endpoint resulted in AADSTS90036).
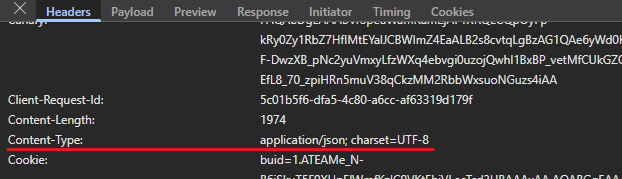
Step 4 is basically the same as in the AADInternals’ module: the flowtoken and ctx is posted to the certauth.login.microsoftonline.com endpoint.
Notice here, that the ContentType parameter is set to “application/json” – where it is not specified, it defaults to “application/x-www-form-urlencoded” for a POST call. In the browser trace, this is defined in the Content-Type header:
Step 5 is slightly different from AADInternals’ CBA module, but follows the same logic: send the login (userprincipalname), ctx, flowtoken, canary and certificatetoken content to the https://login.microsoftonline.com/common/login endpoint and in turn we receive the updated flowtoken, ctx, sessionid, canary informations which are posted to the https://login.microsoftonline.com/kmsi endpoint in Step 6
The KMSI_response contains the id_token, code, state, session_state and correlation_id. When we look back on the browser trace, we will see that these parameters are passed to the security.microsoft.com portal to authenticate the user.
Step 7 is probably totally unnecessary (commented out) and can be the result of too much desparate testing. It is just adding the s.SessID cookie to our websession which is also needed during authentication (without this cookie, you will immedately receive some timeout errors). This cookie is received upon the first request (I guess my testing involved clearing some variables… anyways, it won’t hurt)
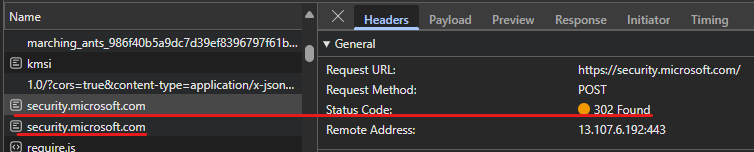
Step 8 is the final step in this authentication journey: we post content we received in the $KMSI_response variable. In the browser trace we can see that an HTTP 302 is the status code for this request, followed by a new request to the same endpoint.
This is why the -MaximumRedirection parameter is set to 1 in this step. (Some of my tests failed with 1 redirection allowed, so if it fails, it can be increased to 5 for example).
Finally we have the sccauth and XSRF-TOKEN cookies which are required to access resources.
I thought this is the green light, all I need is to use the websession to access the secureScoresv2 – but some tweaking was required because the Invoke-WebRequest failed with the following error message:
Invoke-WebRequest : {"Message":"The web page isn\u0027t loading correctly. Please reload the page by refreshing your browser, or try deleting the cookies from your browser and then sign in again. If the problem persists, contact
Microsoft support."
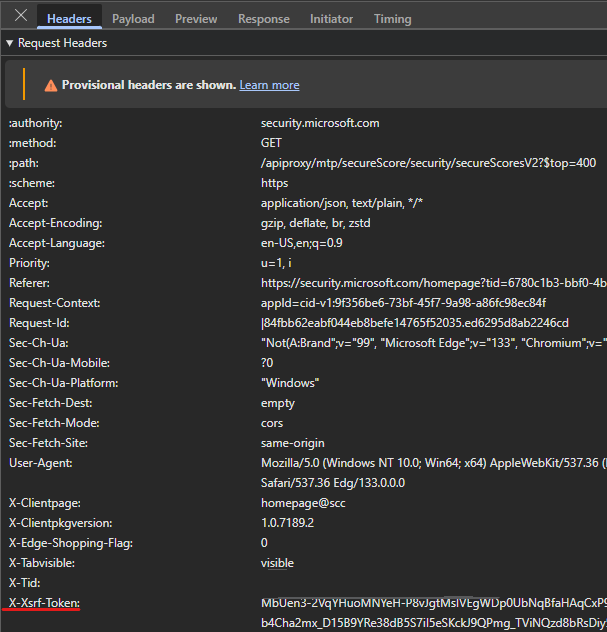
Taking a look on the request, I noticed that the XSRF-TOKEN is used as X-Xsrf-Token header info (even though the cookie is present in the $websession)
XSRF-TOKEN sent as X-Xsrf-Token header
Took some (~a lot) time to figure out that this token is encoded so it needs to be decoded as well before using it as header:
Slight but crucial difference between the encoded and the decoded XSRF-TOKEN
So once we have the decoded token, it can be used as x-xsrf-token:
The response content is in JSON format, the ConvertFrom-Json cmdlet will do the parsing.
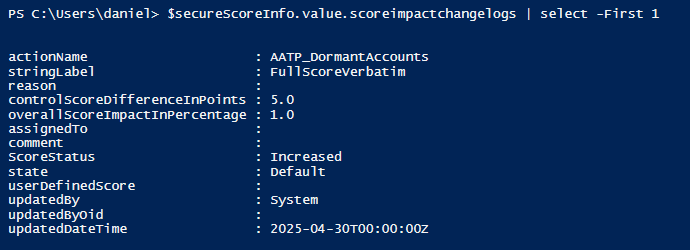
Compared to secureScore exposed by Graph API, here we have the ScoreImpactChangeLogs property which is missing in Graph.
Example of the ScoreImpactChangeLogs property
This is just one example (of endless possibilities) of using Entra CBA to access the Defender portal, but my main goal was to share my findings and give a hint on reaching other useful stuff on security.microsoft.com.
Recently, I came across a post on LinkedIn which demonstrated that Passkey authentication is way faster than traditional Password+MFA notification login. It made me curious: how much time does it exactly take to do MFA?
TL;DR – This report uses the SignInLogs table which needs to be configured in Diagnostic settings – Unfortunately I did not manage to gather the same info from AADSignInEventsBeta table in Defender or sign-in logs from Microsoft Graph – Everything written here is based on my tests and measurements, so it may contain inaccurate conclusions
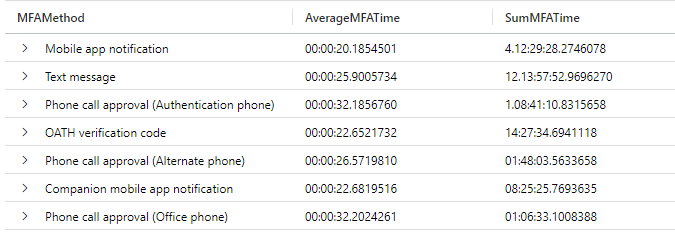
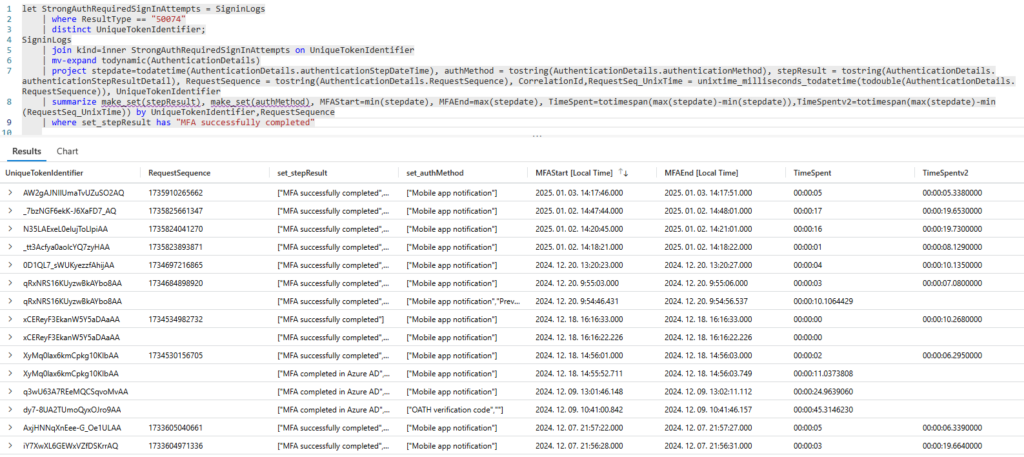
The query that will display the authentication method, the average and overall time spent with completing the MFA prompt:
let StrongAuthRequiredSignInAttempts = SigninLogs
	| where ResultType == "50074"
	| distinct ResultType,UniqueTokenIdentifier,CorrelationId;
let MFA1 =SigninLogs
	| join kind=inner StrongAuthRequiredSignInAttempts on UniqueTokenIdentifier
	| mv-expand todynamic(AuthenticationDetails)
	| project stepdate=todatetime(AuthenticationDetails.authenticationStepDateTime), authMethod = tostring(AuthenticationDetails.authenticationMethod), stepResult = tostring(AuthenticationDetails.authenticationStepResultDetail), RequestSequence = todouble(AuthenticationDetails.RequestSequence), StatusSequence = todouble(AuthenticationDetails.StatusSequence), CorrelationId,RequestSeq_UnixTime = unixtime_milliseconds_todatetime(todouble(AuthenticationDetails.RequestSequence)), UniqueTokenIdentifier, StatusSeq_UnixTime = unixtime_milliseconds_todatetime(todouble(AuthenticationDetails.StatusSequence)), MFAMethod =tostring(MfaDetail.authMethod)
    | summarize make_set(stepResult), MFAStart=min(stepdate), MFAEnd=max(stepdate), TimeSpent=totimespan(max(stepdate)-min(stepdate)),TimeSpentv2=totimespan(maxif(StatusSeq_UnixTime, StatusSequence > 1)-minif(RequestSeq_UnixTime, RequestSequence > 1)) by UniqueTokenIdentifier,MFAMethod
    | where set_stepResult has "MFA successfully completed"
    ;
MFA1
| where isnotempty(MFAMethod)
| project MFAMethod,TimeSpent = coalesce(TimeSpentv2,TimeSpent)
| summarize AverageMFATime=avg(TimeSpent),SumMFATime=sum(TimeSpent) by MFAMethod
Example result:
Explanation
The first step was to find those sign-in attempts that are interrupted, because MFA is needed. This can be easly found as there is a ResultDescription column where we can filter for “Strong Authentication is required.” entries:
SigninLogs
| where ResultDescription == "Strong Authentication is required."
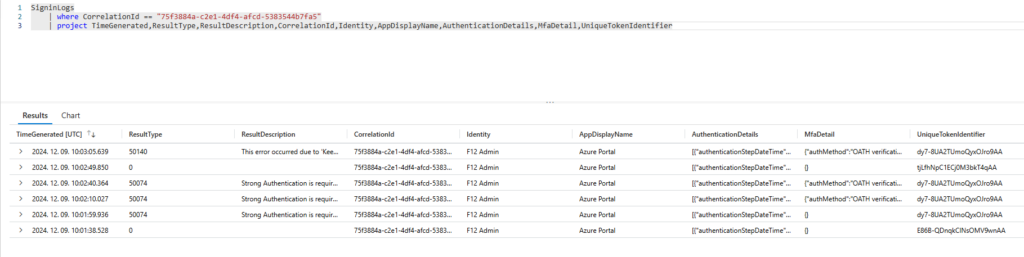
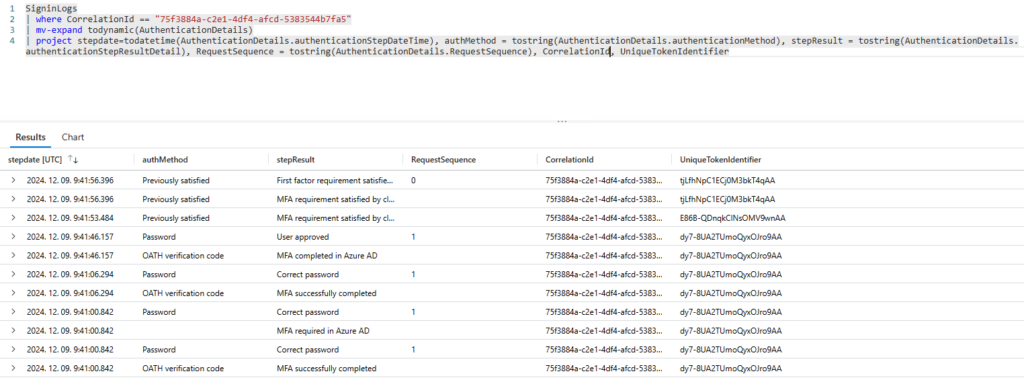
The first catch is that not the entire sign-in session has this field populated with the same value (for logical reasons). Let’s take a simple login to the Azure portal with Authenticator Code as MFA:
In this example, I intentionally waited 30 seconds to provide the code (after successful password entry) [code prompt started on 2024.12.09 9:41:15, code sent on 9:41:45]. The TimeGenerated field is a bit misleading, because it is the creation timestamp of the event entry not the authentication event (this part is stored in the AuthenticationDetails column). It is also worth mentioning that the CorrelationId remains the same in a browser session (even if session policies require re-authentication) – so if for example the Azure portal is kept open in the browser but re-authentication happens, the CorrelationId is the same but the authentication steps (reentering password, new MFA prompt) need to be handled separately. This is why I’m using the UniqueTokenIdentifier.
But let’s get back to the example and extend the AuthenticationDetails column:
Some fields are not totally clear for me, but according to my measures the most accurate timespan of “doing MFA” is the time between the “MFA required in Azure AD” and the “MFA completed in Azure AD” events (it’s not totally accurate because I spent some time to change the MFA method).
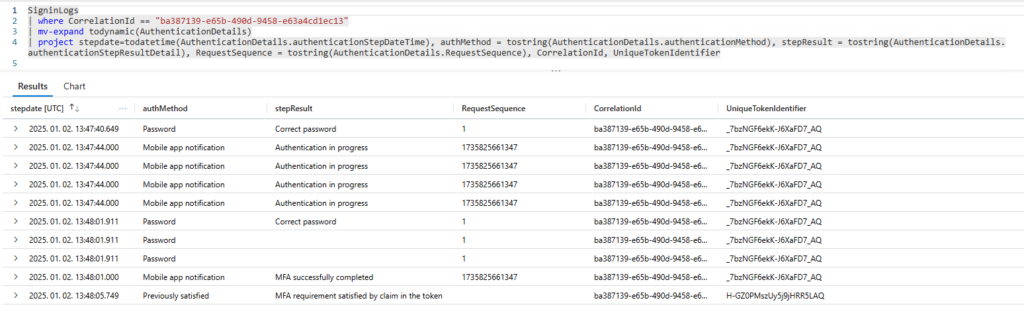
However, this approach (time between “MFA required” and “MFA completed”) will not cover all other MFA methods, because “MFA required” is not always present in the logs. For example, the next sign-in example was using Mobile app notification as MFA:
At this point the possible solution is to either write a query for each authentication method or try to find a unified approach. I opted for the unified option: assume that the “MFA start time” is the first logged AuthenticationStepDate and the “MFA end time” is the last logged AuthenticationStepDate where we have “MFA successfully completed” entry (this one seems to be present in every MFA type).
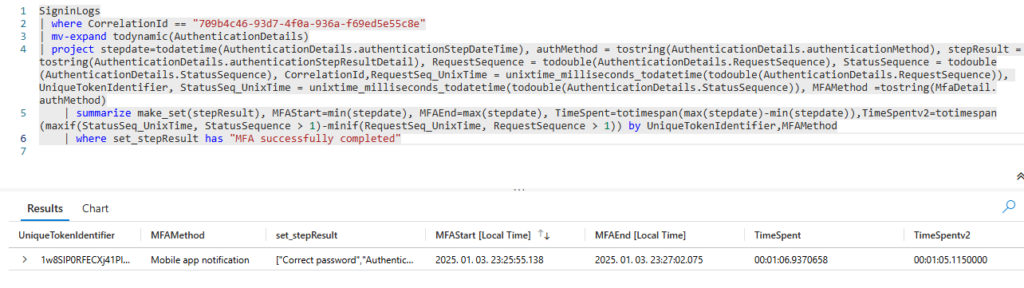
This looks almost appropriate, but in the case of “Mobile app notification” I found the RequestSequence and StatusSequence fields which are Unix timestamps and look more precise:
But since these fields are not always present, I chose the KQL coalesce() function to return the TimeSpentv2 value when present – otherwise return the TimeSpent value.
Note1: the summarize operator needs to group by UniqueTokenIdentifier and MFAMethod, because without the MFAMethod, the “Password” will also be returned as authentication factor.
Note2: when calculating TimeSpentv2, there were other authentication steps where StatusSequence fields were empty, 0 or 1. They are clearly not Unix timestamps, so only values greater than 1 are considered here
A well maintained AD topology is very important because domain joined clients use this information to locate the optimal Domain Controller (DCLocator documentation here) – failing to find the most suitable domain controller will have performance impact on client side (slow logon, group policy processing, etc.). In an ideal world, when a new subnet is created and AD joined computers are placed here, AD admins are notified and they assign the subnet to the appropriate site – but sometimes this is not the case.
There are several methods to detect IP addresses coming from unassinged subnets: – By analyzing the \\<dc>\admin$\debug\netlogon.log logfiles (example here) – Looking for 5778 EventID in System log (idea from here) – Using Powershell get all client registered DNS entries and look up against the replication subnets (some IP subnet calculator will be needed)
My idea was to use Defender for Identity logs (mainly because I recently (re)discovered the ipv4_lookup plugin in Kusto 🙃).
TL;DR – by defining the ADReplicationSubnets as a datatable, we can find logon events from the IdentityLogonEvents table where clients use an IP address that is not in any replication subnet – we can use a “static” datatable, or schedule a PowerShell script which will dynamically populate the items in this table
The query:
let IP_Data = datatable(network:string)
[
 "10.0.1.0/24", //example subnet1
"10.0.2.0/24", //example subnet2
"192.168.0.0/16", //example subnet3
];
IdentityLogonEvents
| where ActionType == @"LogonSuccess"
| where Protocol == @"Kerberos"
| summarize LogonCount=dcount(Timestamp) by IPAddress,DeviceName
| evaluate ipv4_lookup(IP_Data, IPAddress, network, return_unmatched = true)
| where isempty( network)
Quite simple, isn’t it? So we filter for successful Kerberos logon events (without Protocol filter, other logon events could generate noise) and use the ipv4_lookup function to look up the IP address in the “IP_Data” variable’s “network” column, including those entries that cannot be matched with any subnet – then filter for the unmatched entries.
Example result
Scheduling the query as a PowerShell script
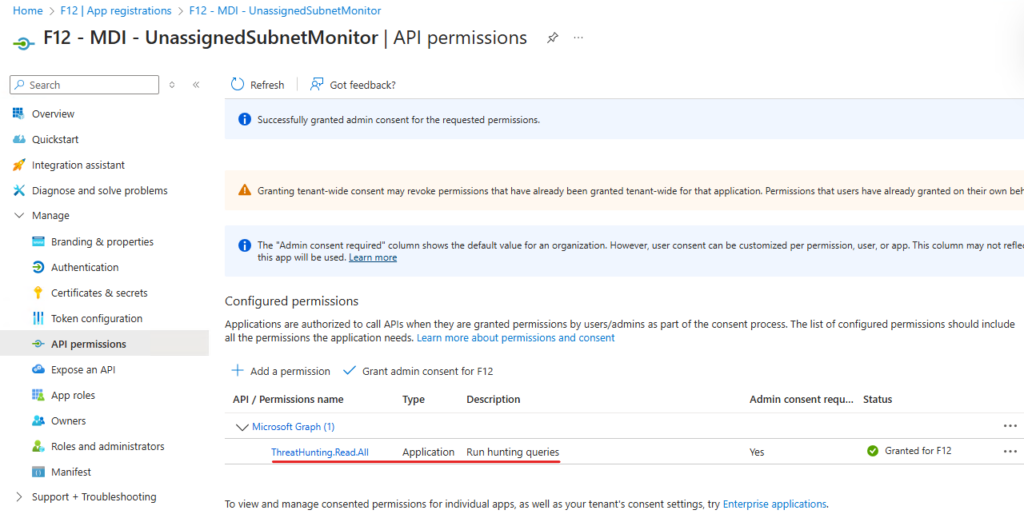
So far, so good. But over time, the list of subnets may change, grow, etc. – how can this subnet list be dynamically populated? Using the Get-ADReplicationSubnet command for example. As a prerequisite I created an app registration with ThreatHunting.Read.All application permission (with a certificate as credential):
The hunting query is the same as above, but the datatable entries are populated by the results of the Get-ADReplicationSubnet command (and some dirty string formatting like adding quotation marks and a column). In the $body variable the Timespan is set to seven days (ISO 8601 format) – when Timespan is not set, it defaults to 30 days (reference)
Running the script
From this point, it is up to you to schedule the script (or fine tune the output) and email the results. 😊
Extra hint: if you have a multi-domain environment, the hunting query may need to be “domain specific” – for this purpose I would insert the following filter: | where AdditionalFields.Spns == “krbtgt/<domainDNSName>”, for example:
IdentityLogonEvents
| where ActionType == @"LogonSuccess"
| where Protocol == @"Kerberos"
| where AdditionalFields.Spns == "krbtgt/F12.HU"
| summarize LogonCount=dcount(Timestamp) by IPAddress,DeviceName
| evaluate ipv4_lookup(IP_Data, IPAddress, network, return_unmatched = true)
| where isempty( network)
The information on this website is provided for informational purposes only and I make no warranties, either express or implied. Information in these documents, including URL and other Internet Web site references, is subject to change without notice. The entire risk of the use or the results from the use of this document remains with the user.
The postings on this site are my own and do not necessarily represent the postings, strategies or opinions of my employer.
We use cookies on our website to give you the most relevant experience by remembering your preferences and repeat visits. By clicking “Accept All”, you consent to the use of ALL the cookies. However, you may visit "Cookie Settings" to provide a controlled consent.
This website uses cookies to improve your experience while you navigate through the website. Out of these, the cookies that are categorized as necessary are stored on your browser as they are essential for the working of basic functionalities of the website. We also use third-party cookies that help us analyze and understand how you use this website. These cookies will be stored in your browser only with your consent. You also have the option to opt-out of these cookies. But opting out of some of these cookies may affect your browsing experience.
Necessary cookies are absolutely essential for the website to function properly. These cookies ensure basic functionalities and security features of the website, anonymously.
Cookie
Duration
Description
cookielawinfo-checkbox-analytics
11 months
This cookie is set by GDPR Cookie Consent plugin. The cookie is used to store the user consent for the cookies in the category "Analytics".
cookielawinfo-checkbox-functional
11 months
The cookie is set by GDPR cookie consent to record the user consent for the cookies in the category "Functional".
cookielawinfo-checkbox-necessary
11 months
This cookie is set by GDPR Cookie Consent plugin. The cookies is used to store the user consent for the cookies in the category "Necessary".
cookielawinfo-checkbox-others
11 months
This cookie is set by GDPR Cookie Consent plugin. The cookie is used to store the user consent for the cookies in the category "Other.
cookielawinfo-checkbox-performance
11 months
This cookie is set by GDPR Cookie Consent plugin. The cookie is used to store the user consent for the cookies in the category "Performance".
viewed_cookie_policy
11 months
The cookie is set by the GDPR Cookie Consent plugin and is used to store whether or not user has consented to the use of cookies. It does not store any personal data.
Functional cookies help to perform certain functionalities like sharing the content of the website on social media platforms, collect feedbacks, and other third-party features.
Performance cookies are used to understand and analyze the key performance indexes of the website which helps in delivering a better user experience for the visitors.
Analytical cookies are used to understand how visitors interact with the website. These cookies help provide information on metrics the number of visitors, bounce rate, traffic source, etc.
Advertisement cookies are used to provide visitors with relevant ads and marketing campaigns. These cookies track visitors across websites and collect information to provide customized ads.