Microsoft Secure Score can be a good starting point in assessing organizational security posture. Improvement actions are added to the score regularly (link) and points achieved are updated dynamically.

For me, Secure score is a mesurement of hard work represented in little percentage points. Every little point is a reward which can be taken back by Microsoft when changes happen in the current security state (let it be the result of an action [ie. someone enabled the printer spooler on a domain controller] – or inactvity [ie. a domain admin account became “dormant”]). Whatever is the reason of the score degradation, I want to be alerted, because I don’t want to check this chart on a daily basis. Unfortunately, I didn’t find any ready-to-use solution, so I’m sharing my findings.
TL;DR
–Get-MgSecuritySecureScore Graph PowerShell cmdlet can be used to fetch 90 days of score data
-The basic idea is to compare the actual scores with yesterday’s scores and report on differences
-When new controlScores (~recommendations) arrive, send separate alert
-The script I share is a PowerShell script with certificate auth, but no Graph PowerShell cmdlets are used just native REST API calls (sorry, I still have issues with Graph PS while native approach is consistent). Using app auth with certificate, the script can be scheduled to run on a daily basis (I don’t recommend a more frequent schedule as there are temporary score changes which are mostly self-remediating)
Prerequisites
We will need an app registration with Microsoft Graph/SecurityEvents.Read.All Application permission (don’t forget the admin consent):

On the server on which you are planning to schedule the script, create a new certificate. Example PowerShell command*:
New-SelfSignedCertificate -FriendlyName "F12 - Secure score monitor" -NotAfter (Get-date).AddYears(2) -Subject "F12 - Secure score monitor" -CertStoreLocation Cert:\LocalMachine\My -Provider “Microsoft Enhanced RSA and AES Cryptographic Provider” -KeyExportPolicy NonExportable
Don’t forget to grant read access to the private key for the account which will run the schedule. Right click on the certificate – All Tasks – Manage Private Keys…
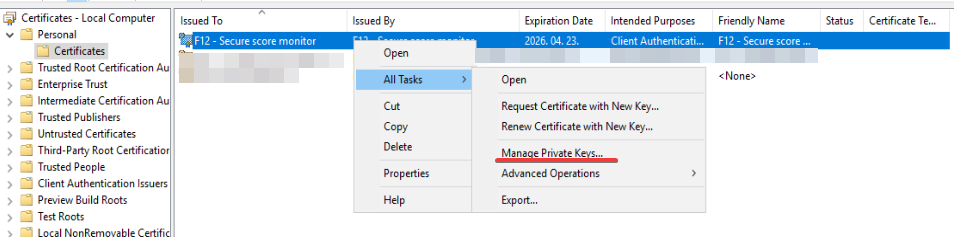
I prefer to use “Network Service” for these tasks because limited permissions are needed

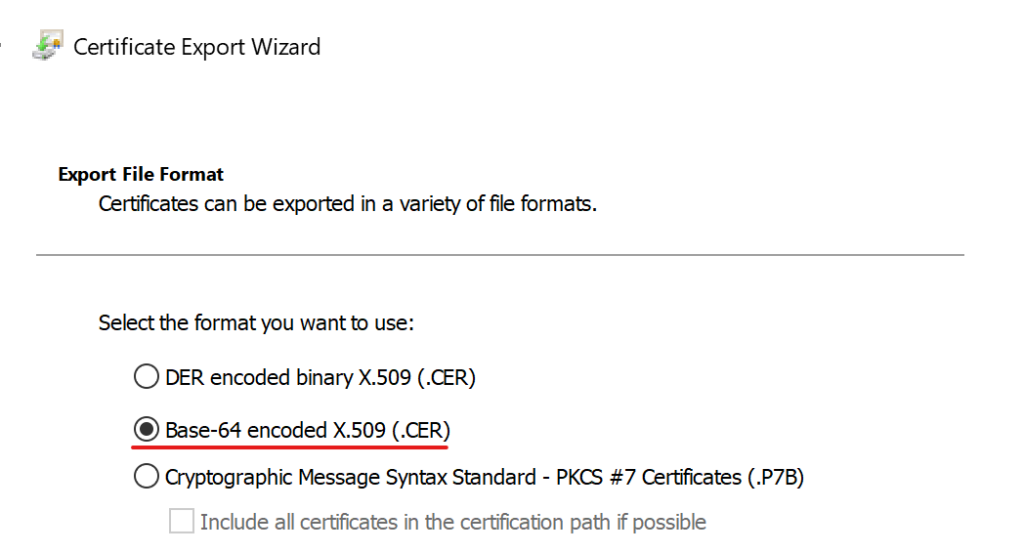
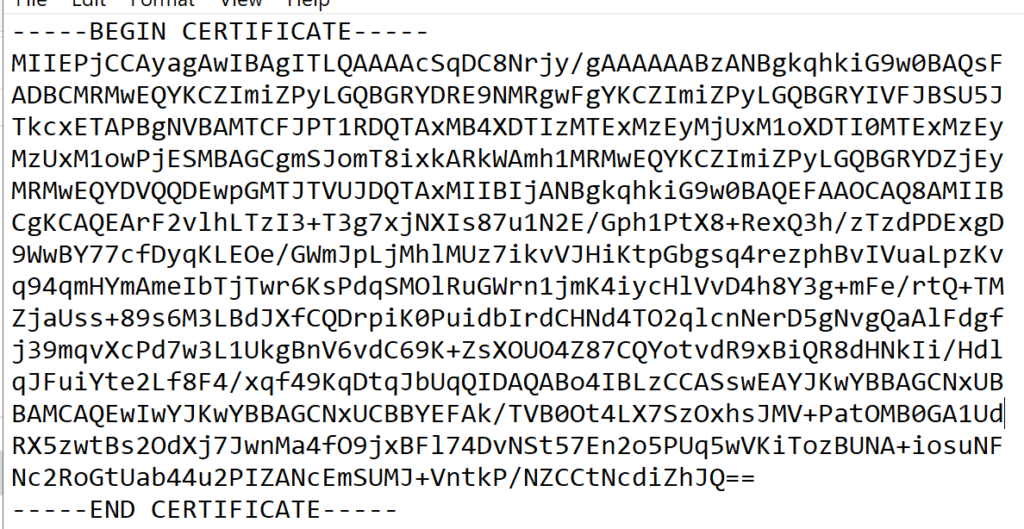
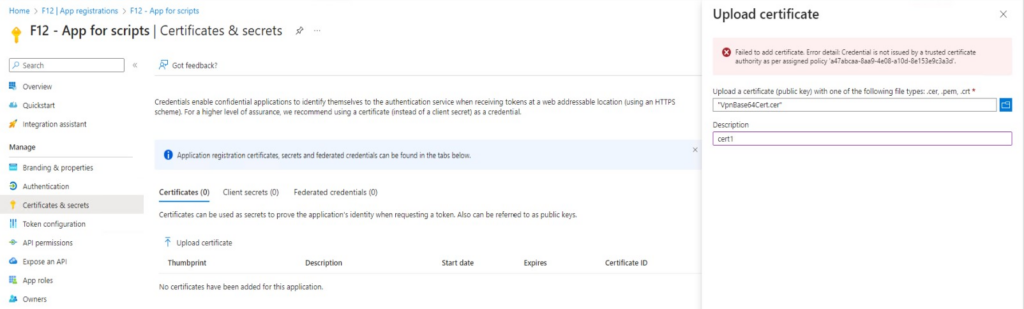
Export the certificate’s public key and upload it to the app registration’s certificates:

Let’s move on to the script.
The script
Some variables and actions need to be modified, like $tenantID, $appID and $certThumbprint in the first lines. Also, the notification part (Send-MailMessage lines) needs to be customized to your needs.
The script itself can be breaken down as follows:
– authenticate to Graph using certificate (the auth function is from MSEndpointMgr.com)
– the following to lines query the Secure Score data for today and yesterday:$url = 'https://graph.microsoft.com/beta/security/securescores?$top=2'
$webResponse = Invoke-RestMethod -Method Get -Uri $url -Headers $headers -ErrorAction Stop
– some HTML style for readable emails
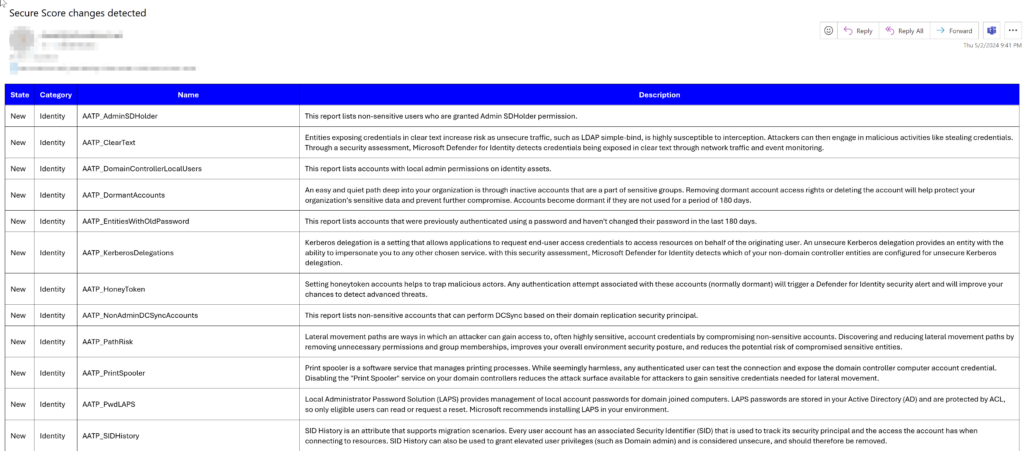
– compare today’s and yesterday’s controlscores – alert when there are new / deprecated recommendations
– compare today’s scores with yesterday’s scores – alert when changes are detected
Here it is:
$tenantId = '<your tenant ID>'
$appID = '<application ID with SecurityEvents.Read.All admin consented permission>'
$certThumbprint = '<thumbprint of certificate used to connect>'
$resourceAppIdUri = 'https://graph.microsoft.com'
#region Auth
$cert = gci Cert:\LocalMachine\my\$certThumbprint
$cert64Hash = [System.Convert]::ToBase64String($cert.GetCertHash())
function Get-Token {
#https://msendpointmgr.com/2023/03/11/certificate-based-authentication-aad/
#create JWT timestamp for expiration
$startDate = (Get-Date "1970-01-01T00:00:00Z" ).ToUniversalTime()
$jwtExpireTimeSpan = (New-TimeSpan -Start $startDate -End (Get-Date).ToUniversalTime().AddMinutes(2)).TotalSeconds
$jwtExpiration = [math]::Round($jwtExpireTimeSpan, 0)
#create JWT validity start timestamp
$notBeforeExpireTimeSpan = (New-TimeSpan -Start $StartDate -End ((Get-Date).ToUniversalTime())).TotalSeconds
$notBefore = [math]::Round($notBeforeExpireTimeSpan, 0)
#create JWT header
$jwtHeader = @{
alg = "RS256"
typ = "JWT"
x5t = $cert64Hash -replace '\+', '-' -replace '/', '_' -replace '='
}
#create JWT payload
$jwtPayLoad = @{
aud = "https://login.microsoftonline.com/$TenantId/oauth2/token"
exp = $jwtExpiration
iss = $appID
jti = [guid]::NewGuid()
nbf = $notBefore
sub = $appID
}
#convert header and payload to base64
$jwtHeaderToByte = [System.Text.Encoding]::UTF8.GetBytes(($jwtHeader | ConvertTo-Json))
$encodedHeader = [System.Convert]::ToBase64String($jwtHeaderToByte)
$jwtPayLoadToByte = [System.Text.Encoding]::UTF8.GetBytes(($jwtPayLoad | ConvertTo-Json))
$encodedPayload = [System.Convert]::ToBase64String($jwtPayLoadToByte)
#join header and Payload with "." to create a valid (unsigned) JWT
$jwt = $encodedHeader + "." + $encodedPayload
#get the private key object of your certificate
$privateKey = ([System.Security.Cryptography.X509Certificates.RSACertificateExtensions]::GetRSAprivateKey($cert))
#define RSA signature and hashing algorithm
$rsaPadding = [Security.Cryptography.RSASignaturePadding]::Pkcs1
$hashAlgorithm = [Security.Cryptography.HashAlgorithmName]::SHA256
#create a signature of the JWT
$signature = [Convert]::ToBase64String(
$privateKey.SignData([System.Text.Encoding]::UTF8.GetBytes($jwt), $hashAlgorithm, $rsaPadding)
) -replace '\+', '-' -replace '/', '_' -replace '='
#join the signature to the JWT with "."
$jwt = $jwt + "." + $signature
#create a hash with body parameters
$body = @{
client_id = $appID
resource = $resourceAppIdUri
client_assertion = $jwt
client_assertion_type = "urn:ietf:params:oauth:client-assertion-type:jwt-bearer"
scope = $scope
grant_type = "client_credentials"
}
$url = "https://login.microsoft.com/$TenantId/oauth2/token"
#use the self-generated JWT as Authorization
$header = @{
Authorization = "Bearer $jwt"
}
#splat the parameters for Invoke-Restmethod for cleaner code
$postSplat = @{
ContentType = 'application/x-www-form-urlencoded'
Method = 'POST'
Body = $body
Uri = $url
Headers = $header
}
$request = Invoke-RestMethod @postSplat
#view access_token
$request
}
$accessToken = (Get-Token).access_token
$headers = @{
'Content-Type' = 'application/json'
'Accept' = 'application/json'
'Authorization' = "Bearer $accessToken"
}
#region end
$url = 'https://graph.microsoft.com/beta/security/securescores?$top=2'
$webResponse = Invoke-RestMethod -Method Get -Uri $url -Headers $headers -ErrorAction Stop
#HTML Style for table reports
$Style = @'
<style>
table{
border-collapse: collapse;
border-width: 2px;
border-style: solid;
border-color: grey;
color: black;
margin-bottom: 10px;
text-align: left;
}
th {
background-color: #0000ff;
color: white;
border: 1px solid black;
margin: 10px;
}
td {
border: 1px solid black;
margin: 10px;
}
</style>
'@
$controlScoreChanges = Compare-Object ($webResponse.value[0].controlScores.controlname) -DifferenceObject ($webResponse.value[1].controlScores.controlname)
$report_controlScoreChanges = if ($controlScoreChanges){
foreach ($control in $controlScoreChanges){
[pscustomobject]@{
State = switch ($control.sideindicator){"<=" {"New"} "=>" {"Removed"}}
Category = $webresponse.value[0].controlScores.where({$_.controlname -eq ($control.inputobject)}).controlCategory
Name = $control.inputobject
Description = $webresponse.value[0].controlScores.where({$_.controlname -eq ($control.inputobject)}).description
}
}
}
if ($report_controlScoreChanges){
[string]$body = $report_controlScoreChanges | ConvertTo-Html -Head $Style
Send-MailMessage -To "<address>" -From "<address>" -Subject "Secure Score control changes detected" -Body $body -SmtpServer "<SMTP server address>" -Port 25 -BodyAsHtml
}
$ErrorActionPreference= 'silentlycontinue'
$report_scoreChanges = foreach ($controlscore in $webResponse.value[0].controlscores){
if ( Compare-Object $controlscore.score -DifferenceObject ($webResponse.value[1].controlScores.where({$_.controlname -eq ($controlscore.controlname)}).score)){
[pscustomobject]@{
date = $controlscore.lastSynced
controlCategory = $controlscore.controlCategory
controlName = $controlscore.controlName
scoreChange = ($controlscore.score) - (($webResponse.value[1].controlScores.where({$_.controlname -eq ($controlscore.controlname)})).score)
description = $controlscore.description
}
}
}
if ($report_ScoreChanges){
[string]$body = $report_ScoreChanges | ConvertTo-Html -Head $Style
Send-MailMessage -To "<address>" -From "<address>" -Subject "Secure Score changes detected" -Body $body -SmtpServer "<SMTP server address>" -Port 25 -BodyAsHtml
}Some example results:

Fun fact:
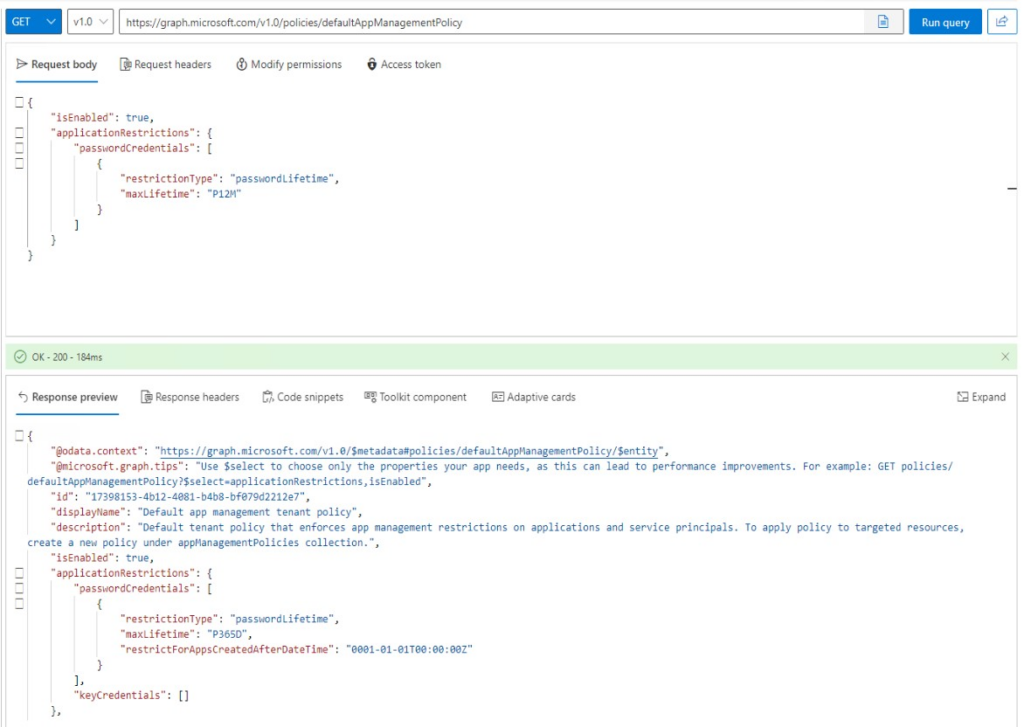
The Defender portal section where these score changes are displayed actually uses a “scoreImpactChangeLogs” node for these changes, but unfortunately I didn’t find a way to query this secureScoresV2 endpoint:

I hope it means that these informations will be available via Graph so that no calculations will be needed to detect score changes.


