I thought it will be a quick Google search to find a PowerShell script that will give a report on applications published via Entra application proxy, but I found only scripts (link1, link2, link3) using the AzureAD PowerShell module – so I decided to write a new version using Graph PowerShell.
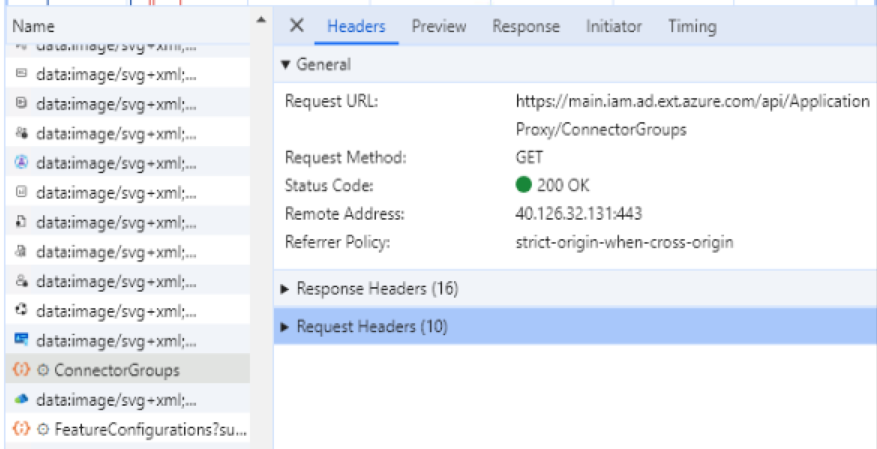
Entra portal is still using the https://main.iam.ad.ext.azure.com/api/ApplicationProxy/ConnectorGroups endpoint to display the connector groups:
So the next step was to figure out if there are some Graph API equivalents. Google search: graph connectorgroups site:microsoft.com led me to this page: https://learn.microsoft.com/en-us/graph/api/connectorgroup-list?view=graph-rest-beta&preserve-view=true&tabs=http From this point it was “easy” to follow the logic of previously linked scripts and “translate” AzureAD PowerShell commands to Graph PS.
Note: as per the documentation, Directory.ReadWrite.All permission is required and only delegated permissions work.
As an alternative, I share the original script that did not use these commands from Microsoft.Graph.Beta.Applications
I’m really into this Windows Hello for Business topic… Recently, I was going through the “RDP with WHfB” guide from MS Learn (link) which gave me an idea: can this method be used to protect user VPN certificates? The short answer is: yes, but no 🙂
TL;DR – Depending on your current infrastructure, several options are available to protect VPN with MFA: Azure MFA NPS extension, SAML-auth VPN with Conditional Access, Entra ‘mini-CA’ Conditional Access – Hello for Business can be used to protect access to certificates, why not use it to protect VPN certs?
Protecting VPN with MFA with Microsoft tools
NPS Extension The most popular option I know to protect VPN with MFA is the Azure MFA NPS extension (link). The logic is very simple: the RADIUS request coming to the NPS server is authenticated against Active Directory, then the NPS extension is doing a secondary authentication (Azure MFA).
SAML-based authentication with Conditional Access This depends on the vendor of the VPN appliance, but the mechanism is that an Enterprise application is created in Entra and Conditional Access policy can be applied to it.
Conditional Access VPN There is another option which is called “Conditional Access VPN connectivity” in Entra – and by the way it seems to me that Microsoft is hiding this option (I guess it’s because it is using Azure Active Directory Graph which is deprecated). I found a photo how it looked like in the old days (picture taken from here):
In the Entra portal this option is not visible (at least for me):
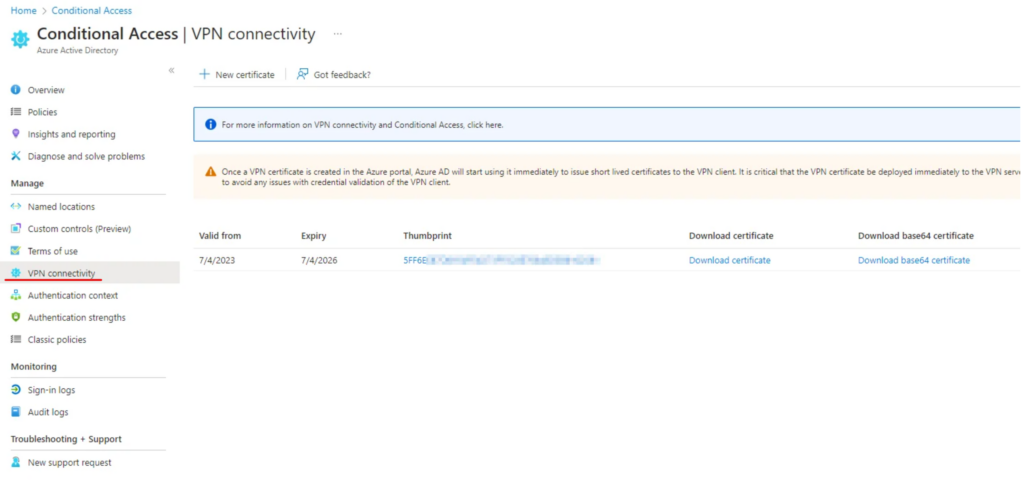
But when using the search bar, the menu can be found:
Some documentation links about this feature:
Conditional Access Framework and Device Compliance for VPN (link)
Conditional access for VPN connectivity using Microsoft Entra ID (link)
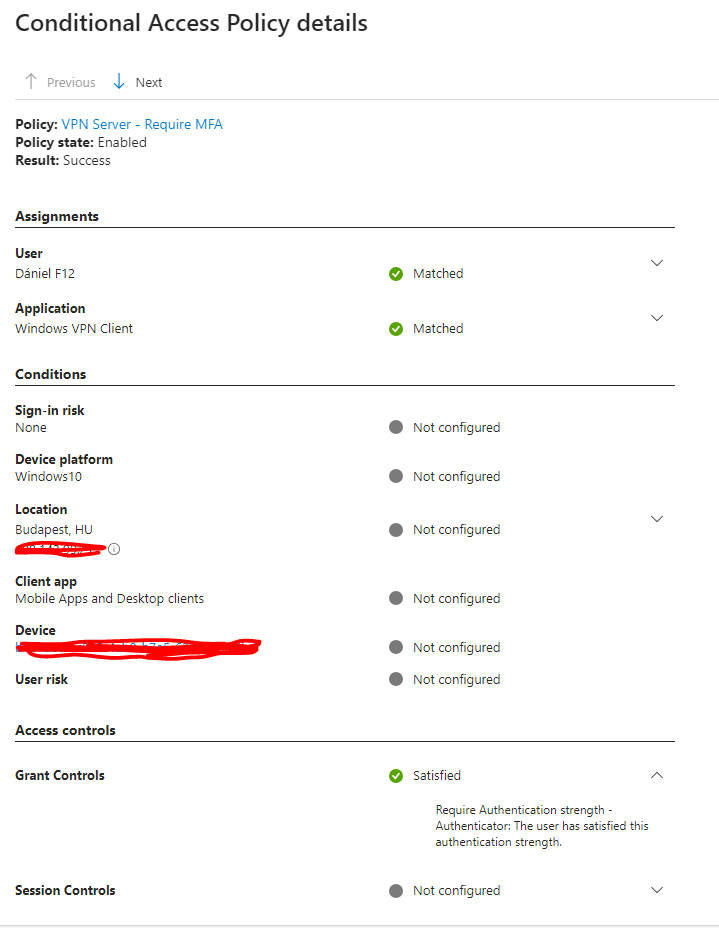
The mechanism in short: Entra creates a ‘mini-CA’ which issues a short-lived certificates to clients; when a Windows VPN client is configured to use DeviceCompliance flow, the client attempts to get a certificate from Entra before connecting to the VPN endpoint (from an admin standpoint a ‘VPN Server’ application is created in Entra and conditional access policies can be applied to this application – I’m not going into details about this one, mainly because I encountered a lot of inconsitencies in the user experience when testing this solution 🙃) – and when everything is OK, the user gets a short-lived certificate which can be used for authentication (eg. EAP-TLS) Some screenshots about this:
Conditional Access policy evaluation result
Certificate valid for ~1 hour
VPN Certificate created with Microsoft Passport KSP Disclaimer: it is not an official/supported by Microsoft method to use VPN certificates for authentication, I tested it only for entertainment purposes.
This was the initial trigger of this post – based on the “Remote Desktop sign-in with Windows Hello for Business” tutorial, create VPN certificates using the Microsoft Passport KSP (link). The process is straigthforward: – create the VPN certificate template (or duplicate the one you already have) – export the template to a txt file – modify the pKIDefaultCSPs setting to Microsoft Passport Key Storage Provider – update the template with the new setting
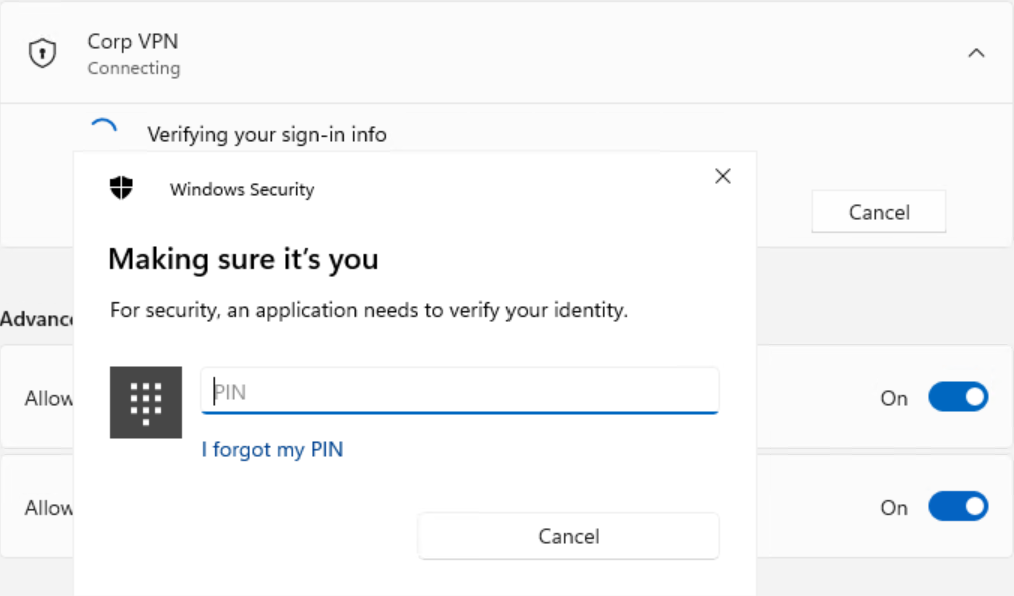
User experience: well, if the user is WHfB enrolled and logs in with WHfB then nothing changes (the certificate is used “silently” upon connecting) – but when using password to log in to Windows, the VPN connection prompts for Hello credentials:
So if Hello for Business can be considered a multi-factor authentication method, then this solution fits as well 🙂
Windows Hello for Business and Windows Hello may sound siblings, but they are actually two different families in authentication world (link)*. Hello is basicly using password caching while Hello for Business uses asymmetric authentication (key or certificate based) – that’s why Windows Hello for Business (WHfB) has some infrastructure prerequisites in az on-premises or hybrid environment. Not every environment is prepared for WHfB, hence some organizations may have opted to enable convenience PIN for their users to make sign-in… well… more convenient. Why does it matter? Because users may encounter errors during WHfB enrollment, WHfB has impact on Active Directory infrastructure, WHfB is a strong authentication method (~considered as MFA in Conditional Access policy evaluation) and so on.
*the common thing about Hello and WHfB is the Credential Provider: users see the PIN/biometric authentication option on their logon screen
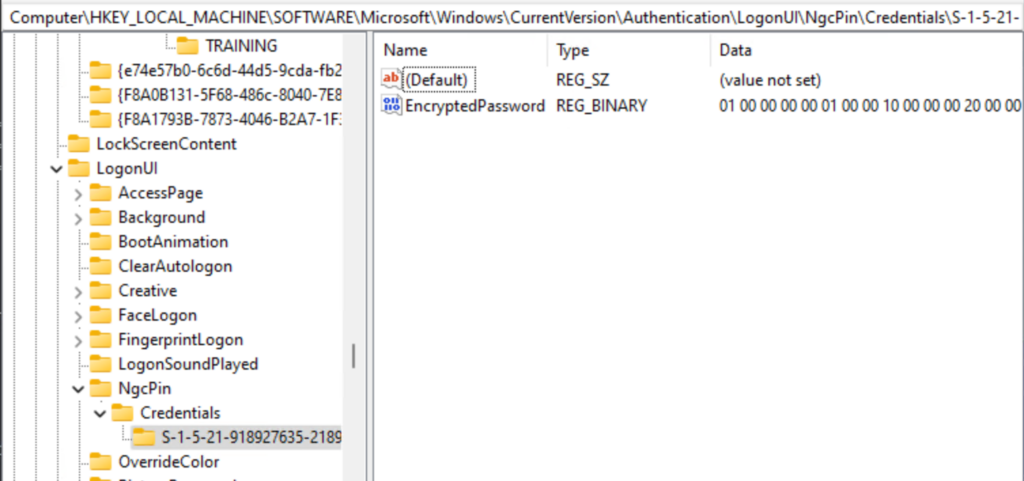
TL;DR – Turn on convenience PIN sign-in policy enables Hello PIN in Account settings, but invokes Hello for Business enrollment when setting up in Windows Security app – Hello for Business implementation is very simple (and preferred over Hello) with Cloud Kerberos Trust, but migrating users from Hello has some pitfalls – Hello usage can be detected in the following registry hive: HKEY_LOCAL_MACHINE\SOFTWARE\Microsoft\Windows\CurrentVersion\ Authentication\LogonUI\NgcPin\Credentials\<userSID>
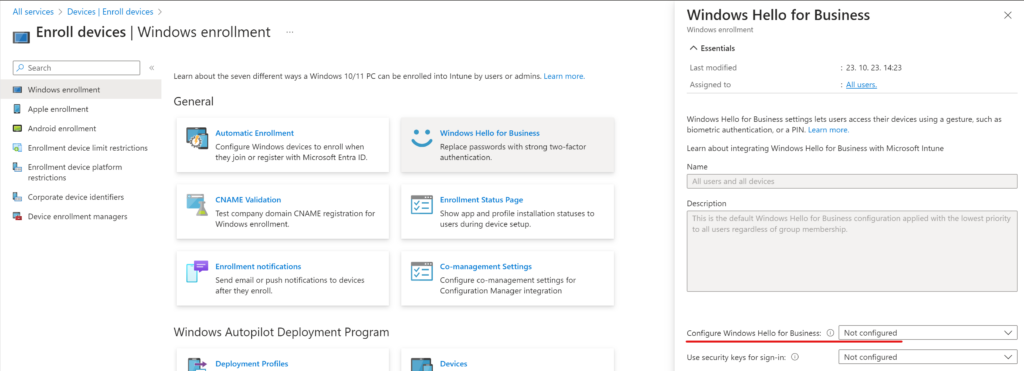
Behavior Let’s assume that WHfB is not configured in your environment, even the Intune default policy for WHfB is set to “Not configured” like this:
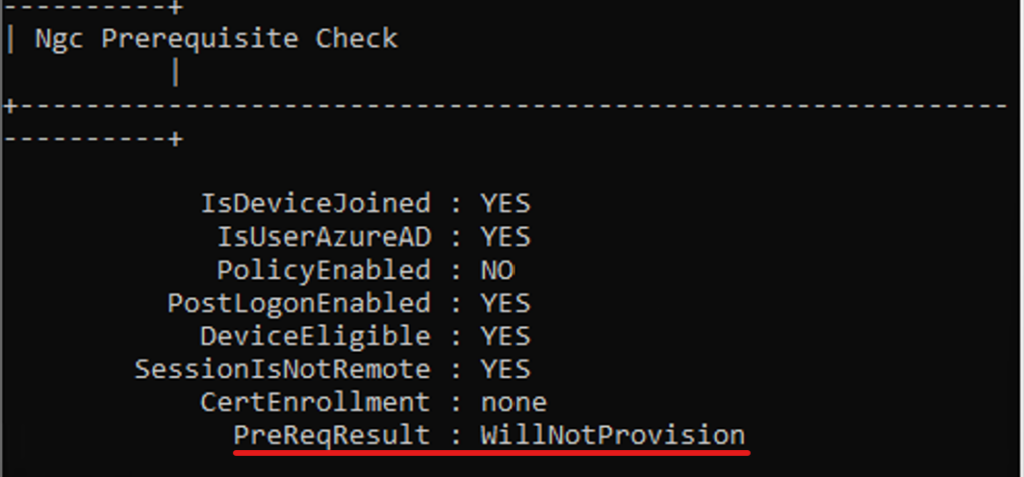
On a client device, the eligibility for WHfB can be checked using dsregcmd /status under “Ngc Prerequisite Check” (link). On a domain joined/hybrid joined device, the PreReqResult will have the WillNotProvision value until WHfB is explicitly enabled.
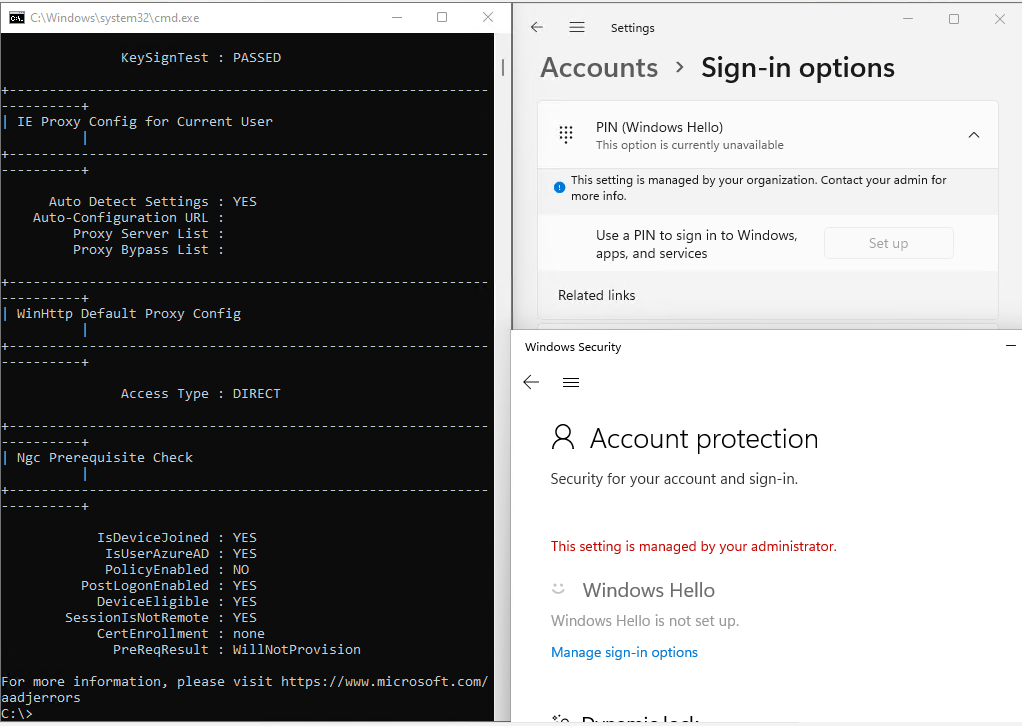
When you open Settings – Accounts – Sign-in options, you will see that PIN (Windows Hello) is greyed out nor Windows Security app will display options to set up Hello:
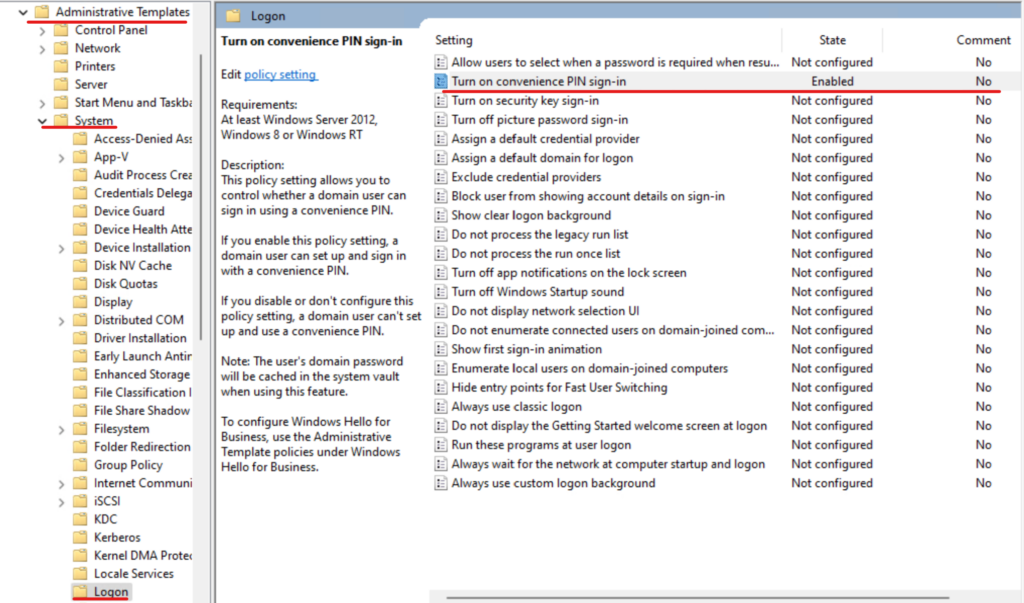
Now let’s enable convenience PIN sign-in group policy: Computer Configuration – Administrative Templates – System – Logon – Turn on convenience PIN sign-in
The Windows Security traybar icon almost immediately shows a warning status:
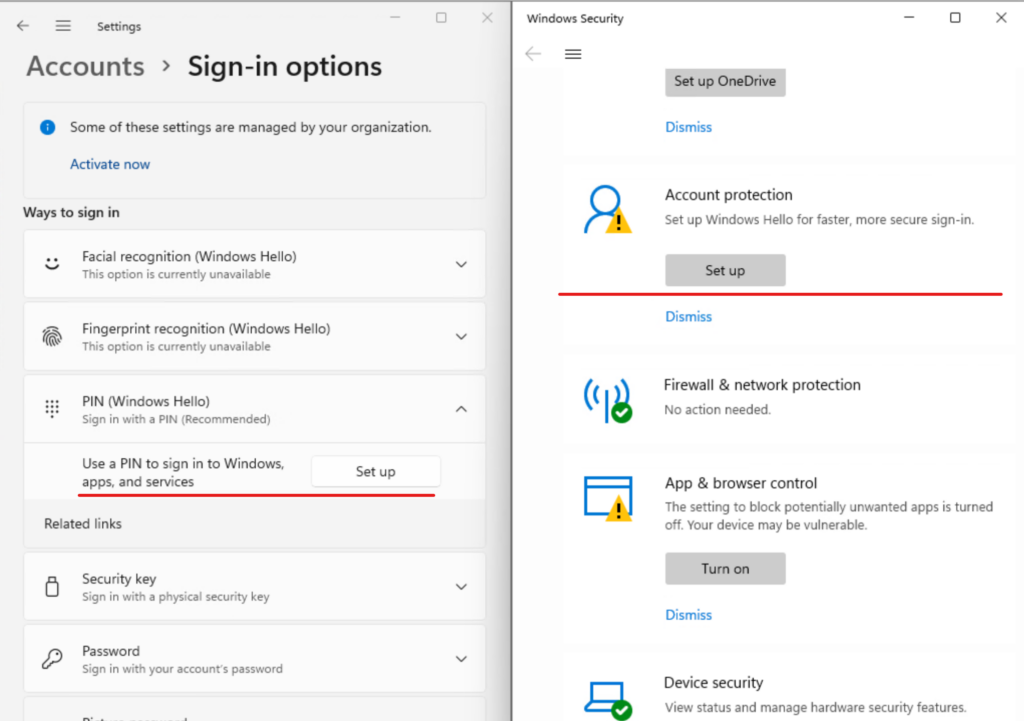
The Hello enrollment is now active in the Settings- Accounts – Sign-in options menu and we also have the option to set up Hello in Windows Security:
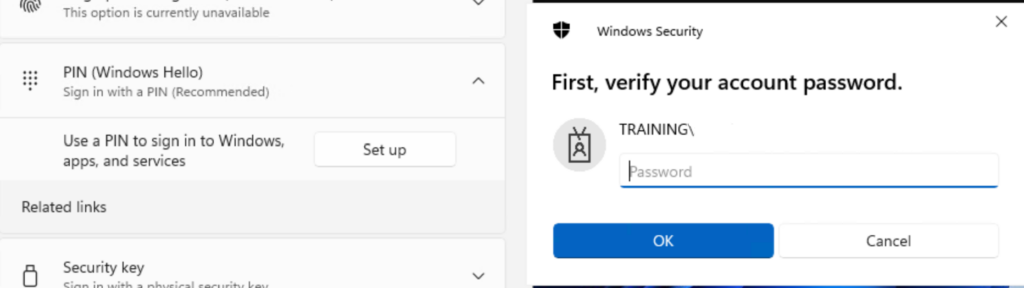
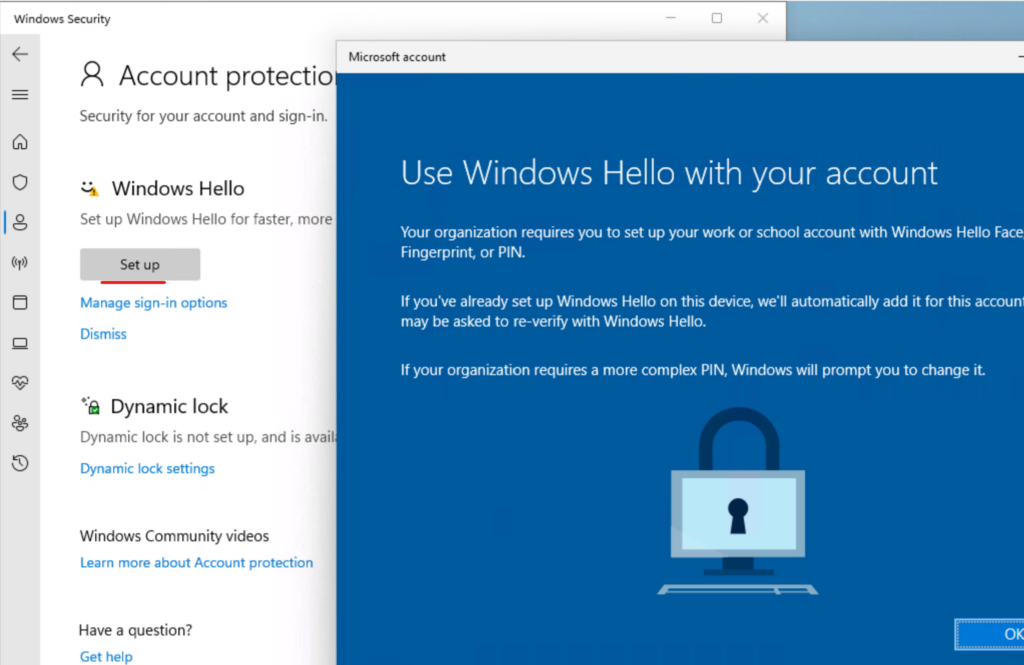
And here lies the discrepancy in the enrollment behavior: the Settings menu (left) sets up Hello, while Windows Security app (right) will invoke the WHfB enrollment process
Windows Hello setup using Settings menu
Windows Security invoking Hello for Business enrollment
Migrating from Hello to Hello for Business At this point, we may decide to prevent Hello for Business – but I suggest to follow the other direction and migrate Hello users to Hello for Business. Since we have Cloud Kerberos Trust, we don’t need a PKI either, only (at least one) Windows 2016 or newer Domain Controllers (and hybrid joined devices with hybrid identites with MFA registration of course)[link]… so the deployment is very easy… but migration can be a bit tricky.
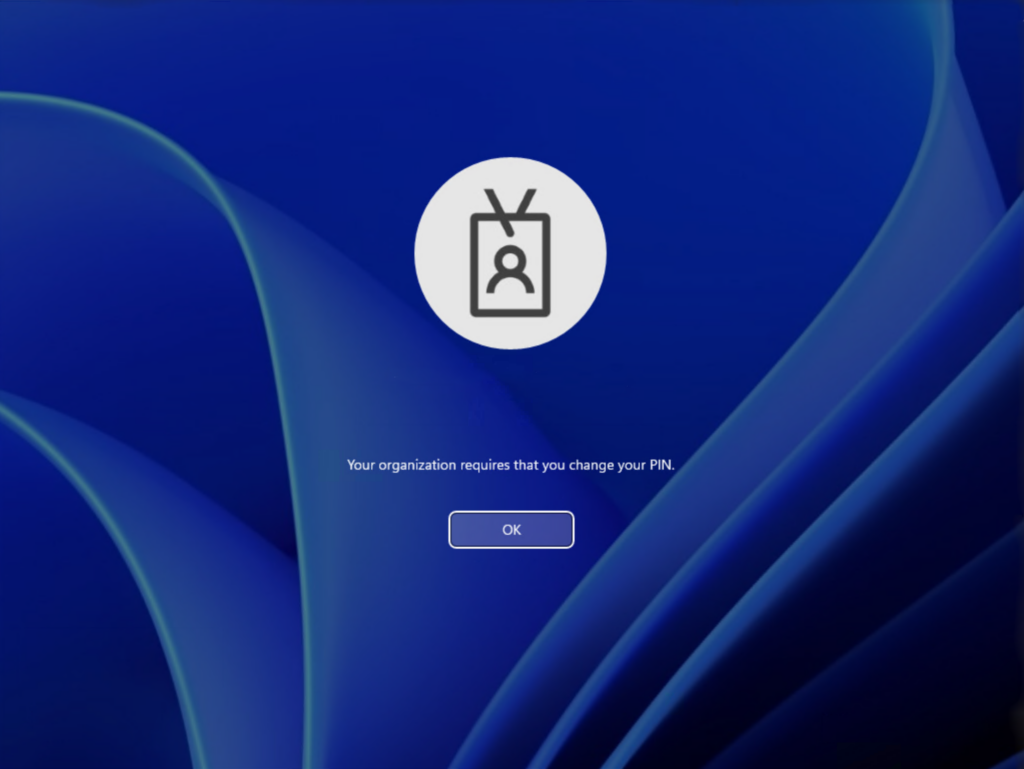
First, when a Hello for Business policy is applied on a computer, the credential provider (~the login screen asking for PIN) is disabled for the user until WHfB enrollment. This means that the user will be asked for password instead of PIN – this may result in failed logon attempts, because users will probably enter their PIN “as usual”. Another issue that you may encounter is related to the previous and the applied PIN policy. Based on my experience, the WHfB enrollment process is prompting the current PIN and tries to set it as the new PIN (from a user experience standpoint, this was a clever decision from Microsoft), but if the new policy requires a more complex PIN, the process may encounter an error (0x801c0026 not documented here)
Convenience PIN migration to Hello for Business PIN error
This error is handled by the logon screen:
Detecting Hello usage As problems may occour with Hello to WHfB migration, it’s a good idea to have an inventory about Hello users. On every device, each Hello registration is stored under the following registry hive: HKEY_LOCAL_MACHINE\SOFTWARE\Microsoft\Windows\CurrentVersion \Authentication\LogonUI\NgcPin\Credentials\<userSID>
It’s up to your creativity how you collect this information and translate the SIDs to some human readable format 🙂
Microsoft is rolling out the managed conditional access policies (link) gradually and I wanted to know how it is going to impact the users (which users to be exact). Apparently, if the Sign-in logs are not streamed to a Log Analytics Workspace, the options are limited – but if you have the AADSignInEventsBeta table under Advanced hunting on the Microsoft Defender portal, some extra info can be gathered.
Streaming Entra logs to Log Analytics gives wonderful insights (not only for Conditional Access), so it is recommended to set up the diagnostic settings. If it is not an option, but the AADSignInEventsBeta is available (typically organizations with E5 licences), then the following query will show those sign-ins that would have been impacted by a report-only Conditional Access policy:
AADSignInEventsBeta
| where LogonType has "InteractiveUser"
| mv-apply todynamic(ConditionalAccessPolicies) on (
where ConditionalAccessPolicies.result == "reportOnlyInterrupted" or ConditionalAccessPolicies.result == "reportOnlyFailure"
| where ConditionalAccessPolicies.displayName has "Microsoft-managed:" //filter for managed Conditional Access policies
| extend CADisplayName = tostring(ConditionalAccessPolicies.displayName)
| extend CAResult = tostring(ConditionalAccessPolicies.result))
| distinct Timestamp,RequestId,Application,ResourceDisplayName, AccountUpn, CADisplayName, CAResult
Note: in the AADSignInEventsBeta table, the ConditionalAccessPolicies is a JSON value stored as a string so the todynamic function is needed.
Note2: Since every Conditional Access policy is evaluated against each logon, the query first filters for those sign-ins where the report-only result is ‘Interrupted’ or ‘Failure’, then the policy displayname is used to narrow down the results. Starting the filter with displayName would be pointless.
Some example summarizations if you need to see the big picture (same query as above but the last line can be replaced with these ones): View impacted users count by application: | summarize AffectedUsersCount=dcount(AccountUpn) by Application, CADisplayName, CAResult Same summarization in one day buckets: | summarize AffectedUsers = dcount(AccountUpn) by bin(Timestamp,1d), CADisplayName, CAResult List countries by result: | summarize make_set(Country) by CADisplayName, CAResult
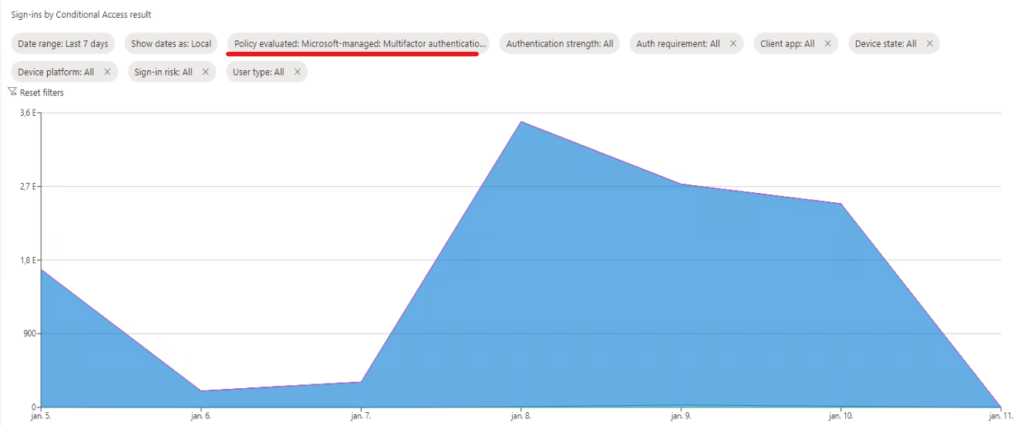
Other useful feature is the Monitoring (Preview) menu in Conditional Access – Overview:
Here we have a filter option called ‘Policy evaluated’ where report-only policies are grouped under the ‘Select individual report-only policies’ section. This gives an overview but unfortunately does not list the affected users.
When a Microsoft-managed policy is opened, this chart is presented under the policy info as well.
In the November 2023 – What’s New in Microsoft Entra Identity & Security w/ Microsoft Security CxE identity episode, a public preview feature of Entra Workload ID premium license was presented (link) which was actually announced on November 9th (link). I really love the idea of restricting application key credentials to a predefined list of Certificate Authorities, this is why I thought to write some words about it.
TL;DR – You can generate a report on current keyCredentials usage (with certificate Issuer data) using the PowerShell script below (Graph Powershell used here) [no extra license needed] – First, you create a certificateBasedApplicationConfigurations object – Then you can modify the defaultAppManagementPolicy or create an appManagementPolicy and apply it directly to one or more application objects (for the latter, tutorial below) – These configurations require Entra Workload ID premium license
Reporting on application key credentials
The linked announcements are highlighting how to set the defaultAppManagementPolicy, but before setting this, you may want to know which applications are using certificates to authenticate and which CA issued these certs. This way, you can first change the certificates to the ones you trust, then you can set up the restriction(s). The following script lists these applications and the Issuer of each certificate (for the sake of simplicity, I use the Invoke-MgGraphRequest command)
The result will look like this (yes, I use self-signed certificates in my demo environment 🙈):
Example result from reporting script
Note: the Issuer field may not be 100% reliable as it can be inserted manually when creating the self-signed certificate. The following method will show each certificate in the trust chain ($cred variable comes from the foreach loop above):
To restrict application keyCredentials, the following should be kept in mind (annoncement link again): – The policy applies only to new credentials, it won’t disable current keys – At least one root CA needs to be declared and a chain can consist of a max of 10 objects – First, you create a certificateBasedApplicationConfigurations object (~the trusted cert chain) – Next, you can modify the defaultAppManagementPolicy to restrict all keyCredentials to this/these trusted CAs (as demonstrated on the linked page) – OR you can create a separate appManagementPolicy to restrict the trusted CA THEN this policy can be applied directly to one or more applications (steps below)
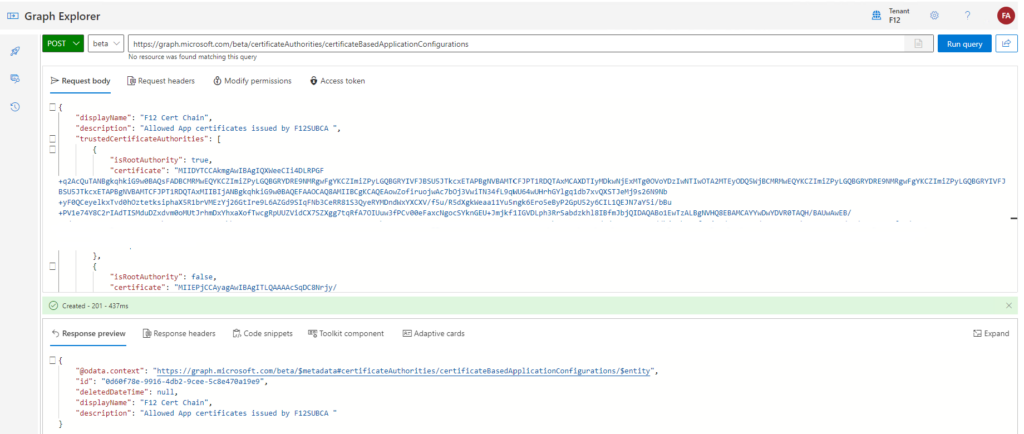
Creating the certificateBasedApplicationConfigurations object
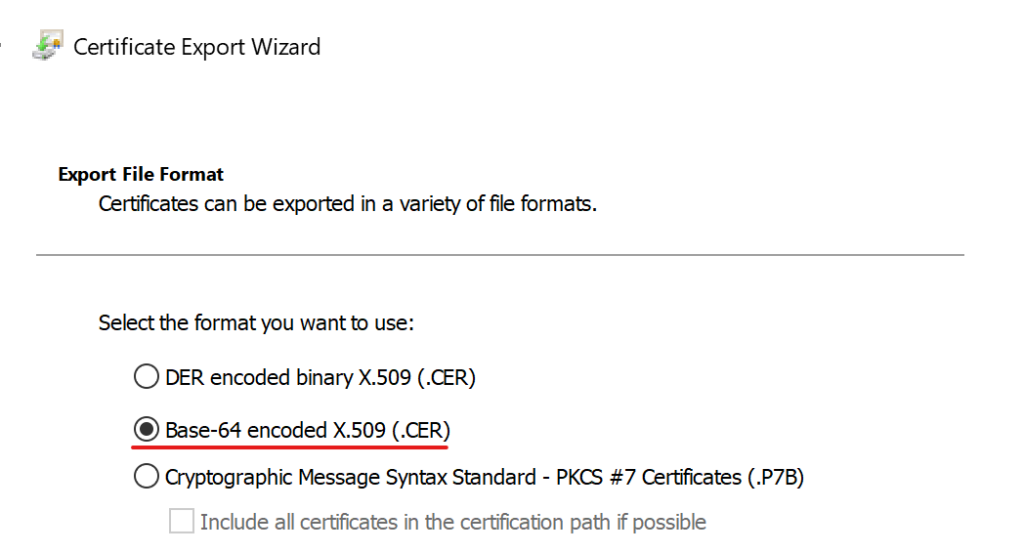
In this example, I’m going to use Graph Explorer to create the object. As a Windows user, I will simply export my issuing CA’s (F12SUBCA01) certificate and it root CA’s (ROOTCA01) certificate to a Base-64 encoded CER file using the certlm.msc MMC snap-in, open them in Notepad and copy the contents to the Graph Explorer call’s Request body. Find the issuing CA’s cert, then right-click – All Tasks – Export:
Select “Base-64 encoded X.509 (.CER)” as export file format.
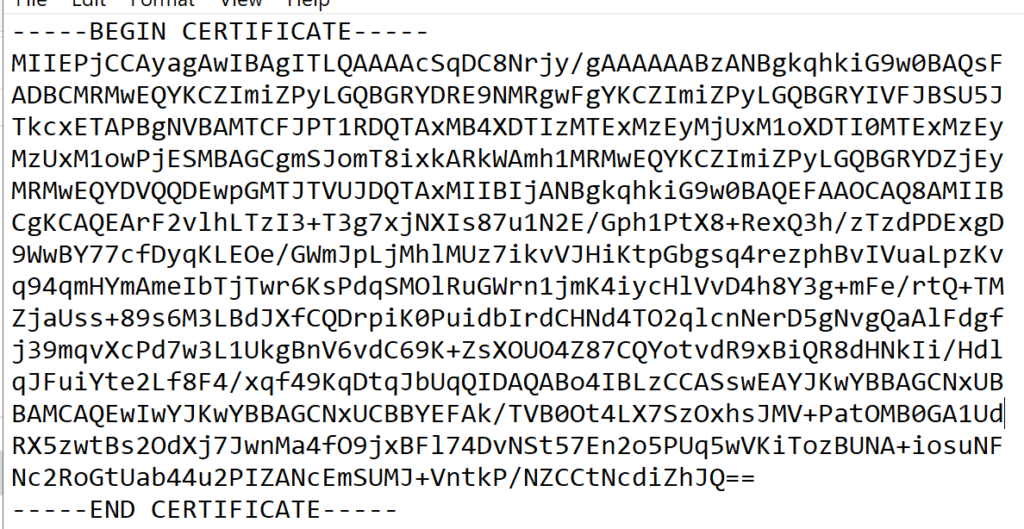
Repeate the same steps for each certificate in the chain. Now, open the cer files with notepad, remove the ‘—–BEGIN CERTIFICATE—–‘ and ‘—–END CERTIFICATE—–‘ lines and every line-breaks
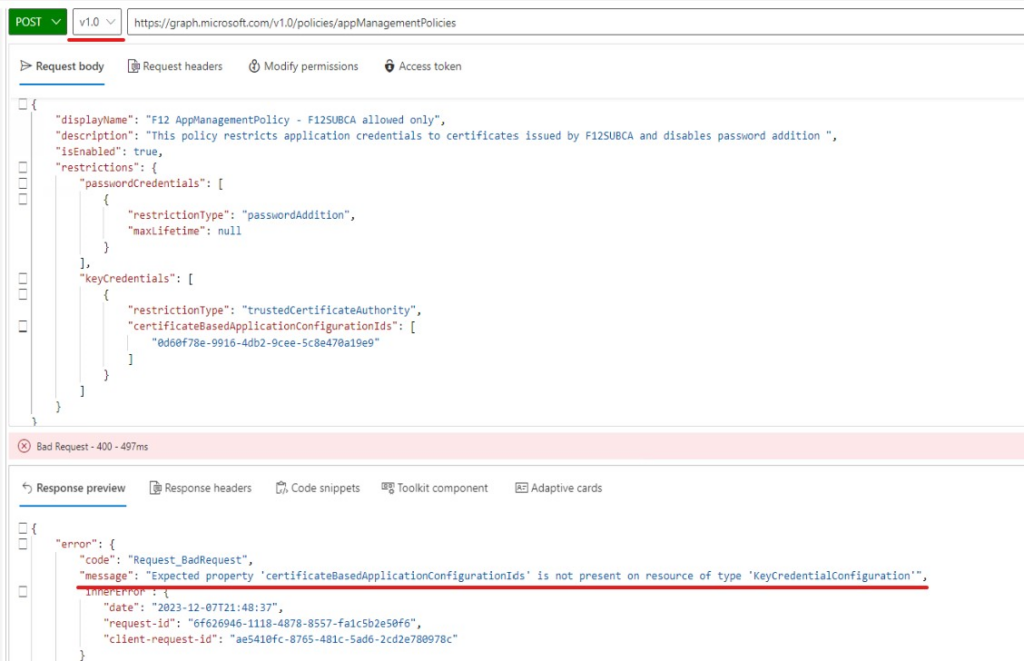
These values will be used in the payload sent to Microsoft Graph. CAUTION! Use the beta endpoint for now as it is a preview feature. If you accidentally use the v1.0 endpoint, you will encouter issues (example below)
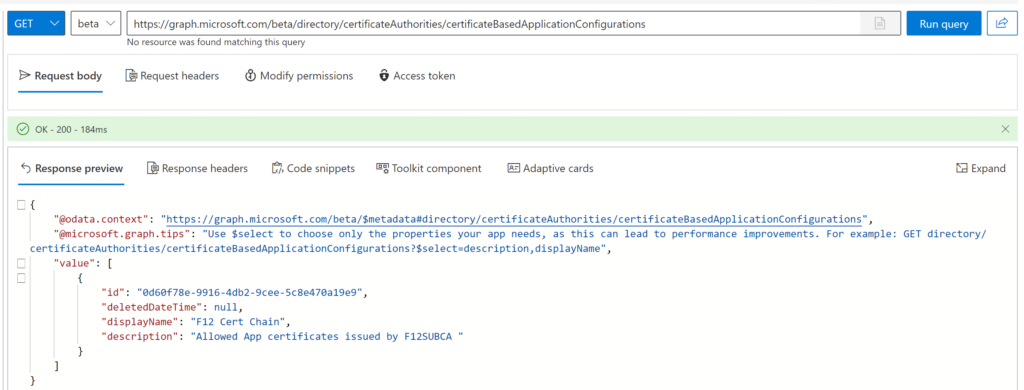
If everything was inserted correctly, the response includes an id, take a note of it. If you did not manage to take it, no problem, you can query these configurations as follows:
METHOD: GET
ENDPOINT: beta
URI: https://graph.microsoft.com/beta/directory/certificateAuthorities/certificateBasedApplicationConfigurations
List configuration objects
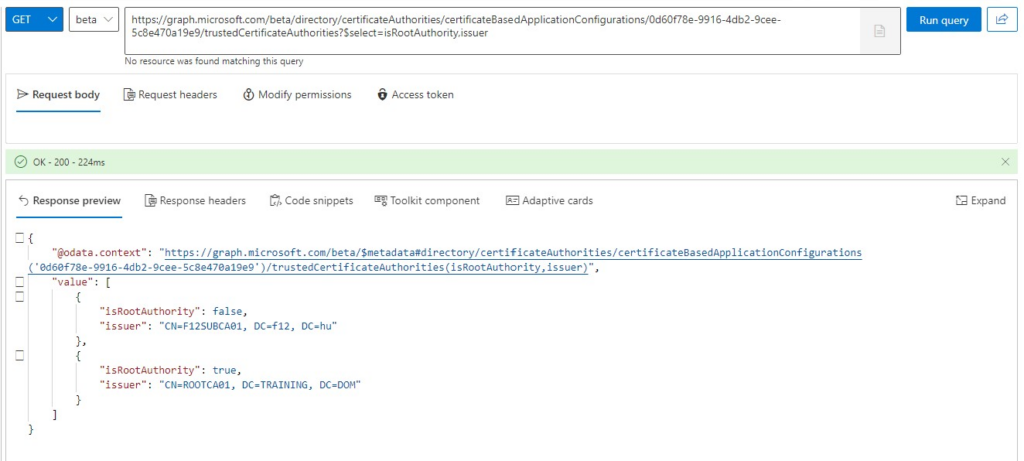
Note: when you dig further, the CA information can be queried for each configuration id, for example (you can omit the ‘?$select=isRootAuthority,issuer’ part if you want to check the certificate data too:
METHOD: GET
ENDPOINT: beta
URI: https://graph.microsoft.com/beta/directory/certificateAuthorities/certificateBasedApplicationConfigurations/<configurationID>/trustedCertificateAuthorities?$select=isRootAuthority,issuer
Creating the appManagementPolicy object
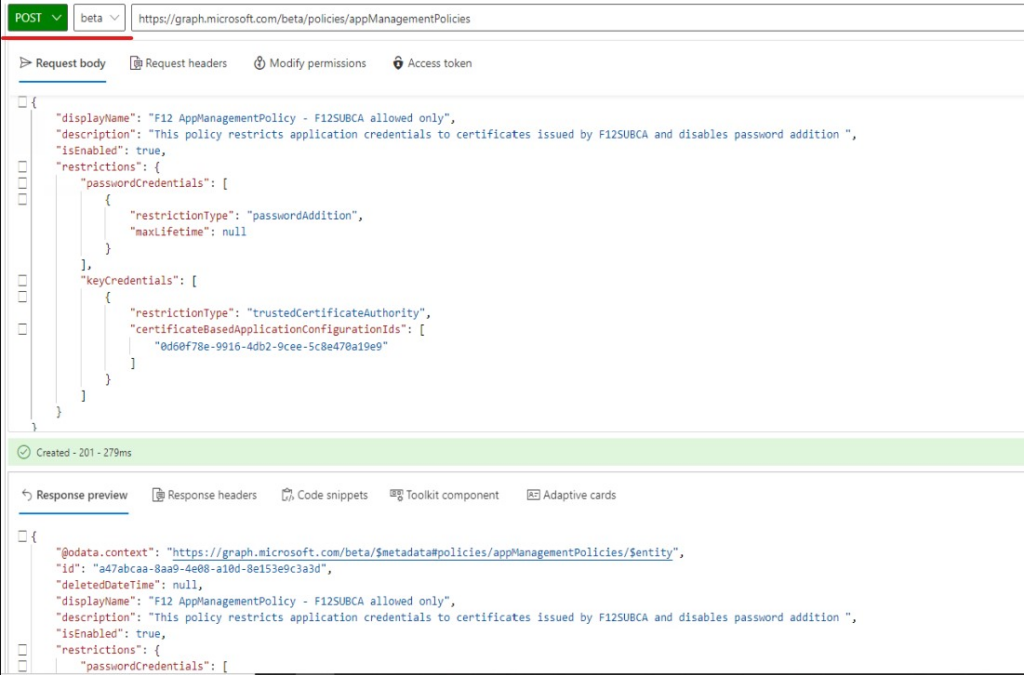
Now that we have the CA configuration, the next step is to create the appManagementPolicy object (if you are not going to apply it in the defaultAppManagementPolicy). The appManagementPolicy can contain restrictions for passwordCredentials and KeyCredentials. In this example, I’m going to create a policy that prohibits passwordCredentials and restricts key credentials to the trusted CA configuration defined above.
METHOD: POST ENDPOINT: BETA URI: https://graph.microsoft.com/v1.0/policies/appManagementPolicies REQUEST BODY: {
“description”: “This policy restricts application credentials to certificates issued by F12SUBCA and disables password addition “,
“isEnabled”: true,
“restrictions”: {
“passwordCredentials”: [
{
“restrictionType”: “passwordAddition”,
“maxLifetime”: null
}
],
“keyCredentials”: [
{
“restrictionType”: “trustedCertificateAuthority”,
“certificateBasedApplicationConfigurationIds”: [
“0d60f78e-9916-4db2-9cee-5c8e470a19e9”
]
}
]
}
}
Creating the appManagementPolicy object
Take a note of the id given in the response as it will be used in the final step.
NOTE: if you accidentally use the v1.0 endpoint, you will encounter issues like this:
“Expected property ‘certificateBasedApplicationConfigurationIds’ is not present on resource of type ‘KeyCredentialConfiguration'”
Applying the policy to an application
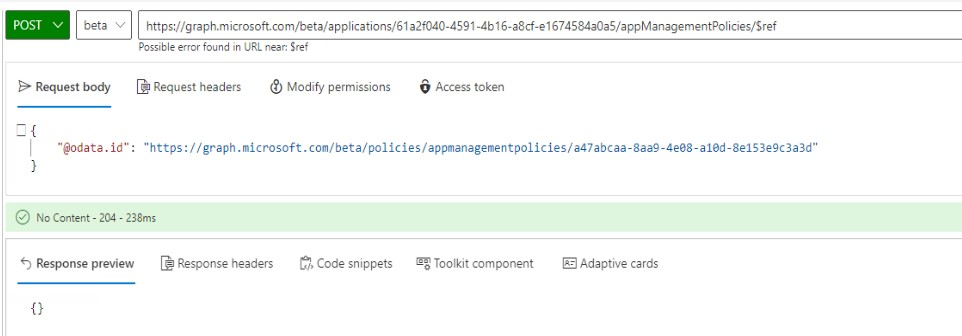
Finally, the policy needs to be applied to an application, as follows:
METHOD: POST
ENDPOINT: BETA
URI:https://graph.microsoft.com/beta/applications/<objectID of application>/appManagementPolicies/$ref
REQUEST BODY:
{
    "@odata.id": "https://graph.microsoft.com/beta/policies/appmanagementpolicies/<appManagementPolicyID>"
}
Applying the policy to an application
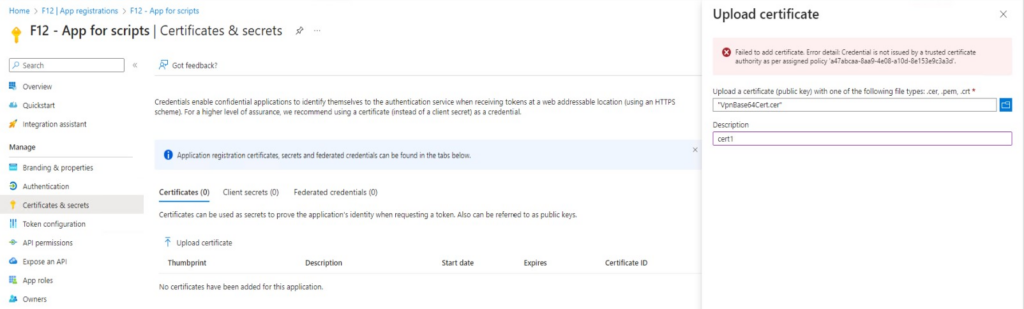
The result for this application:
Uploading a certificate not issued by the trusted CA fails
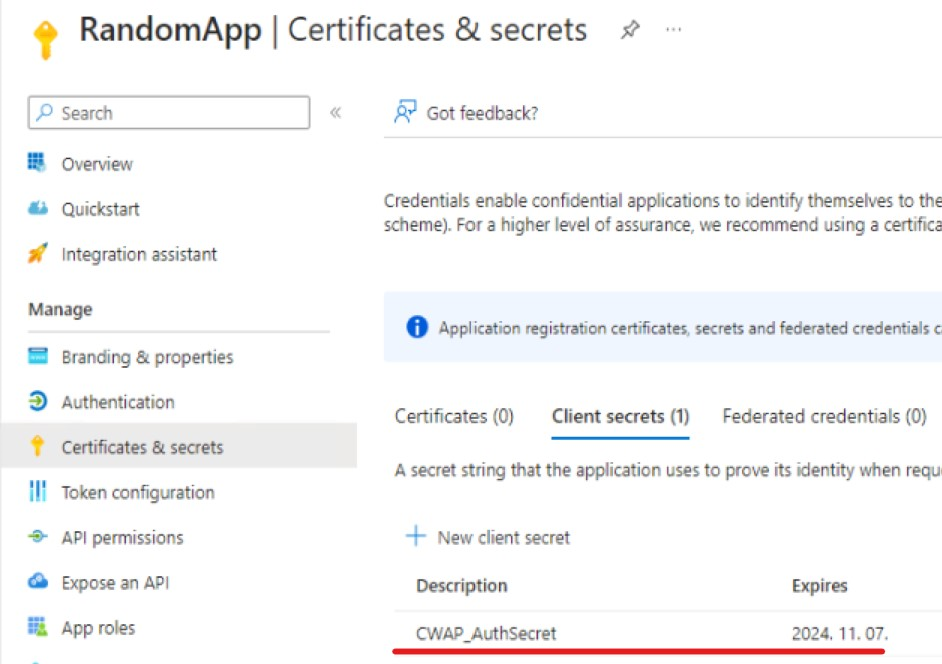
Adding new client secret option is greyed out
Closing words: it is a bit cumbersome to configure these settings, but the result is purely satisfying 😊 I hope, once it goes GA it will get some graphical interface to ease the process.
Back in the days, I wrote about the Entra Workload Identities Premium licence and it’s very appealing capabilities (link). One of my favorites was the defaultAppManagementPolicy which can (also) restrict the lifetime of (new) password credentials created for an application. Well, it looks like I was too restrictive which led to the error message in the title.
TL;DR
When you publish an application via EntraID Appliction Proxy, the application is generated with a password credential valid for 1 year (actually 365 days + 4 minutes)
if you have Workload Identites Premium licence* and have set the default password credential lifetime to 12 months or less, Entra ID will not be able to create the Application Proxy application resulting in this very informative error message upon application creation: ‘Application operation failed’
Conclusion: when using passwordLifetime restiction in the defaultAppManagementPolicy and you intend to use AppProxy, make sure to set this lifetime to at least 366 days
Explained
When publishing a new application via Entra ID Application Proxy, I encountered this very detailed and error message: ‘Application operation failed’
Error message during AppProxy application creation
I went through some previously published applications to get an idea what may be wrong… And on the ‘Certificates & secrets’ page I had a flashback about configuring password credentials policy, then I was on the right track with a small surprise.
When an application is published with Application Proxy, an app registration is created with a password credential.
There is nothing you can do about it (as far as I know), you just live with it – it is handled by Microsoft automatically, I guess.
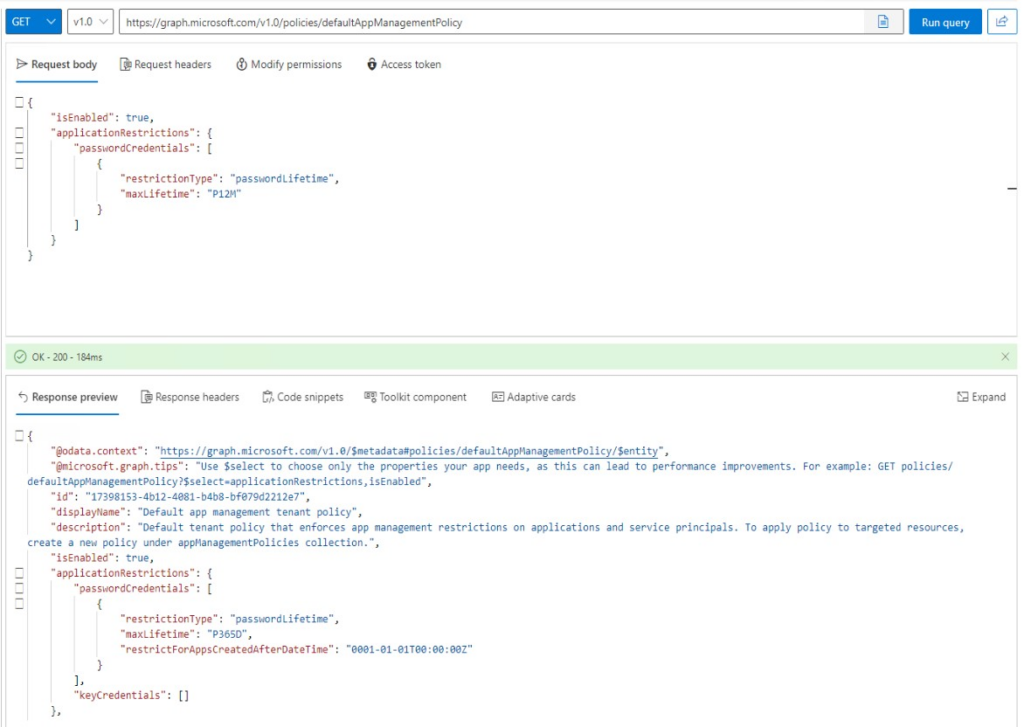
When you create a passwordLifetime policy specifying 12 months of lifetime, it is automatically translated to 365 days in the policy. On the next screenshot you can see my previous PATCH payload for defaultAppManagementPolicy which was followed by a GET to countercheck the settings:
passwordLifetime set to P12M which is translated to P365D
Remark: 12 months is not neccessarily 365 days (leap years!) This may cause issues in automations too when attempting to create a password valid for 1 year/12 months, which is 366 days in this case.
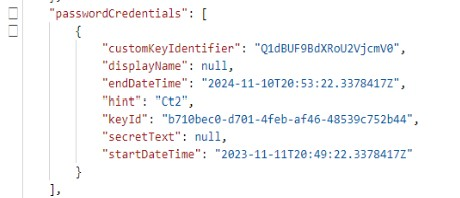
The point is that even if you set this lifetime to P12M (12 months) or P365D (365 days) this will prevent Application Proxy from adding the password credential, because the expiration for this password is set to T+365 days+4 minutes:
PasswordCrendetial endDateTime and startDateTime for an app published with Application Proxy
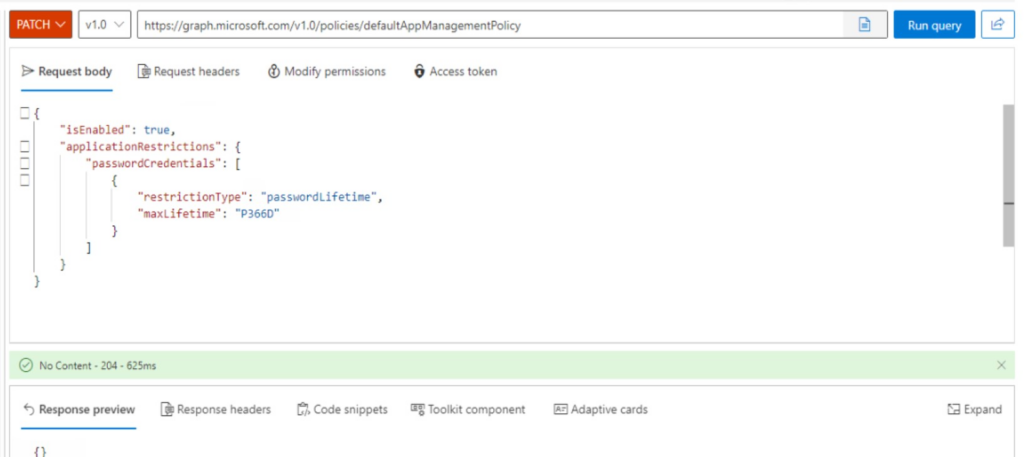
To get over this issue, modify the defaultAppManagementPolicy to allow 366 days of lifetime for a password credential:
Modifying the maxLifetime to 366 days
Now the application is successfully published:
*I used a trial licence back in those days to set up the policies…when the trial licence expires, these policies remain effective, but you will not be able to modify these settings – so you have to buy a licence to roll back these changes. So be cautious when playing with settings tied to a trial licence 🙃
I spent ‘some’ time exploring this web sign-in thing and thought to share the results of my research.
History
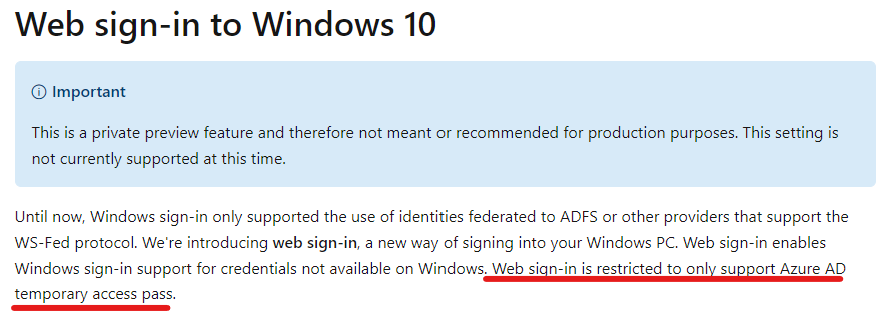
Web sign-in is available since Windows 10 1809 (link) as a private preview feature and it was restricted to TAP (temporary access pass)
There was a time when Web sign-in was not limited to TAP, so you could log in using your username + password or passwordless in the popup window (reference). But since this was a preview feature it was not recommended to use it in production.
Present
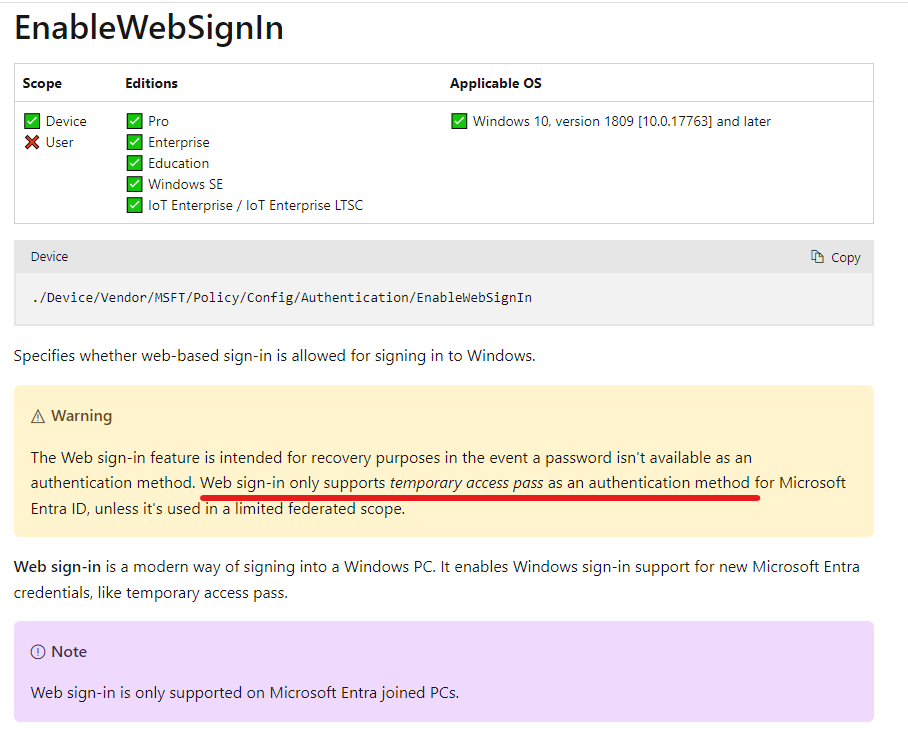
According to this documentation Web sign-in is available since Windows 11, 22H2 with KB5030310 (my experience is a bit different). According to the Authentication policy CSP documentation, Web sign-in is restricted to TAP-only:
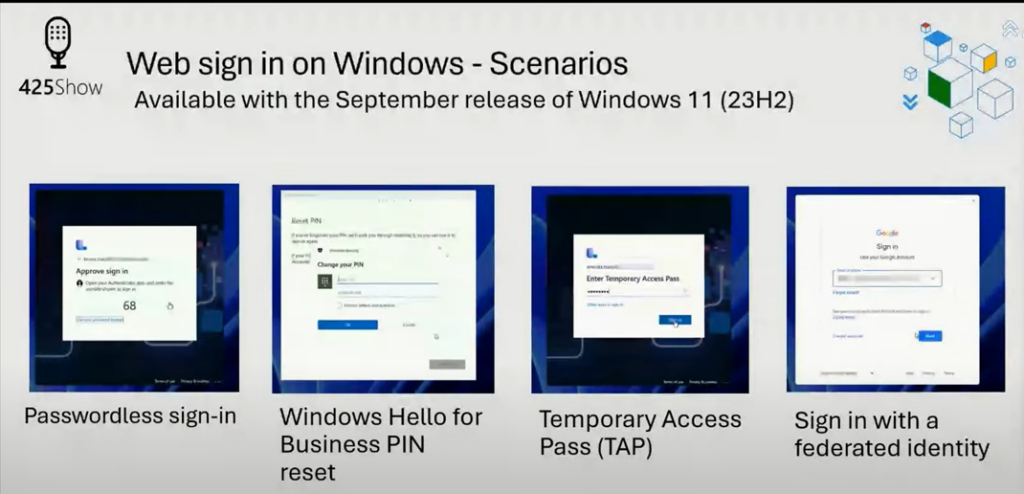
In the ‘October 2023 – What’s New in Microsoft Entra…’ video from The Microsoft 425Show (link) the option to use Web sign-in using a federated identity or passwordless sign-in is a feature of Windows 11 23H2 (expected to be released on November 14, 2023.)
While writing this article, I installed the KB5031455 update on a test machine which enabled Web sign-in that is not restricted to TAP-only.
Anyways, I guess at some point in time this will be available for everybody, so let’s see what an IT admin should know about this new way to sign in.
Basics
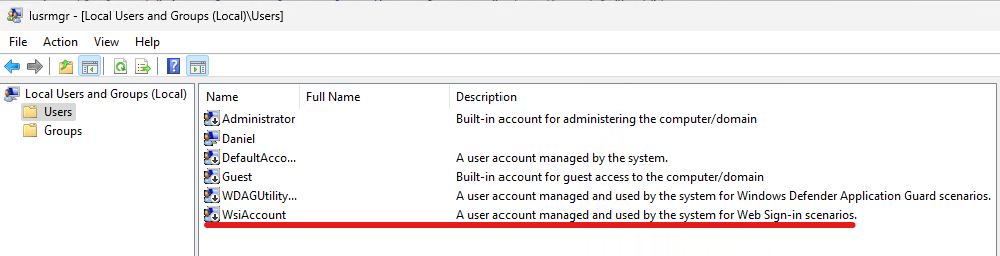
Web sign-in is only available on AzureAD (Entra) joined devices, Hybrid joined devices can’t benefit from it
Internet connectivity is required as the authentication is done over the Internet
Web sign-in is a credential provider (like the password, PIN or smartcard provider you see on the login screen), authentication provider is still the AAD Token Issuer
Credential Providers can be found in registry here: Computer\HKEY_LOCAL_MACHINE\SOFTWARE\Microsoft\Windows\ CurrentVersion\Authentication\Credential Providers
When using passwordless option in Web sign-in, the Primary Refresh Token will get the MFA claim since it is a multi-factor authentication mechanism.*
Experience: Web sign-in also allows you to use username+password login – but in this case the MFA claim is not present (so when accessing a resource to which a Conditional Access policy requires MFA, then the users will be prompted). This is because “Windows 10 or newer maintain a partitioned list of PRTs for each credential. So, there’s a PRT for each of Windows Hello for Business, password, or smartcard. This partitioning ensures that MFA claims are isolated based on the credential used, and not mixed up during token requests.” (link). So this is not an option to bypass MFA 🙂
In my opinion, web sign-in is not intended to be the primary authentication method for a regular use device (one device-one user). This can be used as part of the passwordless journey (before Windows Hello for Business enrollment) and/or on shared devices (where WHfB is not an option but you want to provide a passwordless solution).
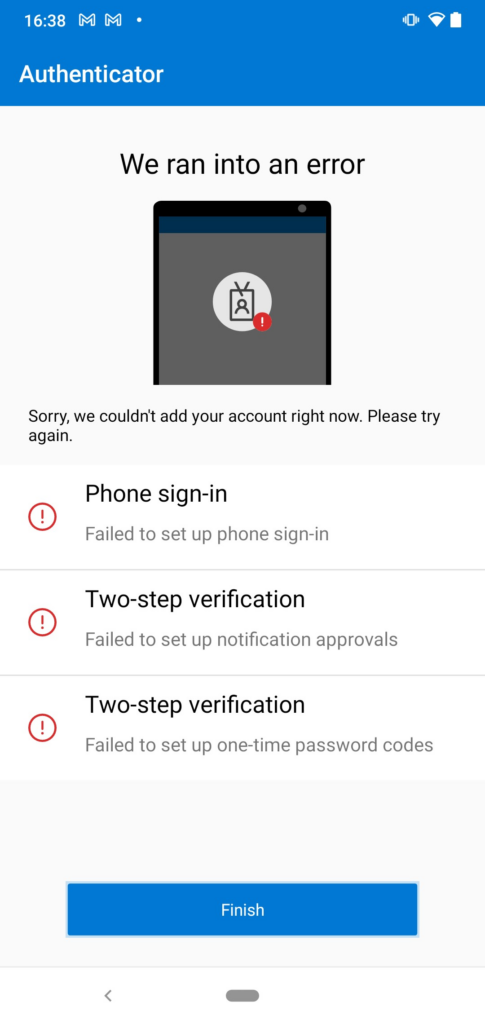
* I was wondering if ‘passwordless’ is truly an MFA mechanism, because ‘passwordless’ is not neccessarily MFA by design. It is just one factor in the authentication process (‘something you own’ = the device you use to authenticate) – but in the case of ‘Microsoft Authenticator passwordless’ the second factor (biometric or PIN) is enforced by the application (link). If you remove the PIN code and/or the biometric data on the device which is already registered for passwordless, you break your passwordless registration:
Others than Basics
As per the documentation, you can turn it on using Intune or a provisioning package… what is not in the documentation (at least explicitly) is that it can be turned on using the MDM WMI Bridge provider (back in those days I used it a lot for AlwaysOn VPN deployment via SCCM).
When you are signing-in the traditional way you see interactive sign-in events for the user Application = Windows Sign In and Resource = Windows Azure Active Directory
When using Web sign-in, the interactive part is Application = Microsoft Authentication Broker and Resource = Device Registration Service
But what is interesting here is that straight after the interactive login, there is two additional non-interactive sign-ins, one is using the Windows-AzureAD-Authentication-Provider/1.0 UserAgent:
This timestamp is exactly the same as the AzureAdPrtUpdateTime from dsregcmd /status:
which is followed by a non-interactive Windows Sign In later:
Too much time spent for just a few valuable information… But “it’s not about the destination, it’s about the journey”.
So recently I was planning on requiring authentication stenghts in a Conditional Access policy – more precisely requiring Windows Hello for Business – when I realized that I’m not 100% sure that every user will meet this requirement. I wanted to make sure everybody has WHfB enrollment and that it is actively in use – so let’s see the process.
Note: I will use ‘Hello’ for simplicity, but don’t confuse Windows Hello with Windows Hello for Business – two totally different things.
TL;DR
Having a Hello for Business enrollment does not necessarily mean that it is actively used or that it is even a “valid” enrollment
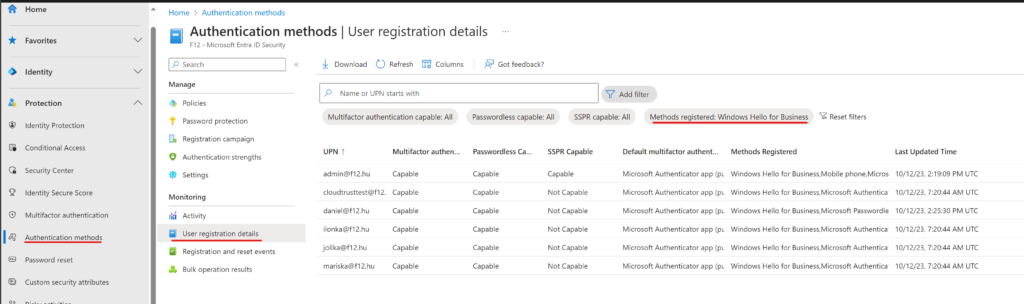
Entra portal – Protection – Authentication methods – User registration details can be used to filter for those who have Hello
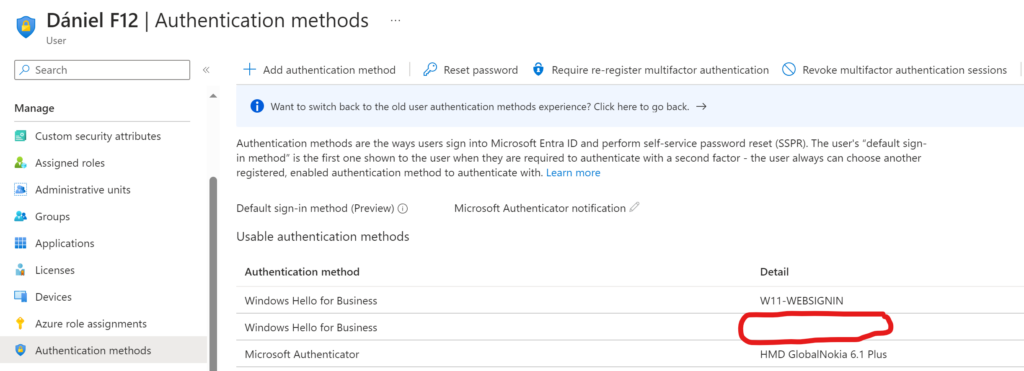
For a particular user, the Authentication methods blade can give information about Hello device registrations
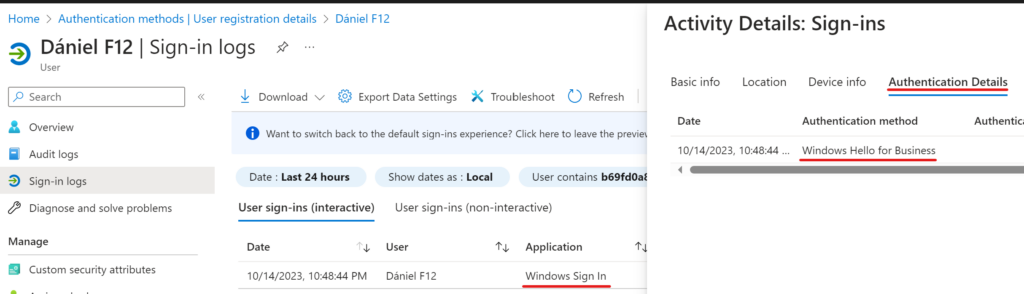
Filtering the Sig-in logs to “Windows Sign In” application can give some overview about Hello usage
I wrote a script to have all this info in one ugly PowerShell object
First of all, I want to highlight this section from MS documentation:
Windows 10 or newer maintain a partitioned list of PRTs for each credential. So, there’s a PRT for each of Windows Hello for Business, password, or smartcard.This partitioning ensures that MFA claims are isolated based on the credential used, and not mixed up during token requests.
It means that when you log in to Windows using your password, the PRT used will not get the MFA claim even if the user has Hello registration on the device. And it can happen that the user reverts to password usage [eg. forgot the PIN code, the fingerprint reader didn’t recognize him/her, etc.] – and Windows tends to ask for the last credential used* – so Bye-bye Hello and hello again Password (sorry for this terrible joke).
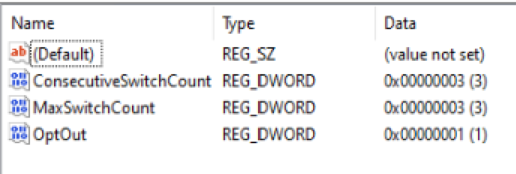
*Update: This behaviour is controlled by the NgcFirst registry key, in the following hive: HKLM\Software\Microsoft\Windows\Currentversion\Authentication\CredentialProviders\{D6886603-9D2F-4EB2-B667-1971041FA96B}\<usersid>\NgcFirst There is a ConsecutiveSwitchCount counter, which increases by 1 when the user logs in using a password. Also here, you can find the MaxSwitchCount DWORD which is set to 3 by default. When the user uses password login 3 times in a row, then it is considered an Opt-out, which is visible in the OptOut entry (set to 1)
User opted out from Windows Hello for Business authentication
But let’s get back to square one: when you open the Authentication methods blade on Entra, you have the User registration details which can be used to list users with Hello:
User registration details filtered to Hello registrations
Let’s open one user to see the devices registered:
Authentication methods for one user
Yes, sometimes the Detail column is not showing the computer name – however, if you click on the three dots menu and select View details, you can see the device Id and object Id – very user friedly, isn’t it?
Hello registration details
Note: when a device is deleted, the registration will remain but it will not be tied to any device
And the last piece is the sign-in log: if you filter the sign-ins to application “Windows Sign In” and open the entries, the Authentication Details will reveal the method used:
Windows Sign in event using Hello
My requirement was to have a table about each Hello registration for every user and a timestamp of the last Hello sign-in event. This is why I wrote the following script (assuming you use Graph Powershell in your environment):
Note: to find the HelloForBusinessMethodLastUsed value, the script is querying the sign-in logs which will take some time in a larger environment.
Note2: if the DeviceID field equals 00000000-0000-0000-0000-000000000000, then this is a Hello registration that is not corresponding to any Entra joined device – probably the device was deleted. You may want to review these entries and delete them.
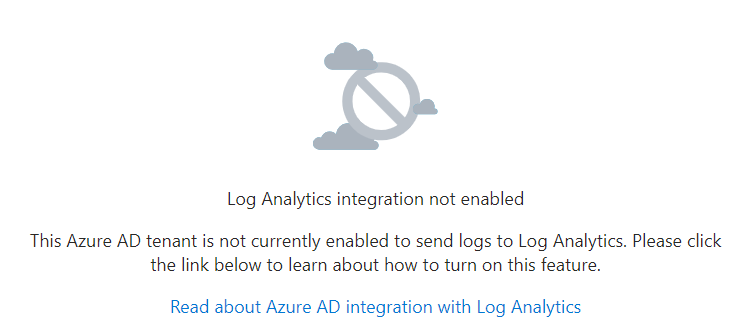
Recently, John Savill* uploaded a video on this very cool feature and I thought to give it a try when I realized I have no Log Analytics integration enabled, so no Workbooks for me 🙁 [*big fan of John’s videos, pure gold]
This is not fair to those who only use Microsoft 365 products or who are prevented from enabling the integration due to some circumstances – that’s why I decided to look for a workaround.
TL;DR
When you have the correct licences (AAD P2 and any Defender licence I guess) there is a table in Advanced Hunting on the Microsoft 365 Defender portal, called “AADSignInEventsBeta” (MS doc)
This table is intented to be a temporary offering, but has almost the same information as the SigninLogs table that you get with Log Analytics integration
The queries used by the Gap Analyzer workbook are available on github, here
Below you can find the queries aligned to the AADSignInEventsBeta table’s schema
Disclaimer: I tried to validate every query in my demo environment, but some may require fine-tuning (especially because there are some columns that are not well documented, so values are set as per my testing – see notes under each query). Also, don’t forget to set the query range according to your needs:
Users Signing-In Using Legacy vs. Modern Authentication
AADSignInEventsBeta
| where LogonType has "InteractiveUser"
| project ClientAppUsed, ErrorCode, ConditionalAccessPolicies, AccountDisplayName
| where ConditionalAccessPolicies != "[]"
| where ErrorCode == 0
| extend filterClientApp = case(ClientAppUsed != "Browser" and ClientAppUsed != "Mobile Apps and Desktop clients", "Legacy Authentication", "Modern Authentication")
| summarize count() by AccountDisplayName, filterClientApp
| summarize Count = count() by filterClientApp
Note: The Gap Analyzer workbook uses the SignInLogs table which contains only the interactive sign-in logs while the AADSignInEventsBeta has both the interactive and the non-interactive logs – that’s why every query starts with a LogonType filter for InteractiveUser.
Users Using Legacy Authentication by Application
AADSignInEventsBeta
| where LogonType has "InteractiveUser"
| project ClientAppUsed, Application, ConditionalAccessPolicies, ErrorCode, AccountDisplayName
| where ClientAppUsed != "Browser" and ClientAppUsed != "Mobile Apps and Desktop clients"
| where ConditionalAccessPolicies != "[]"
| where ErrorCode == 0
| summarize count() by AccountDisplayName, Application
| summarize Count = count() by Application
Users using Legay Authentication
AADSignInEventsBeta
| where LogonType has "InteractiveUser"
| project ClientAppUsed, Application, ConditionalAccessPolicies, ErrorCode, AccountDisplayName
| where ClientAppUsed != "Browser" and ClientAppUsed != "Mobile Apps and Desktop clients"
| where ConditionalAccessPolicies != "[]"
| where ErrorCode == 0
| summarize count() by AccountDisplayName, Application, ClientAppUsed
| project-away count_
{user} legacy authentication sign-ins to {app} – this is an additional query to the previous one. Make sure you insert the Application and the AccountDisplayName values in the app and user variables
let app = "<Application>";
let user = "<AccountDisplayName>";
AADSignInEventsBeta
| where LogonType has "InteractiveUser"
| project AccountDisplayName, ClientAppUsed, Application, ConditionalAccessPolicies, ErrorCode, Timestamp, CorrelationId, NetworkLocationDetails, DeviceName, AadDeviceId, OSPlatform, Browser, UserAgent
| where ClientAppUsed != "Browser" and ClientAppUsed != "Mobile Apps and Desktop clients"
| where ConditionalAccessPolicies != "[]"
| where ErrorCode == 0
| where Application == app
| where AccountDisplayName == user
| project Timestamp, CorrelationId
Number of Users Signing In to Applications with Conditional Access Policies Not Applied
AADSignInEventsBeta
| where LogonType has "InteractiveUser"
| project Application, ConditionalAccessStatus, ErrorCode, AccountDisplayName, AuthenticationRequirement
| where ErrorCode == 0 // sign-in was successful
| where ConditionalAccessStatus == "2"
| where AuthenticationRequirement == "singleFactorAuthentication" // Sign-in was not MFA

| summarize Count = count() by Application, AccountDisplayName
| summarize count() by Application
Note: as per the documentation for the table, ConditionalAccessStatus == “2” means policies are not applied. Note2: the original query has the following clause: | where Status.additionalDetails != “MFA requirement satisfied by claim in the token” and Status.additionalDetails != “MFA requirement skipped due to remembered device” // Sign-in was not strong auth This detail is not available in the AADSignInEventsBeta table, but I guess this means that MFA was not required – which can be filtered using |where AuthenticationRequirement == “singleFactorAuthentication”. To be precise: if sign-in was successful, I guess it is more relevant if single factor was required than the actual authentication strenght
{User} sign-ins to {App} without CA coverage – this is an additional query to the previous one. Make sure you insert the Application and the AccountDisplayName values in the App and User variables
let App = "<Application>";
let User = "<AccountDisplayName>";
AADSignInEventsBeta
| where LogonType has "InteractiveUser"
| project Application, AccountDisplayName, ConditionalAccessStatus, ErrorCode, Timestamp, CorrelationId, DeviceName, AadDeviceId, OSPlatform, Browser, UserAgent, AuthenticationRequirement
| where ErrorCode == 0 // sign-in was successful
| where AuthenticationRequirement == "singleFactorAuthentication" // Sign-in was not MFA
| where ConditionalAccessStatus == "2"
| where Application == App
| where AccountDisplayName == User
| project Timestamp, CorrelationId, OSPlatform
High Risk Sign-In Events Bypassing Conditional Access Policies
AADSignInEventsBeta
| where LogonType has "InteractiveUser"
| project AccountDisplayName, ConditionalAccessStatus, RiskLevelDuringSignIn, ErrorCode, AuthenticationRequirement
| where AuthenticationRequirement == "singleFactorAuthentication" // Sign-in was not MFA
| where ErrorCode == 0 // sign-in was successful
| where RiskLevelDuringSignIn > 50
| summarize Count = count() by AccountDisplayName, RiskLevelDuringSignIn
| order by Count desc
Note: RiskLevelDuringSignIn column is not even documented, but based on my testing 10 = low, 50 = medium, 100 = high
Risky sign-Ins from {user} with no CA policies
let user = "<accountDisplayname>";
AADSignInEventsBeta
| where LogonType has "InteractiveUser"
| project Timestamp, ErrorCode, RiskLevelDuringSignIn, AccountDisplayName, Country, AuthenticationRequirement, DeviceName, AadDeviceId, OSPlatform, Browser, UserAgent, NetworkLocationDetails, Application, CorrelationId
| where ErrorCode == 0 // sign-in was successful
| where RiskLevelDuringSignIn > 0
| where AccountDisplayName == user
| where AuthenticationRequirement == "singleFactorAuthentication" // Sign-in was not MFA
| project Timestamp, Application, CorrelationId, Country, OSPlatform
Users With No Conditional Access Coverage by Location – summary
AADSignInEventsBeta
| where LogonType has "InteractiveUser"
| project AccountDisplayName, ConditionalAccessStatus, AuthenticationRequirement, ErrorCode, Country
| where ConditionalAccessStatus == "2"
| where AuthenticationRequirement == "singleFactorAuthentication" // Sign-in was not MFA
| where ErrorCode == 0
| summarize count() by Country, AccountDisplayName
| summarize Count = count() by Country
| order by Count desc
Users With No Conditional Access Coverage by Location
AADSignInEventsBeta
| where LogonType has "InteractiveUser"
| project AccountDisplayName, ConditionalAccessStatus, AuthenticationRequirement, ErrorCode, NetworkLocationDetails, Country
| where ErrorCode == 0 // sign-in was successful
| where ConditionalAccessStatus == "2"
| where AuthenticationRequirement == "singleFactorAuthentication" // Sign-in was not MFA
| extend Location = case(Country == "", "Unknown", Country)
| summarize Count = count() by AccountDisplayName, Location
| project-away Count
Named locations without Conditional Access Coverage
AADSignInEventsBeta
| where LogonType has "InteractiveUser"
| project AccountDisplayName, ConditionalAccessStatus, AuthenticationRequirement, ErrorCode, NetworkLocationDetails
| where ConditionalAccessStatus == "2"
| where AuthenticationRequirement == "singleFactorAuthentication" // Sign-in was not strong auth
| where ErrorCode == 0
| extend test = parse_json(NetworkLocationDetails)
| mv-expand test
| project test
| extend ["Named Location"] = tostring(test["networkNames"])
| summarize ["Sign-in Count"]=count() by ["Named Location"]
Users sign-ins from IPv6 addresses not assigned to a Named Location
AADSignInEventsBeta
| where LogonType has "InteractiveUser"
| project ConditionalAccessStatus, AccountUpn, Application, IPAddress, NetworkLocationDetails
| where IPAddress has ":"
| where NetworkLocationDetails has '[]'
| summarize ["Sign-in Count"] = count() by  IPAddress, NetworkLocationDetails
//| summarize Count = count() by IPAddress
| sort by ["Sign-in Count"] desc
| project-away NetworkLocationDetails
Users sign-ins from IPv6 addresses not assigned to a Named Location (Separated by application)
AADSignInEventsBeta
| where LogonType has "InteractiveUser"
| project ConditionalAccessStatus, AccountUpn, Application, IPAddress, NetworkLocationDetails
| where IPAddress has ":"
| where NetworkLocationDetails has '[]'
| summarize ["Sign-in Count"] = count() by  Application, IPAddress
//| summarize Count = count() by IPAddress
| sort by ["Sign-in Count"] desc
//| project-away NetworkNetworkLocationDetails
Disclaimer: the following configurations require Microsoft Entra Workload Identities Premium licence (link)
Note: This post is not strictly related to fighting client secret usage for apps. However, it may provide a basis for considering the purchase of Microsoft Entra Workload Identities Premium licence for at least those apps that use client secret.
In my previous posts I wrote about reviewing client secret usage (part1) and limiting app password lifetime (part2). This time I will protect one of my applications with Conditional Access policy using a location condition.
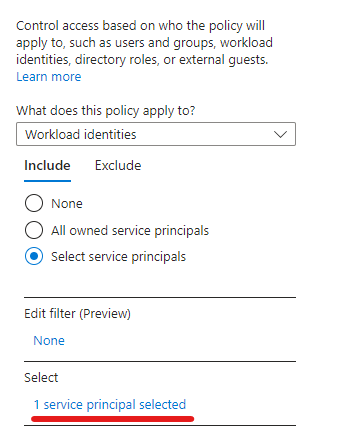
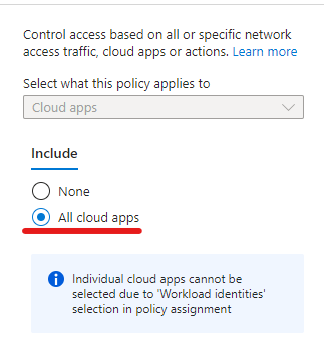
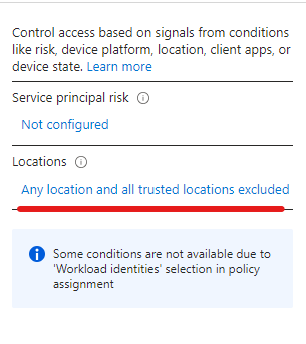
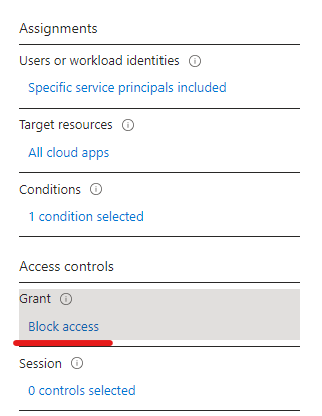
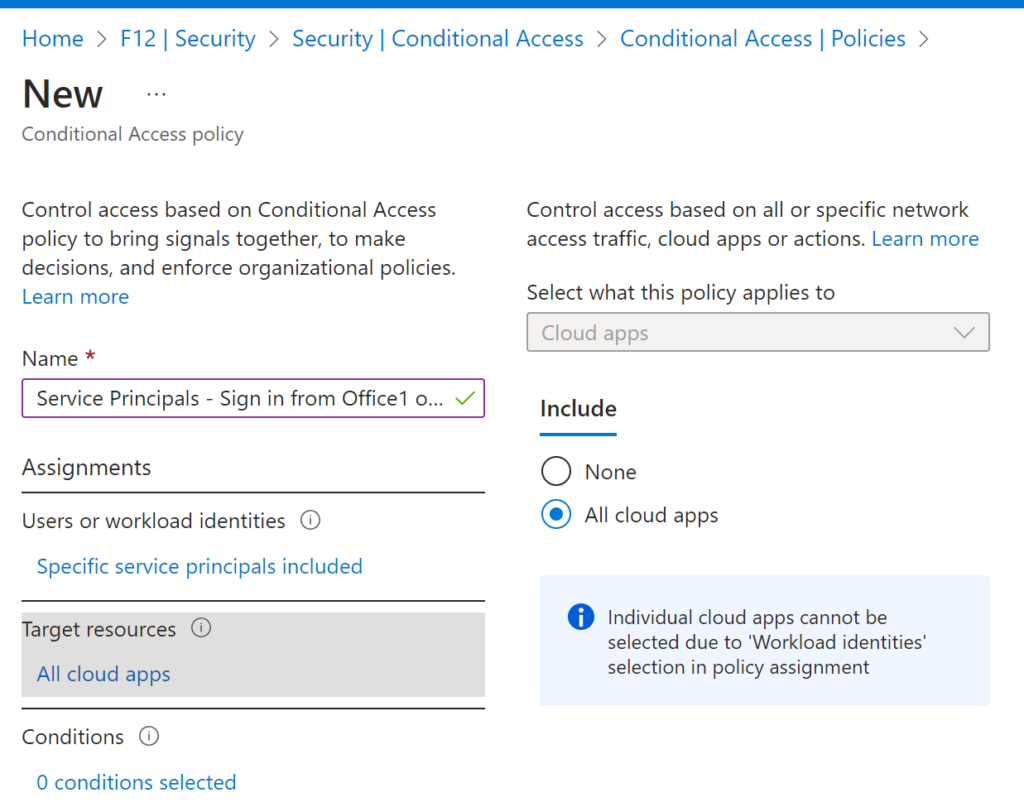
The process is very straightforward: create a CA policy, choose the service principal(s) to protect, select All cloud apps as Target resources, set up the location condition and the access controls. In my case it was simply blocking access from anywhere but the ‘Office’
Conditional Access policy settings to block access from untrusted locations
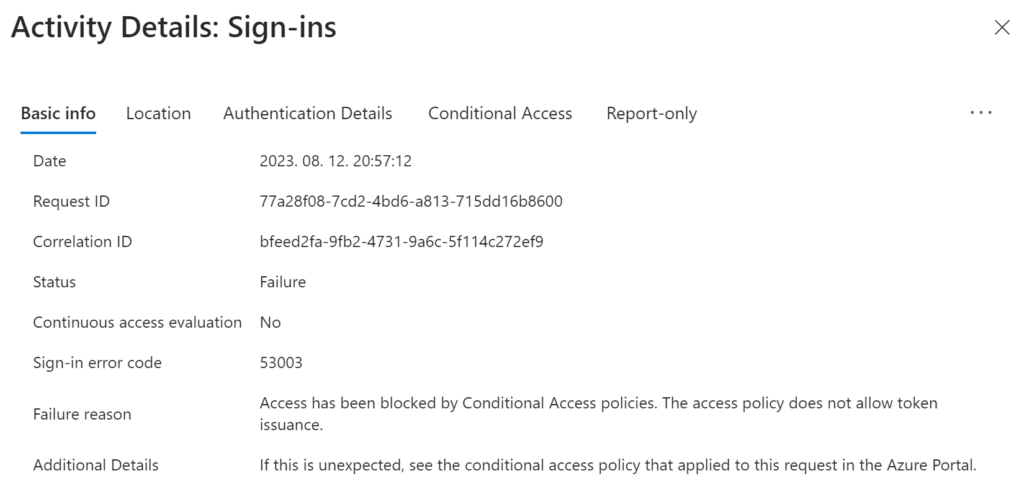
The result when trying to get a token outside the office:
Get-MsalToken : AADSTS53003: Access has been blocked by Conditional Access policies. The access policy does not allow token issuance.
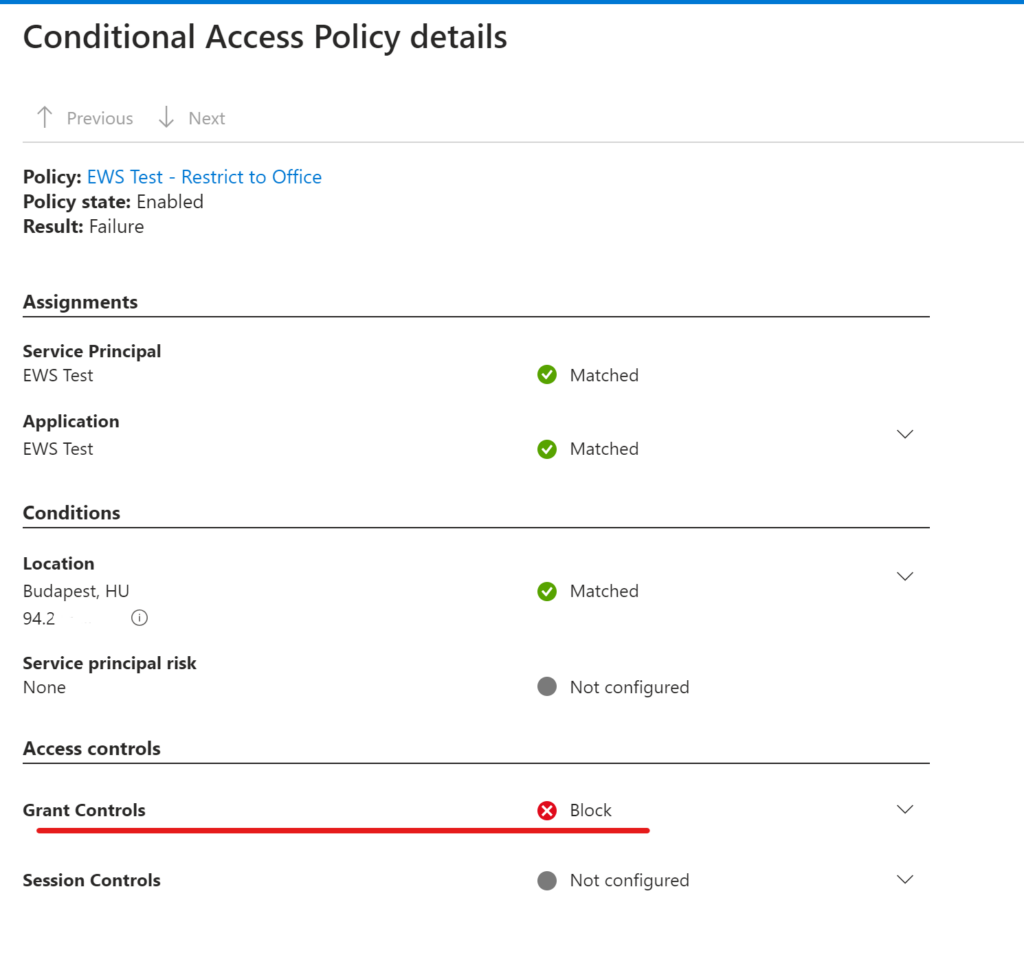
Looking at the Sign-in logs:
Okay, this is cool, but it is nothing more than implementing what is already documented by Microsoft (here). What I thought might be useful to share is to combine Workload identities conditional access with custom security attributes (preview feature at the time of writing).
Workload identity Conditional Access with Custom security attributes
Application custom security attributes (link) is an awesome feature and is a great way to “group” applications/service principals. In this demo, I will mark some service principals that are supposed to be used only in the office and nowhere else – and use this property as a filter for the CA policy.
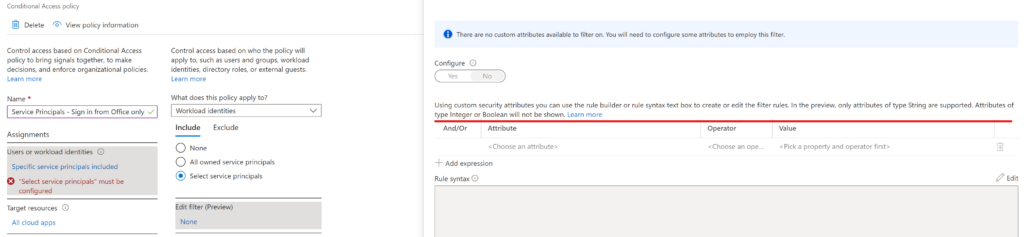
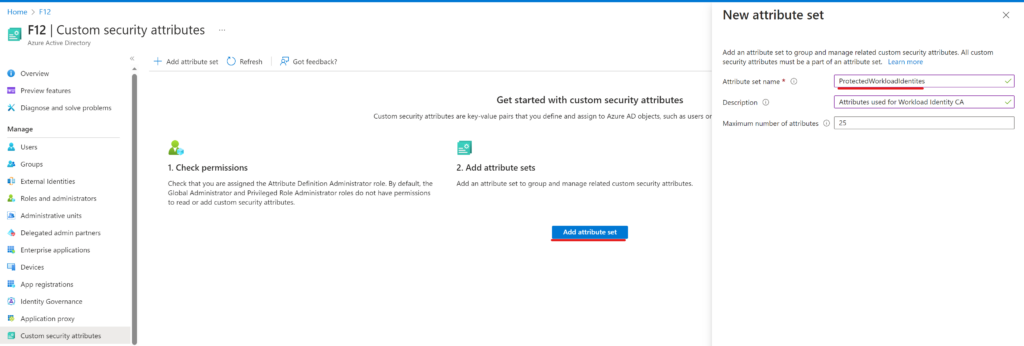
To add an attribute set you need to be assigned the Attribute Definition Administrator role (Global Admins do not have this permission by default, but they can assign it to themselves). Unfortunately Integer or Boolean attributes can’t be used for filtering*:
Using custom security attributes you can use the rule builder or rule syntax text box to create or edit the filter rules. In the preview, only attributes of type String are supported. Attributes of type Integer or Boolean will not be shown.
*My first idea was to mark applications with something like ‘CanOnlySignInFromOffice’ boolean attribute, but this restriction pushed me to a more sophisticated approach.
To overcome this restriction, I will create an attribute which will have a predefined set of sign-in-permitted locations (Office1, Office2… sorry for not being too creative here 🙂 ):
First, I created the ‘ProtectedWorkloadIdentites’ attribute set:
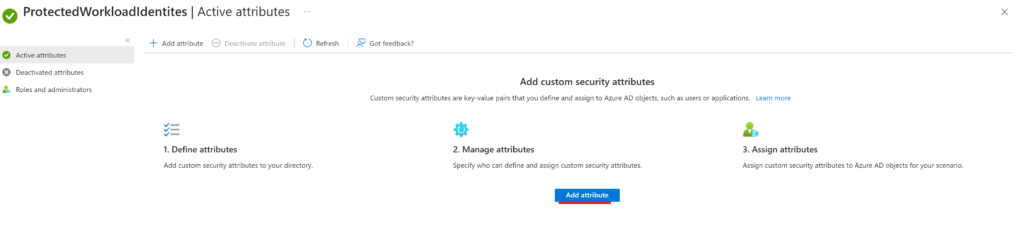
Next, click on Add attribute:
Then create the attribute (SignInRestrictedToNamedLocation) with String type, allowing only predefined values (hint: if value names are the same as the Named Locations it will be easier to administer):
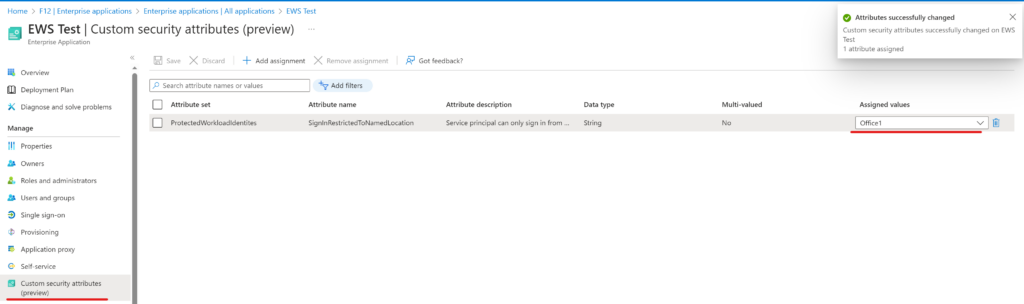
Next step is to assign the attribute to the service principal that should be restricted: Enterprise applications -> [app to be restricted] -> Custom security attributes
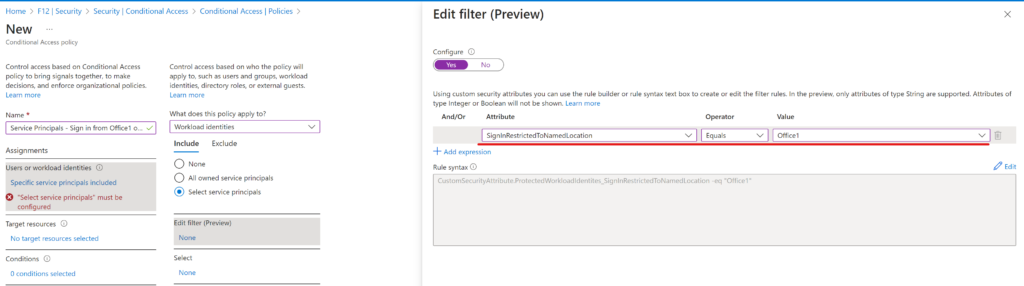
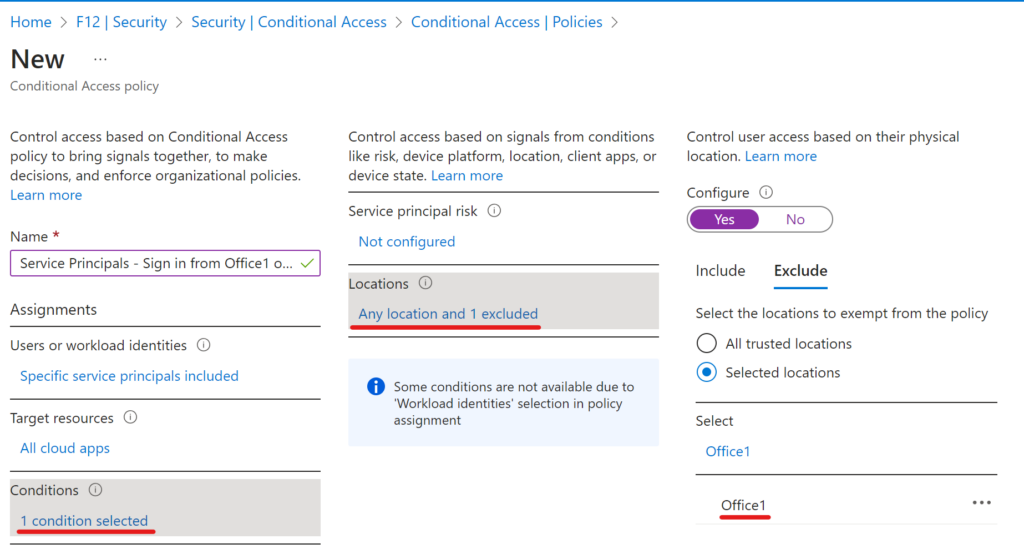
Final step is the Conditional Access policy – this time using the filter instead of directly choosing the identites:
Target resources remains “All cloud apps”:
Location condition is set to Any location with Office1 excluded:
The action is Block access of course.
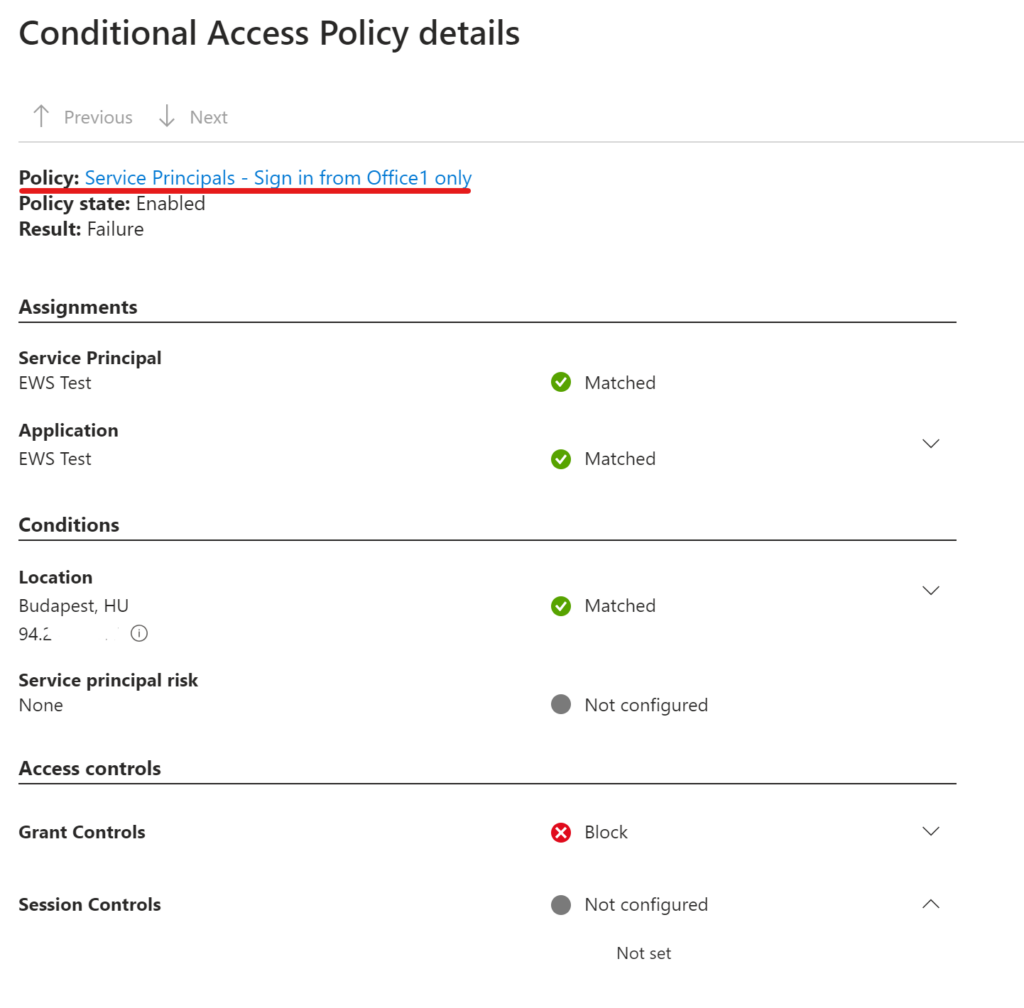
Let’s look at the results:
Sign-in blocked from outside
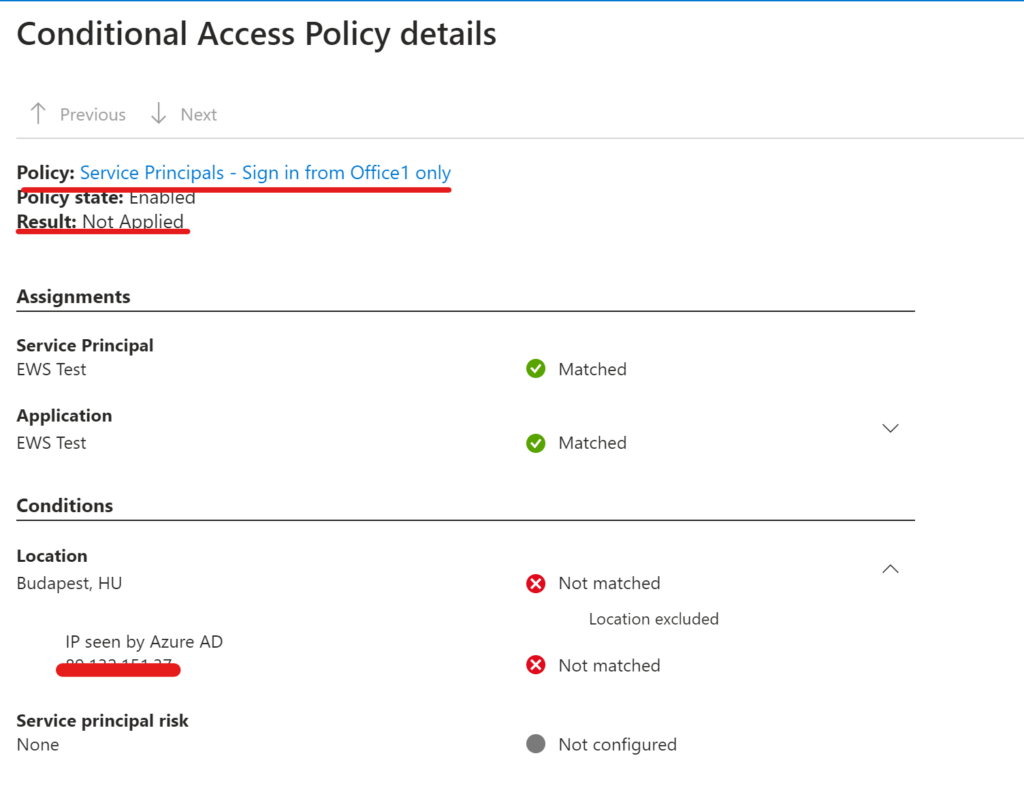
Sign-in granted from Office1
I’m sure there are more complex situations where this approach does not fit well, but I hope the basic idea is helpful.
The information on this website is provided for informational purposes only and I make no warranties, either express or implied. Information in these documents, including URL and other Internet Web site references, is subject to change without notice. The entire risk of the use or the results from the use of this document remains with the user.
The postings on this site are my own and do not necessarily represent the postings, strategies or opinions of my employer.
We use cookies on our website to give you the most relevant experience by remembering your preferences and repeat visits. By clicking “Accept All”, you consent to the use of ALL the cookies. However, you may visit "Cookie Settings" to provide a controlled consent.
This website uses cookies to improve your experience while you navigate through the website. Out of these, the cookies that are categorized as necessary are stored on your browser as they are essential for the working of basic functionalities of the website. We also use third-party cookies that help us analyze and understand how you use this website. These cookies will be stored in your browser only with your consent. You also have the option to opt-out of these cookies. But opting out of some of these cookies may affect your browsing experience.
Necessary cookies are absolutely essential for the website to function properly. These cookies ensure basic functionalities and security features of the website, anonymously.
Cookie
Duration
Description
cookielawinfo-checkbox-analytics
11 months
This cookie is set by GDPR Cookie Consent plugin. The cookie is used to store the user consent for the cookies in the category "Analytics".
cookielawinfo-checkbox-functional
11 months
The cookie is set by GDPR cookie consent to record the user consent for the cookies in the category "Functional".
cookielawinfo-checkbox-necessary
11 months
This cookie is set by GDPR Cookie Consent plugin. The cookies is used to store the user consent for the cookies in the category "Necessary".
cookielawinfo-checkbox-others
11 months
This cookie is set by GDPR Cookie Consent plugin. The cookie is used to store the user consent for the cookies in the category "Other.
cookielawinfo-checkbox-performance
11 months
This cookie is set by GDPR Cookie Consent plugin. The cookie is used to store the user consent for the cookies in the category "Performance".
viewed_cookie_policy
11 months
The cookie is set by the GDPR Cookie Consent plugin and is used to store whether or not user has consented to the use of cookies. It does not store any personal data.
Functional cookies help to perform certain functionalities like sharing the content of the website on social media platforms, collect feedbacks, and other third-party features.
Performance cookies are used to understand and analyze the key performance indexes of the website which helps in delivering a better user experience for the visitors.
Analytical cookies are used to understand how visitors interact with the website. These cookies help provide information on metrics the number of visitors, bounce rate, traffic source, etc.
Advertisement cookies are used to provide visitors with relevant ads and marketing campaigns. These cookies track visitors across websites and collect information to provide customized ads.


